Wednesday, March 30, 2011

Happy Birthday Cupcake

Happy Wednesday, everyone! Here's a card I made not too long ago using the Straight from the Nest Cricut cartridge. I'm not a "bird" person, so to speak, but Provocraft has put out some adorable bird cartridges (Straight from the Nest, 3 Birds on Parade, Give a Hoot) that not only have cute birds (owls, chicks, etc), but a bunch of other great images that you might not expect to find. I went a little crazy with the Stickles, as you can see but I think it added that little extra bit that makes you want to eat the cupcake ;) The only trouble with using Stickles is that, particularly in humid climate, you have to let them dry forever--I usually let it sit out overnight. I also got to use my new-ish simple scallop punch from Stampin Up--so much easier than those edge scissors that I used to use.

Thanks for dropping by and have a great day.

Photobucket

Photobucket

Materials:
Cardstock: Stampin Up, Recollections, DCWV (glitter)
Paper: Little Yellow Bicycle - Sweet Love Collection (cherry), American Crafts misc
Cartridges: Straight from the Nest
Punch(es): Stampin Up Scallop Punch
Embossing Folder: None
Embelishments: Stickles, Ribbon by Papertrey Ink
Stamp(s: Old Hero Arts stamp, I think

Photobucket

Monday, March 28, 2011

What I worked on this weekend...

Since it was my birthday weekend, I decided that I would avoid work and chores and devote oodles of time to crafting. That began with shopping, of course. I visited 2 brick and mortar craft stores and more than a few online retailers. I didn't get into too much trouble, especially since I was fortunate to get a bunch of Amazon gift cards, but I did do some damage. I didn't take a picture off what all I bought yet because I immediately began working on this:

Photobucket

Yes, it's an Easter basket. How retro, right?

What's special about it?

When you open it up...

It's an exploding box!
Photobucket

I purchased the pattern from Kathy at Paper Phenomenon, and love it! See Kathy's gorgeous one here. I definitely have more work to do as I could not find a bunny or a chick to decorate the top with anywhere! (I didn't try particularly hard, just at a dollar store and a grocery store, but I didn't expect it to be quite so difficult). Also, I haven't made any tags or dolled up the pages, let alone thought of photos. The designed wrote the pattern and offered a kit (which sold out, unfortunately) for a Ustream class sometime next month. Once I figured out what I was doing with the pages, it was a breeze. Thus, I may make another basket during her class, once I finish this one, of course. It also could definitely be made with envelopes, so I may try to figure out that rendition out on my own.

Stay tuned...

Photobucket

Sunday, March 27, 2011

Sunday Supper Series #11: Simple Pasta with Meat Sauce

It's a little dark and dreary outside my window--my favorite weather, next to snow! How about a nice comforting bowl of pasta with meat sauce?

Photobucket

Ingredients
1 lb ground beef
8 oz mushrooms, sliced
3 large carrots, diced (about 1/2 c)
1 medium onion, diced
3 cloves garlic, minced
28 oz canned whole tomatoes, roughly chopped
3 tbs tomato paste
1 tsp dried basil
Olive oil

Directions

Season ground beef with a sprinkle of salt and pepper and cook until browned. Drain and set aside.

Saute onions and carrots in a little olive oil until softened and beginning to brown. Add mushrooms about halfway into cooking time for your onions and carrots. Add garlic and dried basil and cook for another minute.

Return meat to the pan and stir in tomatoes and tomato paste. Depending upon how thick you like your sauce, you may want to add a 1/2 cup of water. I like a thick sauce, so omitted this step.

Bring mixture to a near boil and then simmer on low for 45 minutes, stirring occasionally.

Adjust seasoning, as desired. Serve over hot pasta.

Serves 4-6

Photobucket

Photobucket

Saturday, March 26, 2011

My Favorite Cakes

Happy Saturday everyone! Today's my birthday, but for the first time I'd much rather be crafting instead of baking. Don't get me wrong, I still love baking and cooking, but I really want to work on some projects this weekend. Thus, no special birthday cake this year. However, for your viewing enjoyment, below are a number of "special" cakes (and cupcakes) I've made in the past few years. None are really traditional birthday cakes, so to speak, but they were all quite yummy. For all but the first cake, click on the title of each cake to go to the recipe. Have a marvelous Saturday!

1. Super Chocolate Layer Cake
My 30th birthday cake
This is the birthday cake I made for my 30th birthday. It was before I was blogging particularly avidly, so the recipe was never posted. However, it was a lovely cake, super chocolately as you can see. If I ever dig up the recipe again, I'll be sure to share it.

2. Red Velvet Chocolate Layer Cake
Photobucket
I made this cake quite recently just on a whim. It is a bit more pink than red but sweet!

3. Strawberry Layer Cake
Strawberry Cake 2
An awesome summer cake, even though the icing didn't quite stand up to all the strawberries I piled on it.

4. Cherry Upside Down Cake
Photobucket

5. Chocolate Cherry Log Cake
Photobucket
Despite all the chocolate, this was an extremely light cake. It took some time, however, so I've only made it for a Christmas dinner dessert once.

Last, but not least, the cupcakes:

6. Jam-Filled Cupcakes with Chocolate Frosting
Photobucket

7. Chocolate Cupcakes with Cream Cheese Frosting
Photobucket

Friday, March 25, 2011

Hello Kitty Spring Cards

Happy Friday, everyone!

One of the spiffiest parts about moving back to Hawaii, aside from the scenic beauty, is that my birthday is a state holiday! Well, my birthday's tomorrow as is Prince Kuhio's, so today's the state holiday. That means much less traffic and I can roll into work just about whenever as our office is technically closed.

Here are the other two rainy day spring cards I made a couple of rainy Saturdays ago. You may remember that after never much caring for Hello Kitty while I was growing up, I fell head over heels for this cartridge, even though some of the cuts are tiny. But with my Tweezer Bee tweezers, I should be in good shape. You may recognize the background paper on one of them as from my Hello Kitty Valentine's Day card and the other is scraps from Christmas.

Photobucket

Photobucket

Photobucket

Materials:
Cardstock: Stampin Up, Recollections
Paper: Little Yellow Bicycle - Sweet Love Collection, misc Christmas paper
Cartridges: Hello Kitty Greetings
Punch(es): MS Garden Gate
Embossing Folder: None
Embelishments: Stickles, Ribbon by Papertrey Ink
Stamp(s: My Pink Stamper Happiest Moments

Wednesday, March 23, 2011

Happy Spring Ducky

Hi all,

Here's super simple card I made to celebrate spring. The day I made this card, it rained buckets all Saturday so I made this card and two more that you will likely see later this week. I used my all-time favorite cartridge, Create a Critter for the ducky, and found the umbrella on the Cake Basics cart. The grass is from Straight from the Nest, but there's a bunch of grass cuts out there. It's an A2 sized card, so images at cut in the 3.75-4" range. Then I used the Swiss Dots embossing folder to make what looks a little like rain drops. Enjoy!

Photobucket

Materials:
Cardstock: Stampin Up, Papertrey Ink, Recollections
Paper: American Crafts - Christmas Reindeer Games collection (Green)
Cartridges: Cake Basics (umbrella), Create a Critter (duck), Straight from the Nest (grass)
Punch(es): None
Embossing Folder: Cuttlebug Swiss Dots
Embelishments: None
Stamp(s: My Pink Stamper Happiest Moments

Monday, March 21, 2011

Be Yourself Butterfly Card

Yikes, I had no idea that it had been over a month since my last card. In case you were wondering, I survived the Hawaii bar exam. Results won't come in for another couple of months, but at least the matter's out of my hands now. I was able to do a little crafting the weekend after, and a couple times since then, but I just didn't get around to posting. I'm not sure what order I will post in, but I will make sure I share all the cards I made soon. Here's one I made on Saturday for my Auntie. It's very simple, but allowed me to use some of the new toys I've gotten recently, namely the dew drops, Straight from the Nest cartridge, and a new Martha Steward punch. I had a little trouble working with different qualities of cardstock. It took me several times to cut the butterfly swirly layer because the thin cardstock kept tearing. Then when I switched to the thicker blue cardstock, which I believe is Papertrey Ink, my edges weren't clean. I think it might be time to change the black on my Cricut (now where did I put those extra blades...?). Nonetheless, I think it turned out cute enough. It's an A2 card, and I believe the butterfly is cut at 3.5 and the doily at 3.75".

Photobucket

Photobucket

Photobucket

Photobucket

Materials:
Cardstock: Stampin Up, Papertrey Ink, Recollections
Paper: American Crafts, I think it was a summer collection
Cartridges: Basic Cakes (doily), Straight from the Nest (butterfly)
Punch(es): MS Swirling Lace
Embelishments: Dew drops (Scrapadabadoo), flower brad (Target)

Sunday, March 20, 2011

Sunday Supper Series # 10: Easy Potato Pancakes

Hi everyone, it's breakfast time! My husband's a big potato pancakes/latkes fan but making them from scratch is rather a pain. I last made them more than a year ago with tasty results, but it was a lot of grating. Last weekend it occurred to me that since they sell frozen shredded potatoes for hash browns, they just might sell an unseasoned variety. Sure enough, they do! I purchased a generic brand of shredded potatoes that only had a bit of salt-based preservatives. The night before I made them, I measured a little more than 2 cups into a bowl and let them defrost overnight. That morning, they were still a little cold, but not too icy and worked perfectly. I modified this potato pancake recipe from Southern Food at About.com mainly to eliminate the deep frying and change up the onion. The original recipe called for adding raw grated onion--a) I hate grating and b) am not a fan of raw onion. Thus, I diced up a small onion and sauted it until golden brown. Worked great!

Photobucket

2 cups grated potatoes, about 1 1/2 pounds potatoes
1 medium onion, minced
1/4 cup milk, scalded
1 egg, slightly beaten
2 tablespoons all-purpose flour
1 teaspoon salt
dash pepper
1 teaspoon baking powder
olive oil

Preheat oven to 400 degrees.

In medium skillet, saute minced onion until browned. Set aside to cool.

Pour scalded milk over potatoes. Add flour, salt and pepper, baking powder, and onions. Mix in egg.

On a preheated griddle or in the same pan you used to saute the onions, cook potato pancakes in 1/4 c portions until golden brown on both sides. (I used a muffin scoop, which might be larger than 1/4 c)

Place browned pancakes on a cookie sheet covered with parchment paper. Bake for 10 minutes until thoroughly heated. (This step isn't 100% necessary, but it allowed me to get them off the griddle a bit quicker without worrying about burning.)

Serve with apple sauce, of course.

Photobucket

Makes 6-8 silver-dollar pancakes. Serves 2.

Sunday, March 13, 2011

Sunday Supper Series # 9: Slow Cooker Black Bean Soup

My husband made a special request for more soups. I know he likes black bean soup, but I've never made it before. After browsing through a dozen or so recipes, this is what I came up with. It's simmering in the crockpot now, so we'll see how it tastes. I thought about adding a jalepeno pepper, but chickened out at the last minute because I know he doesn't like things too spicy.

Updated: We loved it! This was so simple, and the spices were perfect. I will definitely make this again.

Photobucket

1 lb dry black beans (rinsed and soaked overnight) or 2 15-oz cans
14 oz can fire roasted tomatoes, diced
2-3 cloves garlic, minced
1 medium onion, diced (about 1 cup)
32 oz chicken broth
1 tsp cumin
1/2 tsp salt
1/4 tsp ground pepper

Combine all ingredients in slow cooker. You may add a bit of minced jalapeno pepper, if you like. Cook on low for 8 hours, until beans are tender.

Using an immersion blender, pursee some of the mixture until you have consistency desired. left a few beans whole, but pretty much took the blender through the entire pot.

Adjust seasonings, if necessary.

Serves 4-6

Photobucket

Sunday, March 6, 2011

Sunday Supper Series # 8 - Mango Chicken Stir Fry

Ah, the first Sunday in March. Time is seriously flying along this year. I know for those of you have seasons, you might be anxious for spring and summer. This being the first winter I've spent in Hawaii since high school, I desperately miss real winter, i.e. snow. Yes, I'm crazy, but you probably knew that.

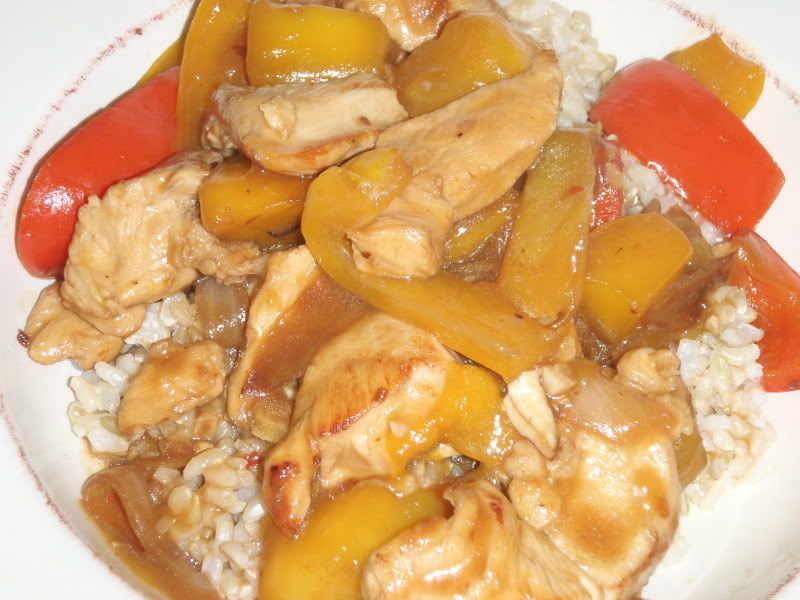
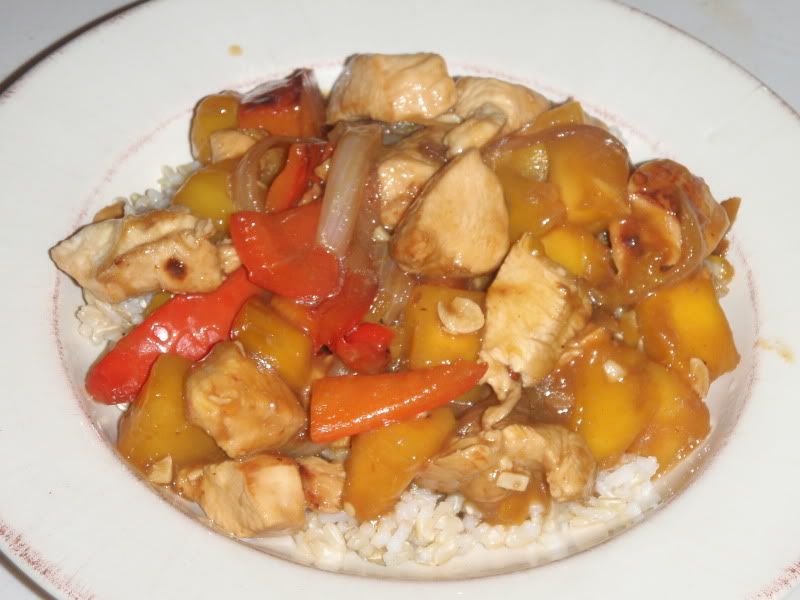
Anyway, I realized that I had no picture posted of my one of my most frequently made dishes--Mango Chicken Stir Fry. It is my husband's favorite dish. I distinctly remember when we first had it together at what was then a new restaurant at the edge of the mall in Chicago's Chinatown. It was a cute place, called "My Place" or something like that and served a nice selection of Thai and pan-Asian, but was sadly short-lived. Anyway, I had never had mango in a stir fry before and loved the idea, so I had to recreate it. This recipe is a modification of a bunch that I found online many years ago.

Since I don't have a real wok (nor do I want one because I don't have the space to store it or a gas range), I saute the chicken and veggies separately, then combine at the end for the sauce to coat everything and thicken. Enjoy!

Photobucket

Ingredients
1 large mango (or about 12 oz frozen), sliced or cubed
1 red pepper, sliced
1 yellow or orange pepper, sliced
1 med onion, sliced
1.5 lb chicken breasts or thighs, skinless, cubed

Marinade
2-3 cloves garlic, minced
1.5 tsp sugar
1 T corn starch
1 T rice wine vinegar
2 T soy sauce
1 T canola oil

Sauce
3 T soy sauce
2 T rice wine vinegar
6 oz pineapple juice
.5 tsp crushed red pepper
1 T corn starch.

Whisk marinade together. About 20-30 minutes before cooking, place chicken in the marinade and set aside while you start the veggies.

Assuming you do not have a wok, you will want to cook your veggies and chicken separately. If you do have a wok, follow the directions for your usual stir fry which I think involves cooking the veggies first, then pushing them to the edges of the pan while you do your meat in the center.

Saute onions and peppers until tender. If you start the onions first, then add peppers when onions have just begun to soften, all the veggies will finish at the same time. Whisk the sauce together while you are waiting and set aside. Remove veggies from heat (or the pan if you do not want to dirty another pan) and keep warm.

In heated pan, saute your chicken until golden brown. If your pan is hot, this will only take a few minutes. Cook your chicken about 75% of the way (it will finish cooking in the sauce). Add the mangos and cook until they begin to brown on the edges. You can use frozen mangos, but make sure you cook them until they have defrosted so you do not water down the sauce.

Return the veggies to the pan, along with the sauce. Heat to a near boil, then simmer on low for 10-15 minutes until sauce has thickened.

Adjust seasoning to taste. Serve over (brown) rice.

Serves 4-6.


Photobucket

Tuesday, March 1, 2011

Red Velvet Chocolate Layer Cake

I have never made a red velvet cake before. When I saw this post at the blog Sprinkle Bakes, I had to try one. Originally, I had planned on making a heart-shaped cake as she did, but decided to leave it round. I was about 2 tsp short in red food coloring, so my cake turned out a bit more pink than red. On the whole, this cake was super easy and fun to make, although it turned out a bit too sweet. I think it was my icing's fault. I did not follow the recipe suggested as I wanted chocolate icing. Perhaps next time I will fill the layers with a marscapone icing (rather than cream cheese and butter) or lessen the sugar in the cake. Either way, it's a gorgeous cake that I would try again.

Photobucket

Photobucket

Ingredients

Cake
2 1/2 cups all purpose flour
1 tsp salt
2 cups of sugar
1 cup butter, softened
2 eggs
1 tbsp cocoa powder
1 1/2 tbsp liquid red food coloring
1 cup buttermilk (or 1 TBS white vinegar to 1 c milk)
1 tsp vanilla extract
1/2 tsp baking soda
1 tbsp cider vinegar

Frosting
2 c confectioners sugar (about 1/2 a box)
1/4 c cocoa powder
1/2 c butter, softened
8 oz cream cheese, softened

Directions

Preheat oven to 350 degrees. Spritz 3 round 9" cake pans.

Whisk or sift together flour and sugar. Set aside. If not using buttermilk, prepare milk and allow to sit a couple minutes.

In a large bowl cream together butter and sugar until light and fluffy. Add eggs, one at a time, beating well after each addition.

Add flour to butter mixture, alternating with buttermilk, and ending with flour. Mix well after each addition. Add vanilla.

In a small bowl, mix together cocoa powder and food coloring until a paste forms. Stir into butter mixture until you have a lovely red color throughout.

In a small bowl, combine cider vinegar and baking soda. This will foam. Add immediately to batter.

Divide batter among three baking pans. Tap each pan on the counter to eliminate air bubbles. Bake for 25-30 minutes until cake is springy.

Remove cakes from pan and cool completely on a wire rack.

Photobucket

Using a mixture, beat together frosting ingredients. Add a splash of milk if too thick.

Frost cake as desired.I like a lot of frosting between my layers, although you could do a thin layer and then frost the entire cake.

Photobucket

Serve immediately or chill until ready to eat.

Photobucket