Sunday, February 24, 2013

MS Simple Waffles

 photo MSWaffles1.jpg

This bright and sunny morning called for some waffles. Though I intended to make buttermilk waffles as I had some leftover buttermilk to finish, this recipe from Martha Stewart was too simple to pass. I substituted white whole wheat flour for a healthier version and they turned out great! I also added a teaspoon of vanilla because that makes most breakfast items even better.

MS Simple Waffles
1 cup all-purpose flour (I used white whole wheat)
2 tablespoons sugar
1 teaspoon baking powder
1/4 teaspoon salt
1 cup milk
2 large eggs
4 tablespoons butter, melted

Preheat waffle iron.

In a large bowl, whisk together dry ingredients and set aside.

In a small bowl, whisk wet ingredients. Pour wet over dry ingredients and gently combine but do not overmix.

Pour into greased waffle maker and cook until golden brown.

 photo MSWaffles1.jpg

Makes 3-4 waffles.

Friday, February 22, 2013

Salted Chocolate Chunk Cookies

 photo saltedchocolate1.jpg

I found this recipe in January's Bon Apetit. It sounded like the perfect sweet and salty treat for a rainy afternoon like we had today. Since the issue is entitled "The Cooking School Issue," I suppose that accounts for the THREE different types of sugar required. I fortunately had them all on hand, however, I still have no idea why powdered sugar is necessary. Probably, if you didn't have any one hand, you might experiment with just a bit more granulated (~ 1/8 c) to achieve the same texture and taste. As has become my habit with cookies, I made a batch and froze the rest of the dough in little balls so whenever we next want cookies, I can pop them straight into the oven for a quick treat. This recipe makes large (3") relatively flat cookies with a nice crunch but also a little bit of chewiness. It's possible that the texture will be different when I bake the dough in the freezer, so I'll try to update this if that occurs. I halved the chocolate suggested by the recipe and thought the cookies plenty chocolatey. Very tasty cookie. Next time I might add some chopped walnuts, but these were great as is.

Salted Chocolate Chunk Cookies
1.5 c all purpose flour
1 tsp baking powder
1/2 tsp kosher salt
1/4 tsp baking soda
1/2 c butter, room temperature
3/4 c light brown sugar
1/2 c granulated sugar
1/4 c powdered sugar
2 large egg yolks
1 large egg
1 tsp vanilla
4 oz (org recipe 8 oz) semisweet or bittersweet chocolate (I used 70% cacao), coarsely chopped
Sea salt

Preheat oven to 375 degrees.

In a medium bowl, whisk together dry ingredients, except sea salt and chocolate.

In a separate medium bowl, beat butter and sugars until light and fluffy. Beat in egg yolks, egg, and vanilla until mixture is pale and fluffy.

Reduce heat to low, slowly add dry ingredients. Mix until blended--do not over mix. Fold in chocolate.

Using a 1 TBS cookie scoop, place on parchment paper-lined cookie sheet at least 2" apart. Sprinkle with sea salt.

Bake 10-12 minutes until golden brown. Cookies will still be very soft and will firm up during cooling.

Let cool for a few minutes on cookie sheet, then move to wire rack and cool completely.

Makes 2-3 dozen.

Sunday, February 17, 2013

Homemade Spreadable Butter

Without really meaning to, I've really gotten into making commonly purchased items from scratch. There's my homemade pizza dough, pizza sauce, taco seasoning, yogurt, and numerous sandwich breads. Despite all this, it never occurred to me that I could make spreadable butter. I've struggled for a long time to find a spreadable butter I liked. I love the convenience of spreadable butter as I frequently eat toast for breakfast or make grilled cheese sandwiches and never have the patience to allow regular butter to get to room temperature first. However, I absolutely despise the fake flavors of products like Country Crock or I Can't Believe It's Not Butter. For awhile, I regularly purchased Smart Balance spreads. There are good coupons available and the taste isn't too bad, however it's definitely an oil-like taste as opposed to a buttery flavor. Plus, when you're doing a pantry challenge and trying only to purchase fresh produce and dairy each week, buying fake butter really seemed wrong. So I turned to Google and came across different variations of this recipe. It looked super easy and I had a stash of butter in my freezer, so I decided to try it.

Well, it was a super simple recipe that I made even easier by whisking by hand rather than breaking out the stand mixer. I simply allowed the butter to come to room temperature first, then used a little elbow grease, and viola(!) spreadable butter without the mystery ingredients. It works just like the fake stuff and tastes so much better.

 photo Spreadablebutter2.jpg

Homemade Spreadable Butter
1/2 c butter, room temperature*
1/4 c canola oil
1-2 TBS water, if desired

*I used salted butter, but you could use unsalted and salt to taste.

Using a stand mixer or whisk, whisk together oil and butter. Add water to achieve desired consistency. Refrigerate and use as you would use the fake stuff.

Note: The fake stuff has food coloring in it to make it look more like butter. Adding oil to butter makes a pale-looking final product, but that's more an acceptable a trade-off.

 photo Spreadablebutter1.jpg

Saturday, February 16, 2013

Chocolate Layer Cake with Espresso Cream Cheese Frosting

 photo chocolateespressolayercake2.jpg

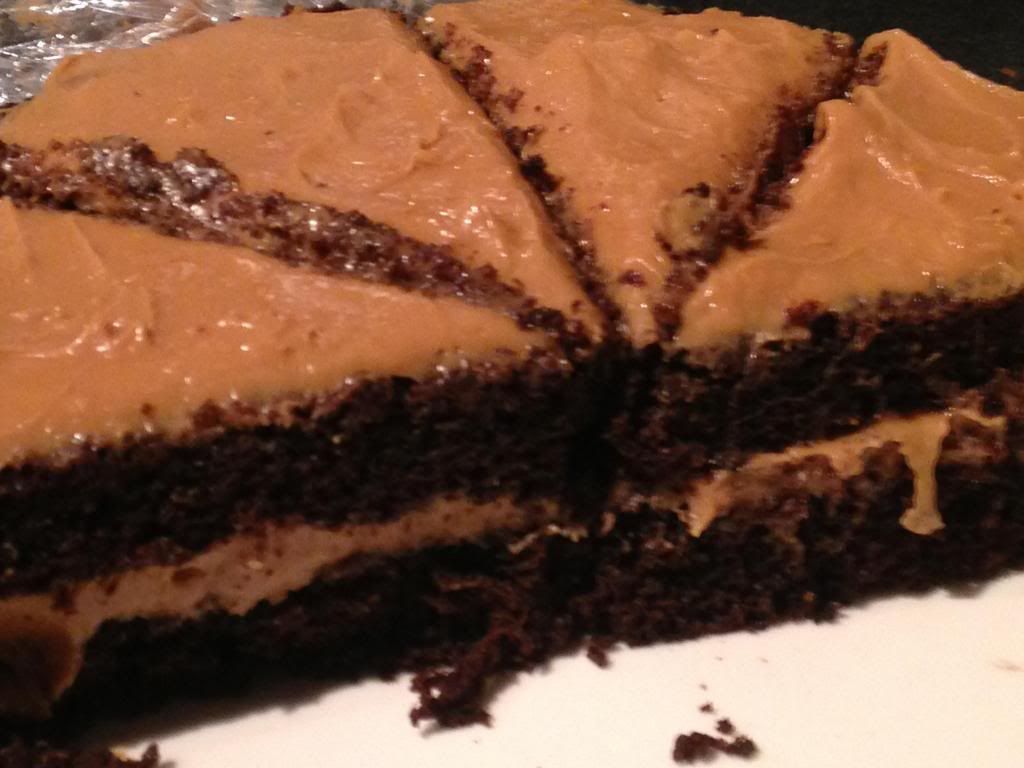
Last weekend I was in a cake mood. I wanted not just any cake, but a chocolate layer cake! However, when my son came down with a stomach bug, baking was put on hold. It turned out for the best as this cake made the perfect Valentine's Day dessert. I combined this cake recipe from Tracey's Culinary Adventures with a modified version of this espresso icing from the Baker Chick. The cake was moist and delicious and the frosting had the perfect amount of coffee flavor. Definitely a keeper (as you can probably tell by the fact that more than half the cake is gone)!

Chocolate Layer Cake
1 cup sugar
1 cup all-purpose flour
1 TBS cornstarch
1/3 cup Dutch-process cocoa powder
1 tsp baking powder
1 tsp instant espresso powder
1/4 tsp baking soda
1/2 tsp salt
2 large eggs, at room temperature
1/3 cup canola oil
1 teaspoon vanilla extract
1/2 cup + 2 tablespoons room temperature water

Preheat oven to 350 F. Grease and flour an 8-inch round pan.

Whisk together the dry ingredients. Add the eggs, oil, and vanilla, beating until smooth. Gradually add the water, beating until smooth. Pour the batter into the prepared pan.

Bake for 35-37 minutes, or until a toothpick inserted in the center comes out clean and the cake is nice and springy. Transfer the pan to a wire rack and cool for 15 minutes, then turn the cake out onto the rack to cool completely.

Espresso Cream Cheese Frosting
8 oz butter, room temperature
8 oz cream cheese (I used low fat), room temperature
3 cup confectioner's sugar
2 TBS instant espresso powder
1 tsp vanilla extract
2-6 TBS half and half

Using a mixer, cream butter and cream cheese together. Add espresso and vanilla and beat well. Add sugar and half and half gradually until desired consistency is achieved.

Preparing the Layer Cake
My skills at assembling a layer cake are rudimentary at best, but I know the basic routine, in theory. For best results, chill the cake and frosting for at least a short while before getting to work (~30 minutes).

Using a large serrated knife, divide the cake into two even layers. My cake domed in the middle, so I actually trimmed the sides to get a smaller but taller cake. For easy maneuvering, use a cutting board or plate to stabilize the layers when flipping.

Place the bottom layer on cake stand (or doily or parchment paper if you prefer a super clean presentation). Generously smooth 1/3 to 1/2 of the frosting on top of the first layer. Top with second layer, doing your best to center it.

To obtain the cleanest finished product, first do a messy "crumb" layer of frosting. Then with a clean knife or icing tool, generously frost the cake with the remainder of the frosting or as desired. (I really wanted some of the cake to show, so I had at least a cup of frosting leftover.)

Store cake in the fridge until about a half hour before serving.

Please note that this is a single-layer cake cut in half. If you prefer thicker or more layers to your cake, please double the recipe.

Friday, February 15, 2013

Pizza Fridays (Slow Cooker Marinara Sauce)

Over the last year and a half, Fridays have become pizza night in our house. My husband loves pizza and I like not having to plan what we're having at least one night a week. We started with ordering in, but my trusty bread machine soon took care of that. (For my honey whole wheat pizza dough, click here. For my cornmeal parmesan dough, click here.) Each dough recipe makes enough for two pizza nights (or 2 large or 4 small to medium pies) so I only have to make dough every over week and put half in the freezer. Typically, I keep shredded cheese and jarred sauce on hand--and that's all my plain cheese pizza-loving husband needs. (My pizza tends to vary more depending upon whatever fresh veggies are in the fridge.) Easy as pie. However, last month when we were eating down the pantry, I finally ran out of jarred sauce. Yikes! Luckily, I still had tons of canned tomatoes from my crazy summer of stocking up. Inspired by this recipe, I whipped up about 5-6 cups of tasty sauce with little to no work at all. I then froze the sauce in 1 cup portions right next to the extra dough. Super convenient!

I like that this sauce is simple, yet intensely flavorful because it simmers all day. It's a tangy, tomatoey sauce that's not too sweet like many jarred sauces. (If you prefer a sweeter sauce, which I do sometimes, just add a little more brown sugar. If you like it a little spicy, add a pinch or two of crushed red pepper flakes.) We've enjoyed it on pizza, in lasagna, and over pasta.

 photo PizzaSauce1.jpg

 photo PizzaSauce4.jpg

2 (28 oz.) cans tomatoes
1 (6 oz.) can tomato paste
1 medium onion, chopped
2-4 cloves garlic, minced
2 whole bay leaves
1 TBS dried basil
½ TBS dried oregano
1 TBS brown sugar
1 TBS balsamic vinegar
1 tsp salt
freshly ground pepper

Saute onions in a little olive oil until softened. Add garlic in last minute. Add with remaining ingredients to slow cooker.

Cook on low for 8 hours. Remove bay leaves and adjust seasonings to taste.

If using on pizza, I recommend using an immersion blender to smooth out the sauce.

Makes 5-6 cups.

Wednesday, February 6, 2013

Spaghetti with Meat Sauce

This recipe reminds me of one of my grandmother's best recipes--her meaty spaghetti sauce. It seemed like it would take her all day to make with much chopping and many hours of watched simmering. This slowcooker recipe from Betty Crocker is much simpler and super tasty. (I was eating it with a spoon!) What's even better about it is that it can be made with ingredients I nearly always have on hand.

Spaghetti with Meat Sauce photo MeatSauce4.jpg

1 lb ground beef
2 large onions, chopped (about 2 cups)
2 cups sliced fresh mushrooms (8 oz)
3 cloves garlic, finely chopped
28 oz diced tomatoes, undrained
24 oz tomato sauce (original recipe called for 30 oz, but this made for a heartier sauce)
6 oz tomato paste (the cheap stuff in a can--use only a few TBS if using good tomato paste)
1 TBS dried basil
1 tsp dried oregano
2 TBS sugar*
1/2 tsp salt
1/2 tsp pepper
1/2 tsp crushed red pepper flakes
Olive oil

Saute meat, onions, mushrooms and garlic in a little olive over medium heat about 10 minutes, stirring occasionally, until meat is cooked through. Drain.

Add meat mixture and remaining ingredients. Cook on low for 8 to 9 hours.

To thicken sauce even more, vent lid during last hour of cooking.

*Note: Since I was using cheap canned tomato products and prefer a sweeter pasta sauce, I increased the sugar from 1 to 2 tablespoons. If you have nicer tomatoes, you may want to use less.

Makes about 6-8 cups of sauce.

Tuesday, February 5, 2013

Update!

Yikes, more than a month between posts! Oh well, it's not too surprising. My son is now 6 months old and more active than ever. Thus, instead of blogging, for the most part I've been playing with him. Not a bad trade off at all seeing how cute he is.

 photo Oatmeal3.jpg


Anyway, January was a fun month in the kitchen for me. Inspired by the Pantry Challenge at Good Cheap Eats, I made it my goal to eat down the freezer and pantry for the whole month buying mostly only fresh produce and dairy each week. I desperately needed room in my freezers and I had a number of pantry items with expiration dates approaching. (As you may know, I started couponing last year which led to some sizeable stockpiles.) For the most part, it was a fantastic success. Not only did we eat every bit of frozen meat except a turkey and prime rib roast, we also ate nearly all of my stash of prepared meals or meal components. We still have some shredded beef, chili, and soups but nothing like what we started the month with. Most of my pantry items now live IN my pantry--a big accomplishment! I no longer have two dozen cans of tomatoes, which is a bit sad, but this means I can stock up anew. My flours and sugars are no longer in the 10 lb+ range, which makes me worry less about spoilage and insects in the coming warmer months (as those things still don't fit in the pantry yet). Cash-wise I can't say that I saved a ton, because I have no idea what my average monthly expenditure is--from October through December, I spent anywhere from $300 to nearly $800. However, I did spend a reasonable amount in January, which makes me happy. That number will be my goal for the coming months.

Eating down the pantry requires meal planning based upon what's on hand. Since the cupboards and freezing were bursting, I had a lot to choose from for the most part. I will say that we ate a whole lot of chicken, especially chicken thighs at the end. Frankly that isn't too unusual, but since I soon dropped a regular menu item (taco salad) because (a) we were out of taco meat and (b) it seemed to be giving my baby gas (he's breastfed), we wound up eating chicken an extra night per week. I also started craving beef even though we had it once a week, which was odd but possibly because I had so much in December. We ate a good mix of family favorites and new recipes. In the near future, I hope to share recipes for chicken with a tomato-basil cream sauce, chocolate pudding, pizza sauce, spaghetti with meat sauce, slow cooker chicken cacciatore, vanilla wafers, and a new waffles recipe.

Stay tuned...