Tuesday, August 31, 2010

My Pink Stamper: It's Cold Outside Challenge

This is my submission for My Pink Stamper's latest challenge. She challenged everyone to make a winter card using the Cricut. Since I just received the new Simply Charmed cartridge in the mail, I decided to give it a whirl. This is my first winter card of the year!

Photobucket

Materials:
- Paper: A2 silver card base, white cardstock cut at 5.25 x 4" for mat and lining.
- Cartridge(s): Simply Charmed (hat at 3", mittens at 2", sentiment at 1")
- Embossing folder: Cuttlebug Snowflakes
- Embellishments: ribbon
- Adhesives: Pink ATG gun, Zig two-way glue pen, Xyron


Photobucket

Photobucket

The Greeting Farm: Fleur Anya

Here are two more super simple cards using Fleur Anya. I colored both of these before I got my Neenah paper and E000 Copic marker, so it's not my best work. Nonetheless, I like her. I used a scrap of paper from my stash. Have a great week.

Photobucket

Photobucket

Materials:

- Paper: A2 blue card base, pattern paper cut at 4 x 2.75", cardstock cut at 5.25 x 4" for mat and lining.

- Stamp(s): The Greeting Farm "FleurAnya", stamped using Ranger Archival ink and clear embossed before coloring with Copics, Hero Arts "Friends" stamped using Colorbok chalk ink,

- Embossing folder: Cuttlebug flowers

-Embellishments: small tag cut at 1" using Gypsy Wanderings

- Adhesives: Pink ATG gun, Zig two-way glue pen, hemp

Monday, August 30, 2010

Simply Charmed: Ice Cream Thanks

As you know, I got the new Simply Charmed cartridge on Friday, but I wasn't allowed to play with it until I finished a couple of projects. Well, I broke down and snuck in these two little ice cream cards. I used a couple of different embossing folders to do the texture for the cone and think I like the Swiss Dots on the smaller cones better. What do you think? The paper is all DCWV, the flowers are from last year and the stripes are from "Summer Dream."

Photobucket

Materials:

- Paper: A2 mint green card base, pattern paper and white lining cut at 4 x 5.25"

- Adhesives: Pink ATG gun, Zig two-way glue pen, foam tape

- Cartridges: Simply Charmed (ice cream cone cut at 4", 2.5" and 2.75")

- Embossing folders: Swiss dots, Stars

- Stamps: Peachy Keen Stamps "Gingerbread Doll Set" stamped using Memento ink

- Other: ribbon, Corner Chomper


Photobucket

Photobucket

Sunday, August 29, 2010

Flapper Anya

This has got to be my favorite Greeting Farm stamp as I keep going back to her. I'm using up scraps, so I don't remember what the dots are, but I know I used it last month, so if you're really curious browse back!

Photobucket

Materials:

- Paper: A2 blue card base, pattern paper cut at 3.5", cardstock cut at 5.25 x 3", pink strip of cardstrip 1.5" x 4.25" (before punching)

- Stamp(s): The Greeting Farm "Flapper Anya", stamped using Ranger Archival ink and clear embossed before coloring with Copics, Hampton Art "You and Me" stamped using Memento ink,

- Punch(es): Martha Stewart Doily Lace

-Embellishments: gems

- Adhesives: Pink ATG gun


Photobucket

Saturday, August 28, 2010

Get Well Bear

No, no one's sick (that I know of), but I couldn't resist this adorable bear from Kaban Stamps. I think the set's called "Little Friends." I cut the bear out of the picture as there's a little table and some bottles, which really didn't fit on this card. I'm actually thinking that I probably could use him on a different sort of card, maybe a miss you or something that. Regardless, he's cute! I used a new border punch that I got at Michaels (it's their Recollections line). These daisies are cute, but the punch doesn't seem too sturdy and is stiff. Here's my card.

Photobucket

Materials:

- Paper: A2 white card base, pattern paper cut at 4 x 5.25", green strip of cardstrip 1.5" x 4.25" (before punching)

- Adhesives: Pink ATG gun, Zig two-way glue pen, glue dots

- Stamp(s): Kanban "Little Friends", stamped using Ranger Archival ink and clear embossed before coloring with Copics, Hero Arts "Everyday Sayings" stamped using Memento ink, Colorbox chalk ink for distressing.

- Punch(es): Recollections flower border punch, Marvy Uchida 1.5" circle punch

-Embellishments: ribbon, gems


Photobucket

Photobucket

Friday, August 27, 2010

Simply Charmed and My Friday Night

Happy Friday! Look what was waiting in my mailbox when I came home:

Photobucket

Look for some cards from it later this evening. I thought I could wait to open to the box until I'd finished a couple more projects, but its cuteness was too much to resist. After I took the picture, the plastic lasted about 20 seconds!

This evening, I will also be watching Laura of Following the Paper Trail on UStream. We're be making this awesome train mini that she shares in this Youtube video.


I don't know whether I'll be making the project tonight as I really need to finish up some projects, but I definitely will be tuning in.

Wednesday, August 25, 2010

Pink and Blue goodies

No card today as the only thing I made last night was another raccoon witch and ratatouille. However, I wanted to show you the goodies I got in the mail.

Photobucket

As you can see, I finally joined the Scotch ATG craze. With a price of $30 (or less) on a new pink tape dispenser that came with two spools of tape, with $1.50 going to breast cancer research (or awareness?), I couldn't resist. Frankly, it was quite silly of me not to have bought one months ago. I wasn't doing the math properly. Each spool of ATG tape has 36 yards. I was buying Glue Glider Pro refills with 40 FEET. Oh well. really do like the smaller size of the Glue Glider Pro, but I was just buying too many refills....I easily bought more than 10 in the last two months. Even at $5 or less a pop, that's too much. Refills for the ATG are about the same, have so much more tape. I'm still getting the hang of it, but I'm loving in, especially because I know it will last longer.

After ordering the ATG gun I had promised to take a break from shopping. I failed. Some blogger whom I read daily posted about Amazon's fabulous deal on a BLUE Cuttlebug for only $39.99 with free shipping, of course. Not only is the machine pretty, but included in the box is a bone folder, a paper trimmer, extra blades, three pairs of nonstick scissors, and 4 little dies. All those extras alone could easily cost $20+ The paper trimmer is the same as the green one sole separately, which I own and have gunked up by cutting paper that already had adhesive on it. Thus, I will now use the new blue one for nice paper and the green one for gunky paper. The scissors seem a little stiff, but I'm sure I can fix that. The bone folder will be a backup as I love my Martha Stewart one. All in all a really good deal.


Photobucket

Oh yeah, while placing my order for the Pink ATG at Cutters Creek, I couldn't help ordering two itty bitty new Copic markers. I have an addiction.

Tuesday, August 24, 2010

Halloween Day 6: Witchy Raccoon

Good morning! When I envisioned this card, I pictured a kitty, but while flipping through the Create a Critter booklet, this guy jumped out at me. He fit perfectly with the purple theme of pattern paper from the K&Co's "Halloween by Tim Coffey" paper collection that I'm still working my way through. I was only able to finish one card before work, but will make more tonight using my Gypsy. Multiples are the way to go to meet my goals.

Photobucket

Materials:

- Paper: A2 black card base, pattern paper and white lining cut at 4 x 5.25", black mat cut at 2.75 x 3.75, blue mat cut at 2.5 x 3.5", tan mat cut at 2 5/8 x 1 1/8", and yellow mat cut at 2.5 x 7/8".

- Adhesives: Pink ATG gun, Zig two-way glue pen, foam, and stickles

- Cartridges: Create a Critter (raccoon cut at 2.5"), Paper Doll Dress Up (witch's hat and moon and stars cut at 2.5")

- Stamp(s): Inkadinkadoo "Halloween/Harvest Assortment" stamped using Memento ink, Colorbox chalk ink for dist


Photobucket

Photobucket

Monday, August 23, 2010

Ribs again

Summer means ribs, corn, and more ribs! I love them best charred on the grill. Unfortunately, I do not have a balcony or patio or anywhere I can have a grill, so I must make do with my over. This method is super simple and creates moist and tender ribs. Even when I do have a grill, I pre-bake the ribs to speed up the cooking.

Last evening, I was extremely lazy and didn't even make my own rub. I used a premixed seasoning from the Spice House called Milwaukee Iron Seasoning. It has assorted chile peppers, salt, garlic, coriander, cumin, cayenne, onion, and parsley. It was more than a bit too hot when I tasted the seasoning alone, so I mixed 1 tbs of the seasoning with 1 tablespoon of sugar, and a teaspoon of salt. I used Sweet Baby Ray's BBQ sauce.

Photobucket

1-2 lbs pork or beef ribs
2 tbs of your favorite rub
1-2 c of your favorite bbq sauce

1. Preheat oven to 325 degrees.

2. Liberally rub ribs with seasoning. Place on a rack so the fat drains off while cooking.

3. Cover tightly with foil. Cook 60 minutes or until ribs are tender.

4. Remove cover and lather with sauce.

5. Broil for 10 minutes or so until desired degree of charring occurs. (If you don't like charring, just broil until sauce is absorbed a bit, maybe 5-7 minutes).


Photobucket

Happy Birthday: Take a Bite Out of Life

My brother-in-law's birthday is this week, so here is the card I made. I didn't really have a clue what sort of card fit him, so I just made a fun one. He or his wife like Indiana Jones, so perhaps it's fitting. I used a bunch of Cricut cartridges, mostly without my Gypsy because the darn thing was charging. (It can be used while charging, but due to the plug situation, I elected to plus it up in another part of my room).


Photobucket

Photobucket

Materials:

- Paper: 5 x 7" kraft card base, tan cardstock mat cut at 4.75 x 6.75", lining cut at 4.75 x 5.75"

- Adhesives: Glue Arts Glue Glider Pro, Zig two-way glue pen, glue dots, Xyron, Mod-Podge. foam tape

- Cartridges: Create a Critter (gator and bubble cut at 2"), Paper Doll Dress Up (island cut at 5", boy cut at 4"), Gypsy font (1")

- Other: hemp, Colorbox chalk ink for distressing, gel pen for belt.

Sunday, August 22, 2010

Bear Flip Book

WARNING - TONS OF PICTURES

It's finished, it's finished! (Well, as much as I'm going to post is finished.) Earlier this month, I was inspired by this post at 4 Crafty Angels to do a part card, part mini album to send to my husband. I used the tutorial here and it worked beautifully. It has a cover, an inside large sentiment, and 7 large photos that were cut down from 4 x 6" photos. I've already put in all the photos and just have go back and do some journaling. I'm hoping to mail it to my husband tomorrow! There really isn't a theme other than cute animals from the Create a Critter cartridge. I wanted to send him some pictures of him and his friends, although while I take a ton of photos, most are of my husband because he's so darn photogenic ;) I was able to find some recent shots of him and a few friends that I had printed. I don't have a photo printer, and once and while send photos that I think are "scrapable" to Walgreens or CVS but that occasionally presents a problem when I sit down to scrap. Oh well. I don't want a photo printer right now so I make do. As I mentioned last week I used all papers in my stash, likely all DCWV given the age of the paper as it used to be all I bought. Making this gave me lots of smiles. Hope you like it!

"All wrapped up"
Photobucket
"Unwrapped"
Photobucket
Inside greeting
Photobucket
First right flap
Photobucket
Left
Photobucket
Photobucket
Photobucket
Photobucket

Photobucket

Photobucket

Photobucket

Photobucket

Photobucket
It's fairly thick, but not too bad (about 3/4")
Photobucket
Back (hopefully this will keep the ribbon secure)
Photobucket

Saturday, August 21, 2010

Halloween Day 6: Mummy Card

I love this little guy. I have no idea where I saw the greeting. It's definitely not original but so cute. When I made background paper last weekend, I somehow neglected to make a full sheet of tombstones (or else I did and used it but don't remember). Thus, I cut a small tombstone out of purple and used it as an embellishment. It was completely a happy accident that the skeleton appears to be holding up the tombstone. I also attempted to distress the edges with Vintage Photo distress ink, but made more of a mess than anything. Oh well, Halloween cards can be grungy.

Photobucket

Photobucket

Materials:

- Paper: A2 card base, pattern paper cut at 4 x 5.25" (K&Co "Halloween by Tim Coffey" and paper stamped by me), plain cardstock cut at 4 x 5.25" for lining.

- Adhesives: Glue Arts Glue Glider Pro, Zig two-way glue pen

- Cartridges: Paperdoll Dress Up (doll cut at 4"), Alphalicious (sentiment cut at .5")

- Stamps: Inkadinkadoo "Halloween/Harvest Assortment" stamped using Colorbox Chalk Ink

- Embellishments: ribbon, gems


Here's a last look of them together:
Photobucket

Spinach and Mushroom Manicotti

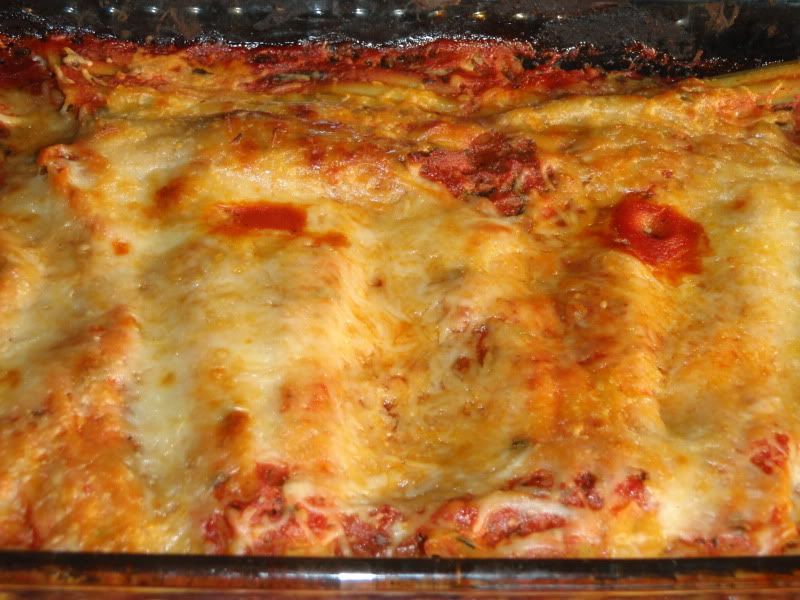
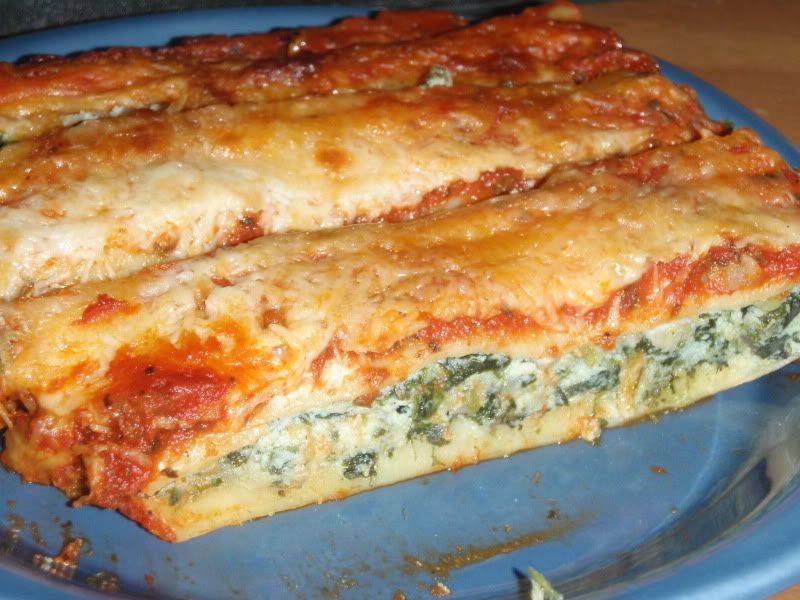
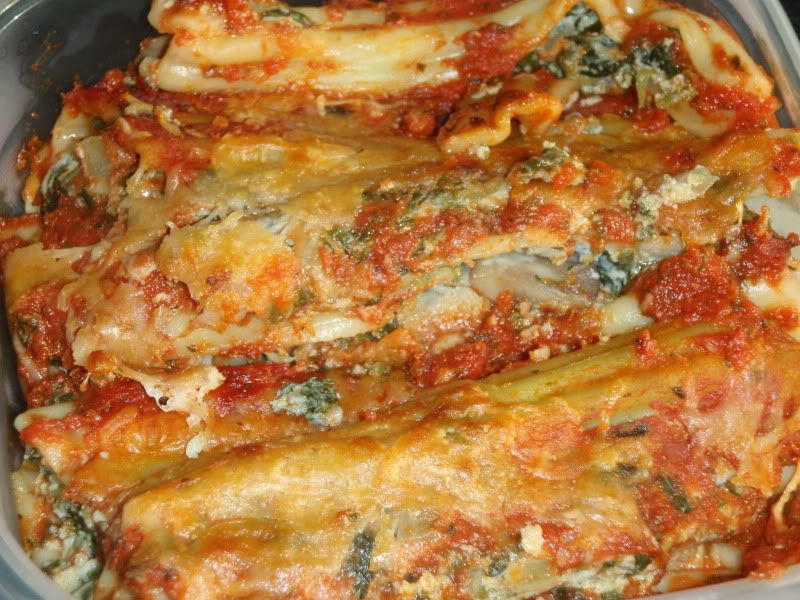
I don't recall where I got the urge to make manicotti. Something about filling cute little tubes with cheesy/spinachy goodness sounded fun. However, I made a couple unfortunate miscalculations. First, I used fat free ricotta as my only cheese in the filling. It's too dry. Second, I guess I skimped on the sauce and/or over-cooked it a bit. The end result is still tasty, but is a tad dry and not photogenic.

Photobucket

Ingredients
8 oz uncooked manicotti, cooked to al dente
8 oz spinach
1 c chopped onions
10 oz mushrooms, sliced
5 cloves garlic, minced
15 oz ricotta
2 eggs
1/3 c chopped fresh basil
8 oz shredded cheese (e.g. parmesan, monzarella)
12 oz prepared sauce
olive oil, salt and pepper

Directions
1. Saute onions, mushrooms, and garlic until tender. You could do them separately or all in the same pan. The former might yield better results.

2. Wilt in spinach. If using frozen, defrost and drain before adding. Allow mixture to cool.

3. In a separate bowl, combine ricotta, eggs, basil and a handful of shredded cheese. Generously season with salt and pepper. Add in spinach-mushroom mixture.

4. Using a plastic bag with the corner snipped, fill each manicotti shell.

5. In a 9 x 13" pan, pour 1 c sauce. Add in filled shells. Top with remaining sauce and a sprinkle of cheese.

6. Bake covered in a 350 degree oven for 30 minutes. Uncover and cook for another 10 or until cheese is browned.

Photobucket

Photobucket

Halloween Day 5: Celebrate with Flourish Pumpkin

I'm having loads of fun with the Celebrate with Flourish Cricut Lite cartridge. This pumpkin is 4 pieces, but extremely simple. I opted to fill the entire cover with the die cut, so I put the message on the inside. I've now made seven or so Halloween cards, only about ten more to go!

Have a great weekend.
Photobucket

Materials:

- Paper: A2 card base, pattern paper cut at 4 x 5.25" (K&Co "Halloween by Tim Coffey"), 5.25 x .75" before punching

- Adhesives: Glue Arts Glue Glider Pro, Zig two-way glue pen. glue dots

- Cartridges: Celebrate with Flourish (cut at 4")

- Punch: MS Scalloped Dots

- Stamps: Inkadinkadoo "Halloween/Harvest Assortment" stamped using Colorbox Chalk Ink

- Embellishments: ribbon, gems

Photobucket

Photobucket

Photobucket

Photobucket

Friday, August 20, 2010

Updates to the blog

I will post another card or project this evening, but for now take a spin around my site and see if you can locate the three new permanent elements that I've added in the last day or so. Two are lists and you know how I love lists.

Thursday, August 19, 2010

Halloween Day 5: Happy Halloween Pumpkin

Sorry for the lateness of this post. I laid it out this morning, but didn't get back to it until late this evening. I attempted to use Celebrate with Flourish for the greeting, but I didn't like the flourish part of the "Halloween," so I just trimmed the "Happy" and used a stamp. Can't wait for the Gypsy update.

Photobucket

Materials:

- Paper: A2 card base, kraft cardstock cut at 4 x 5.25" embossed; strip of cardstock cut at 2.5 x 5", and small square of pattern paper 2.25 sq (K&Co "Halloween by Tim Coffey")

- Adhesives: Glue Arts Glue Glider Pro, Zig two-way glue pen

- Cartridges: Celebrate with Flourish (cut at 2")

- Stamps: Inkadinkadoo "Halloween/Harvest Assortment" stamped using Colorbox Chalk Ink