Showing posts with label Halloween. Show all posts

Monday, September 27, 2010

Halloween Day 11: Candy Pumpkin

Here's another simple Halloween card. I picked up an awesome ribbon packet by Recollections at Michaels yesterday and this sequin trim is one of 4 or five different ones ranging to crushed velour to a popcorn type, three yards each. Look for more ribbons later this week. I got this little die cut last year, so it was fun to bring it out.

Photobucket

Photobucket

Materials:
- Paper: A2 card base - Papertrey Ink cardstock, K&C "Halloween Tim Coffey" cut at 4 x 5.25" and 4x4"
- Cartridge(s): Gypsy Wandering (pumpkin cut at 4")
- Embellishments: Recollections trim, K&Co sticker
- Adhesives: Pink ATG gun, glue dots, Xyron
- Special Tools: Scor-Buddy, mini-pumpkin punch, Cuttlebug 2 x 2" die, white Sakura gel pen

Friday, September 24, 2010

Halloween Day 10: Batty for You

Happy Friday! It's a wet and rainy morning in Chicago, which is actually weather I enjoy. Next to snow, rain where the temperature is higher than the 60s is my favorite weather. Anyway, here's another shape card made using my Gypsy that will fit in an A2 envelope. It took me awhile to work out the measurements, but now that they're all done, I will likely make a few more of this one because he's so cute! I colored his eyes using a red Copic marker, but may try using stickles next time. Originally I was going to put the tag near the bottom of the card on the ribbon, but its current location will help keep the card closed...I just hope its recipient realizes that it opens.

Photobucket

Photobucket

Photobucket

Materials:
- Paper: Papertrey Ink and Recollections cardstock, K&C "Halloween Tim Coffey" mat cut at 5 3/8 x 3"
- Cartridge(s): Simply Charmed (bat cut at about 3.75" and welded to a 5.5 x 4.25" rectangle), Don Juan (tag cut at 1.5")
- Stamp: My Pink Stamper "Spooky Puns" stamped using Memento ink
- Embellishments: square brad, PaperTrey Ink ribbon
- Adhesives: Pink ATG gun, Zig two-way glue pen, glue dots
- Special Tools: Scor-Buddy, 1" circle punch

Sunday, September 19, 2010

Halloween Day 9: The Greeting Farm Shedevil

Sorry for the late post. I spent the night at my in-laws last night and neglected to bring my digital camera. Today's card features the other new Halloween digi that I bought last week from The Greeting Farm. I used this Saturday Sketch from Club Anya. I'm a fourth to a third there of the cards I want to make for Halloween. Fortunately, I still have a few weeks to go.


Photobucket

Photobucket

Photobucket

Materials:
- Paper: A2 card base (PaperTrey Ink), Recollections paper and cardstock cut at 4 x 5.25", 3.5 x 1.5", and 4 x 3"
- Stamp: The Greeting Farm "Shedevil"
- Embellishments: buttons, ribbon from PaperTrey Ink
- Adhesives: Pink ATG gun, Zig two-way glue pen, glue dots
- Special Tools: Scor-Buddy, Fiskars "Apron Lace" punch

Saturday, September 18, 2010

Halloween Day 8: Ghost Shape card

Happy Saturday! Here in Chicago, it's dark and gloomy with intermittent showers. Perfect sleeping or crafting weather. Unfortunately, I have to go out very soon. Oh well, before I go, here's an easy little shape card for Halloween. I'm hoping to finish a good chunk of my Halloween cards this weekend, so I can send them out in early October. I used the Simply Charmed cartridge and my Gypsy to make an A2 sized card.

Photobucket

Photobucket

Materials:
- Paper: Recollections cardstock (glossy and plain)
- Cartridge(s): Simply Charmed (ghost cut at 5, flipped and welded), Alphalicious (or any basic shape) (rectangle cut at 2 x 4.25 and welded to the ghost)
- Stamp: My Pink Stamper "Spooky Puns" stamped using Studio G white pigment ink
- Embellishments: buttons, hemp
- Adhesives: Pink ATG gun, Zig two-way glue pen, glue dots
- Special Tools: Scor-Buddy

Thursday, September 16, 2010

Halloween Day 7: The Greeting Farm "Hallo Witch"

As you may know, the Greeting Farm released their new line of Halloween stamps Wednesday morning. I couldn't wait and ordered a couple first thing, even before having my coffee. What is great about them is that they're digitals ("digis"), which means that you print them directly from your computer. While I prefer physical stamps to digis most of the time, these were so cute that I really appreciated the instant gratification. (They're also cheaper, too). I assume that these images will only be digis since it is rather late in the Halloween card-making season and most rubber stamps shipped soon after CHA, but who knows?

Here's my first Halloween card since last month. Of the the set of new stamps, she's my favorite. Don't worry, I'm still working on the last recipe box and will hopefully have it up on Friday or Saturday.

Photobucket

Photobucket

Materials:
- Paper: A2 card base in kraft card stock, 4 x 5.25" pattern paper - Recollections "Time Frame," leftover strips of paper from the K & Co "Halloween Tim Coffey".
- Stamp(s): The Greeting Farm "Hallo Witch", colored with Copics; My Pink Stamper "Spooky Puns" stamped with Colorbox chalk ink.
- Embellishments: hemp, buttons
- Adhesives: Pink ATG gun, glue dots
- Special Tools: Scor-Buddy

Tuesday, August 24, 2010

Halloween Day 6: Witchy Raccoon

Good morning! When I envisioned this card, I pictured a kitty, but while flipping through the Create a Critter booklet, this guy jumped out at me. He fit perfectly with the purple theme of pattern paper from the K&Co's "Halloween by Tim Coffey" paper collection that I'm still working my way through. I was only able to finish one card before work, but will make more tonight using my Gypsy. Multiples are the way to go to meet my goals.

Photobucket

Materials:

- Paper: A2 black card base, pattern paper and white lining cut at 4 x 5.25", black mat cut at 2.75 x 3.75, blue mat cut at 2.5 x 3.5", tan mat cut at 2 5/8 x 1 1/8", and yellow mat cut at 2.5 x 7/8".

- Adhesives: Pink ATG gun, Zig two-way glue pen, foam, and stickles

- Cartridges: Create a Critter (raccoon cut at 2.5"), Paper Doll Dress Up (witch's hat and moon and stars cut at 2.5")

- Stamp(s): Inkadinkadoo "Halloween/Harvest Assortment" stamped using Memento ink, Colorbox chalk ink for dist


Photobucket

Photobucket

Saturday, August 21, 2010

Halloween Day 6: Mummy Card

I love this little guy. I have no idea where I saw the greeting. It's definitely not original but so cute. When I made background paper last weekend, I somehow neglected to make a full sheet of tombstones (or else I did and used it but don't remember). Thus, I cut a small tombstone out of purple and used it as an embellishment. It was completely a happy accident that the skeleton appears to be holding up the tombstone. I also attempted to distress the edges with Vintage Photo distress ink, but made more of a mess than anything. Oh well, Halloween cards can be grungy.

Photobucket

Photobucket

Materials:

- Paper: A2 card base, pattern paper cut at 4 x 5.25" (K&Co "Halloween by Tim Coffey" and paper stamped by me), plain cardstock cut at 4 x 5.25" for lining.

- Adhesives: Glue Arts Glue Glider Pro, Zig two-way glue pen

- Cartridges: Paperdoll Dress Up (doll cut at 4"), Alphalicious (sentiment cut at .5")

- Stamps: Inkadinkadoo "Halloween/Harvest Assortment" stamped using Colorbox Chalk Ink

- Embellishments: ribbon, gems


Here's a last look of them together:
Photobucket

Halloween Day 5: Celebrate with Flourish Pumpkin

I'm having loads of fun with the Celebrate with Flourish Cricut Lite cartridge. This pumpkin is 4 pieces, but extremely simple. I opted to fill the entire cover with the die cut, so I put the message on the inside. I've now made seven or so Halloween cards, only about ten more to go!

Have a great weekend.
Photobucket

Materials:

- Paper: A2 card base, pattern paper cut at 4 x 5.25" (K&Co "Halloween by Tim Coffey"), 5.25 x .75" before punching

- Adhesives: Glue Arts Glue Glider Pro, Zig two-way glue pen. glue dots

- Cartridges: Celebrate with Flourish (cut at 4")

- Punch: MS Scalloped Dots

- Stamps: Inkadinkadoo "Halloween/Harvest Assortment" stamped using Colorbox Chalk Ink

- Embellishments: ribbon, gems

Photobucket

Photobucket

Photobucket

Photobucket

Thursday, August 19, 2010

Halloween Day 5: Happy Halloween Pumpkin

Sorry for the lateness of this post. I laid it out this morning, but didn't get back to it until late this evening. I attempted to use Celebrate with Flourish for the greeting, but I didn't like the flourish part of the "Halloween," so I just trimmed the "Happy" and used a stamp. Can't wait for the Gypsy update.

Photobucket

Materials:

- Paper: A2 card base, kraft cardstock cut at 4 x 5.25" embossed; strip of cardstock cut at 2.5 x 5", and small square of pattern paper 2.25 sq (K&Co "Halloween by Tim Coffey")

- Adhesives: Glue Arts Glue Glider Pro, Zig two-way glue pen

- Cartridges: Celebrate with Flourish (cut at 2")

- Stamps: Inkadinkadoo "Halloween/Harvest Assortment" stamped using Colorbox Chalk Ink

Tuesday, August 17, 2010

Halloween Day 4: Trick or Treat Witches

Here are a a couple of cards using my new Cricut Lite Celebrate with Flourish. I love this cartridge for its holiday images, but was really disappointed to learn that it could not be uploaded to my Gypsy. Hopefully Provocraft will soon remedy that, but they haven't as yet. I made the larger witch first at 4", then scaled it down to 3".

Photobucket

Photobucket

Materials:

- Paper: A2 card base, pattern paper or lime green cardstock cut at 4 x 5.25" (K&Co "Halloween by Tim Coffey", 1 x 4" strips of pattern paper, small strip of vellum, if desired.

- Adhesives: Glue Arts Glue Glider Pro, Zig two-way glue pen

- Cartridges: Celebrate with Flourish (cut at 4" and 3")

- Stamps: Inkadinkadoo "Halloween/Harvest Assortment" stamped using Colorbox Chalk Ink

- Embossing Folder: Cuttlebug "Spots and Dots"

- Embellishments: gem


Photobucket

Photobucket

Monday, August 16, 2010

Halloween Day 3: Happy Halloween Pumpkin

Here's my first card using paper I decorated myself. I stamped a piece of 4 x 5.25" kraft cardstock with different pumpkins using clear embossing powder, then dusted it with black embossing powder. I used my new paper from K&Co, as well as fun foam attached with adhesive instead of foam tape. I forget on which blog or Youtube video I saw that trick, but I will definitely try to use it for larger pieces since I have a ton of fun foam and foam tape is expensive. I also inked the edges of the paper and die cut.

Photobucket

Materials:

- Paper: A2 black card base; kraft cardstock cut at 4 x 5.25", pattern paper cut at 3.5" (K&Co "Halloween by Tim Coffey")

- Adhesives: Glue Arts Glue Glider Pro, Zig two-way glue pen, fun foam

- Cartridges: Gypsy Wandering (pumpkin cut at 3")

- Stamps: Inkadinkadoo "Halloween/Harvest Assortment" stamped using Memento Ink


Photobucket

Halloween Weekend Shopping

Well, it's another Monday! After complaining yesterday morning that I could not find Halloween paper at my local Michaels, I went on a quest that afternoon to find some. I went to Tuesday Morning, which is a store similar to Big Lots that I had heard good things about online awhile back. Much to my surprise, it felt a lot like a thrift store and was extremely grungy and small. After much digging through a very small craft section, I came away with just these three items.

Photobucket
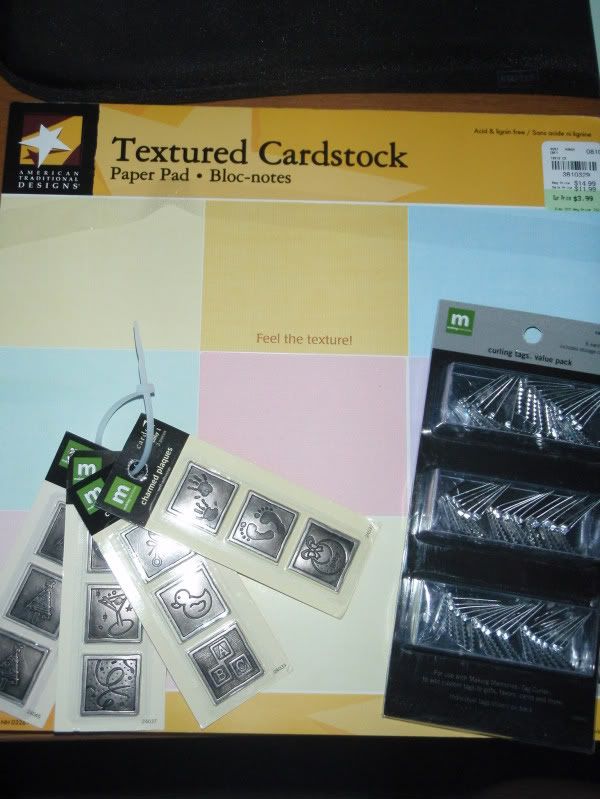
I only paid $4 for the textured cardstock, which was a good deal especially since it is thinner than the DCWV stuff that I had that struggles to go through my Cricut cleanly on the first try. I paid $3 for those tags which hopefully can be bent without the tag maker--oh yeah, I just pulled one out and I'm able to bend it with my fingers. They will make a nice addition to cards. As for the Making Memories plaques, they are self-adhesive and should look smart in an album.

Disappointed with my Tuesday Morning and only 1.5 miles or so from Jo-Ann's, I mapped it using my Iphone and treked on over. There I used my 10% off everything coupon from CHA and finally found some Halloween stuff!
Photobucket
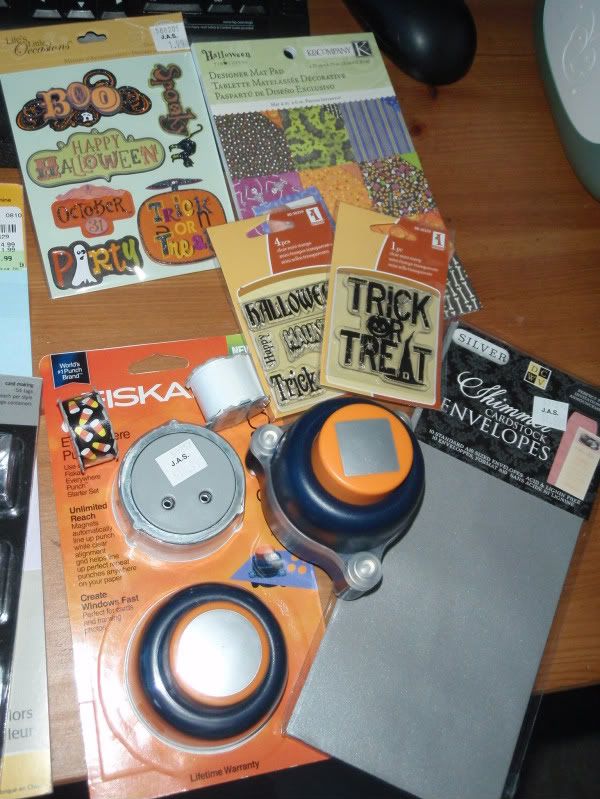
I only got that K&Co mat pad (4x6" sheets) even though they had some other cute stuff because I'm not sure just how many Halloween cards my attention span is going to allow me to make. Assuming I use them judiciously, I will be able to make 18+ cards using this stack. I also got some $1 Inkadinkadoo Halloween stamps, die cut stickers, and ribbon with candy corns.

The only product that I used at CHA and loved but was not able to buy was the new Fiskars Everywhere Punch. Basically, using a magnet and swappable bases, it allows you to punch a variety of shapes anywhere on a page rather than just near the edge. It was a great gimmick to sell the square punch with the base rather than the circle, which is why you see two in the picture, but oh well. Finally, I got some silver No 10 policy envelopes to make another envelope mini.

I hope to post another card soon. Thanks for stopping by!

Sunday, August 15, 2010

Halloween Paper

After complaining that I couldn't find Halloween paper that I liked at my local Michaels, I remembered that I have all these cool supplies such as embossing powder, stamps, etc, which could be used to make my own background paper! (Yes, I often forget the obvious ;) This is what I came up with. I will still keep scouring the net for "in stock" paper that I like and probably make a run to another craft store or two in the are, but this will keep me crafting for the time being. I used a stamp set from last year, Colorbox ink, and some Stampendous embossing power. What do you think?

Here's all of them:
Photobucket

A few close-ups:
Photobucket

Photobucket

Halloween Day 2: Witch's Hat

Well, it's Sunday and the weather forecasters have predicted that the heat and humidity will finally abate today. Yesterday wasn't nearly as bad as it was last week, but still not a good day to be outside. I walked from my Spanish class in Printers Row to my Michaels, at most a 10 minute walk, but I was fairly uncomfortable. Among other thing, I was looking for Halloween paper for my upcoming Halloween cards, but they had next to nothing! Not only do I want instant gratification, but I am worried about how long a "pre-order" would take to ship because I'm trying to have my Halloween cards done by the end of this month so I can move on to Christmas. That's why I haven't ordered any online at the moment. My next big online purchase will hopefully be a pink ATG tape gun, but those are all preorders or "not available" at the moment. I may check Joann's today, but we'll see.

On to the card. This is a super simple card, although I was happy to use one of my new embossing folders, some Halloween bling which I did pick up at Michaels, and some ribbon from last year's Thanksgiving/fall Target dollar bin ;)

Photobucket

Materials:

- Paper: A2 kraft card base; purple cardstock cut at 4 x 5.25", two 4" x 1-2" pieces of coordinating cardstock from my scraps. The green piece is DCWV textured.

-Embossing folder(s): Cuttlebug "Spots and Dots"

- Adhesives: Glue Arts Glue Glider Pro, Zig two-way glue pen, glue dots

- Cartridges: Paper Doll Dress Up (hat cut at 3.5")

- Embellishments: ribbon, gems


Photobucket

Saturday, August 14, 2010

Halloween Day 1: Frankenstein

Happy Saturday! I have been seriously behind in my Halloween cards. I am going to try to do nothing but for awhile until I get them done. I don't know whether I will be able to stick to it every single day as I'm working on a couple of other projects, but I will try. I made two Frankenstein cards both on A2 card bases. I made the larger one first, then scaled it down. The instructions below are for the smaller guy.

Photobucket

Materials:

- Paper: A2 card base; two pieces of cardstock, one for the lining and one for the background paper cut 4 x 5.25".

-Stamp(s): Peachy Keen Stamps "Basic Paper Doll Faces" (PK-573), stamped using Memento ink. Bats are from a holiday stamp set from last year--no idea on manfg.

- Adhesives: Glue Arts Glue Glider Pro, Zig two-way glue pen, foam tape.

- Cartridges: Paper Doll Dress Up (frankenstein and clothes at 3.5", bag at 4", tree at 3")


Here's the first one. I had to cut down the tree to make it fit, which is why I've provided directions for the smaller one.
Photobucket