Friday, July 30, 2010

The Greeting Farm: Hippie Anya

Sorry for the late posting, but I actually colored her at work and then put her together at home. (My boss is on vacation, so other than manning the phones and getting ahead on a few things, it's pretty quiet at work.) I'm still working on the skin tones for people stamps, and may have to order a few more Copic markers. However, tomorrow I'm going to the CHA Supershow, so I'm am trying to behave. (It didn't work so well earlier during the week as Michaels had a screaming Cuttlebug/Cricut sale which I wasn't expecting when I went in for glue dots and an album, but I didn't buy anything today.) Anyway, here she is:

Photobucket

Materials:

- A2 white card base, 4 x 5.25" pattern paper by We R Memory Keepers ("Write Out Collection")

- Adhesives: Glue Arts Glue Glider Pro, glue dots

- Stamps:Greeting Farm Hippie Anya using Ranger Archival ink (embossed with clear embossing powder), colored with Copics, and Hero Arts "Everyday Sayings" using Colorbox chalk ink

- Punch(es): small circle punch, about 1.5"

- Embellishments: buttons from Michaels dollar bin


Photobucket

Thursday, July 29, 2010

Here Comes Trouble - Baby Card

The B is for Boy and Sugar and Spice Cricut cartridges certainly have been put to use. This baby card was made using both and would be perfect for a boy or a girl with just a little hair and a color scheme change. I finally got my best friend's baby gift in the mail today, so I hope she likes it.

Photobucket

Materials:

- A2 blue card base, 4 x 5.25 white cardstock

- Cartridge(s): B is for Boy (greeting cut at 1.75", baby cut at 1.5"), Sugar and Spice (stork cut at about 4")

- Adhesives: Glue Arts Glue Glider Pro, Zig 2-way glue pen, glue dots, Mod-Podge

- Cuttlebug embossing folder: Swiss Dots

- Blue ribbon from Michaels


Photobucket

Pasta with Tomatoes and Turkey Sausage

Morning! I think I will make it a goal to post a recipe weekly at TheFishie's Kitchen and a craft project most days at TheFishie's Realm. As you know, I have been on a huge card/scrapbooking kick and unfortunately have been neglecting this blog. I also have been super-behind on my recipe mags and have at least 3-4 that I haven't even removed from the plastic. I will be spending a lot of time on the train this weekend, so hopefully I will make a dent in them.

On the the recipe, which is probably why you're here. On my way home last night, I stopped at Whole Foods. On an unusual whim, I wandered by the meat counter, in front of the sausages, and went a little nuts, getting three different flavors! This recipe was made with raw pork andouille sausage, but any raw sausage will do. (I also bought Italian turkey sausage, which may go in a similar dish later in the week).

Photobucket
Printable Version

1/2 lb raw sausage (pork, turkey, your choice)
2-14 oz cans of whole or diced tomatoes
1 med onion, chopped (about 1 c)
2 shallots, chopped (about 1/3 c)
3 gloves garlic, minced (1 tbs)
1 tsp dried oregano
1/2 c fresh parsley
salt, pepper, olive oil
1/2 lb pasta
parmesan cheese to serve

1. Cook pasta according to package instructions until al dente. Do not over cook because you will want it to soak up some of the sauce.

2. Saute onions and shallots in olive oil until tender and beginning to brown. Sprinkle with sale.

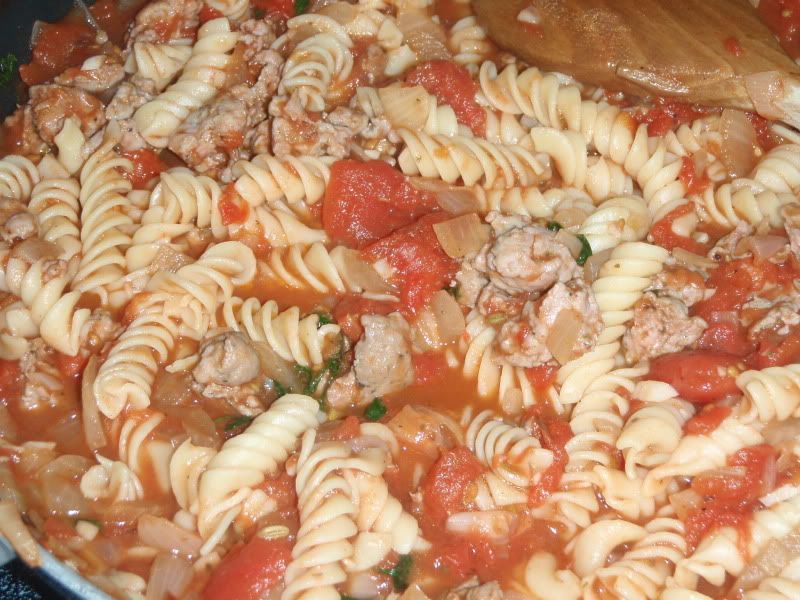
3. Add sausage and garlic. (NOTE: Be sure to remove sausage from casing in order to crumble). Cook until browned.

4. Stir in tomatoes, oregano, and a sprinkle of salt and pepper. Bring to a simmer.

5. Cook on low for about 10-15 minutes until slightly thickened.

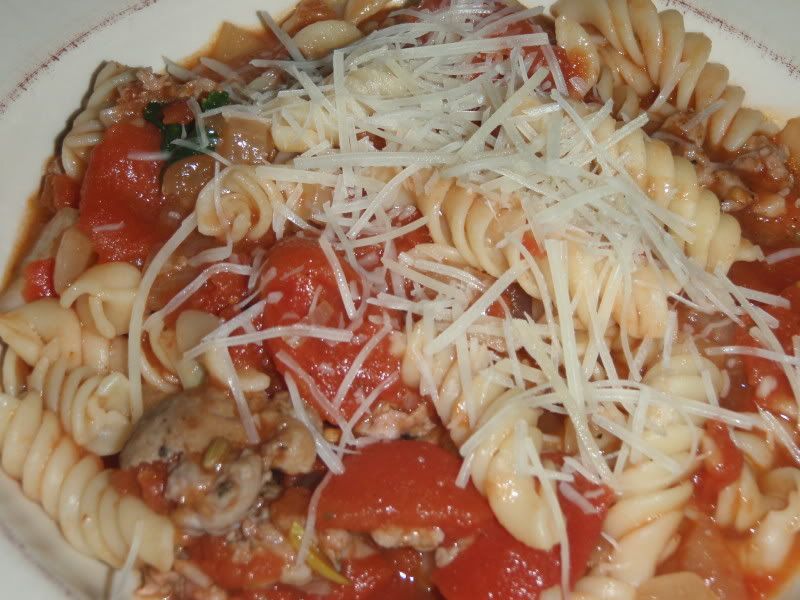
6. Add in pasta and parsley. Cook for another 2 minutes to give the pasta a chance to soak up some of the juices.

Photobucket

Serves 4-6 with a sprinkle of Parmesan.

Tuesday, July 27, 2010

Wedding Card

Here's the wedding card I made for Joe and Tam's wedding on Sunday. Unfortunately, I ran out of time and did not put the wedding cake on the inside that I had intended. I am hoping to make a small scrapbook for them later this summer so there will be time for more wedding diecuts. Tam wore her hair up, so in the album I will adjust that. Joe work a tan suit, so I'm not sure how I will adjust for that. I love a coat and tails!

Photobucket


Materials:

- 5 x 7 white card base, 4.75 x 6.75 silver cardstock

- Cartridge(s): Paperdoll Dress Up (people and outfits cut at 4"), Gypsy Wandering (greeting cut at 1.5")

- Adhesives: Glue Arts Glue Glider Pro, Zig 2-way glue pen, foam tape, glue dots

- Stamps: Peachy Keen Stamps - "Critter Faces" and Colorbox chalk ink

- Cuttlebug embossing folder: D'vine Swirls

- Punch(es): small flower punch

- Organdy ribbon from Michaels, pearls


Photobucket

Monday, July 26, 2010

Baby Boy Mini Album

While it is a week overdue, here's the full completed Baby Boy Mini Album for my best friend's new baby. While I showed you the details last week, here's page by page. There are at least 20 place for photos (and/or journaling) and more than 30 shapes or words cut with my Cricut. Hope she likes it.

Baby Boy Mini Album Cover
Cover

Baby Boy Mini Album Inside Cover - Page 1
Inside cover and page 1

Photobucket
Pages 2-3

Photobucket
Pages 4-5

Baby Boy Mini Album Pages 6-7
Pages 6-7

Photobucket
Pages 8-9

Baby Boy Mini Album Page 10 - Back Cover
Page 10 and inside back cover

Baby Boy Mini Album Back Cover
Back Cover

Sunday, July 25, 2010

Baby Boy Mini Album Page 1

Here's page 1 that I did last because I was struggling with the font size and welding feature (Gypsy), but I think I finally got it right. The toys are from Sugar and Spice, while the onesie is from B is for Boy. In tomorrow's post, I'll do a recap of the entire mini-album so you can see how it's laid out.

Photobucket

Materials:

- We R Memory Keepers "Write Out Collection" paper cut at 8.5 x 7.25", strips of blue and white cardstock cut about 1" and 1.25" x 1.5" to fit.

- Cartridge(s): B is for Boy (onesie cut at 6.5"), Sugar and Spice (rattle cut at 1.75", bottle cut at 2"), Alphalicious (words cut at around 1", scaled to fit using Gypsy)

- Adhesives: Glue Arts Glue Glider Pro, Zig 2-way glue pen, Mod-Podge, foam tape, Xyron

-Embellishments: Making Memories "School days" packaging tape

Saturday, July 24, 2010

Hip, Hip, Hooray Hippo

I made this card as a congratulations/goodbye card for someone who is retiring briefly to begin another job. This is my first hippo card even though it's one of the cutest and most popular critters on the Create a Critter cart.

Photobucket

Materials:

- A2 white card base, DCWV "Summer Dreams" cut at 4 x 5.25"

- Cartridge(s): Create a Critter (hippo cut at 3.37", greeting cut at 1.07" using my Gypsy)

- Adhesives: Glue Arts Glue Glider Pro, Zig 2-way glue pen, Mod-Podge, foam tape

-Embellishments: ribbon, flower, brad

Friday, July 23, 2010

Baby Boy Mini Album Pages 8-10

Sorry for the late post. The never-ending saga of my building's internet connection fouled things up last night. As promised, I came home from work and finished several pages of the Baby Boy Mini Album, three to be precise! Then I toddled over to my computer to upload the pictures...no internet connection at all! Well, I complained all day and finally it looks like I have access. Thus, I'm going to quickly load the three pages and schedule a post for tomorrow.

These three pages have a space theme. I kept the embellishments simple because the paper is so cute. B is for B was used for all images.

Photobucket

Photobucket

Materials:

- DCWV "All About Boys" paper collection cut at 8.5 x 7.25", two mats cut at 4.5 x 6.5 before punching, two white pieces of cardstock cut at 7.75 x 5", 4 mats (cardstock and paper) cut at 4.5 x 4.75", a strip of pattern paper cut at 3 x 7.25"

- Cartridge(s): B is for Boy (astronaut cut at 4", gun cut at 2.5", spaceship cut at 1.75")

- Adhesives: Glue Arts Glue Glider Pro, Zig 2-way glue pen, Mod-Podge, foam tape, glue dots

-Embellishments: buttons, ATD stickers by My Momenta "Boys Will Be Boys," stickles glitter glue


Photobucket

Photobucket

Photobucket

Photobucket

Photobucket

Photobucket

Thursday, July 22, 2010

The glue wasn't dry yet

So check back for the next pages in the Baby Boy Mini Album this afternoon/evening. For now, check out the latest new cartridge that's going on my wishlist here. It's called Simply Charmed and will be available in August. Can't wait!

Photobucket

Tuesday, July 20, 2010

Baby Boy Mini Album Pages 6-7

Happy Wednesday! This week and this summer seems to be flying by. Yesterday, I hinted that I would be moving away from primary colors for the remaining pages of the book, but that just didn't happen. Originally, I made the robot larger and in different colors, but he just didn't work on the page Thus, I returned to the basic red, yellow, blue, black combination. I really love this sprockets paper from the DCWV "All About Boys" paper stack, as well as the robots paper on the next page (so much so that I think I am leaving it largely empty to show off the paper). The top photo mat lifts up for hidden journaling or photo space.

Photobucket

Photobucket

Materials:

- DCWV "All About Boys" paper collection cut at 8.5 x 7.25", black cardstock cut into two 3.5 x 3.25" mats, green textured cardstock cut into two 3.25 x 3" mats, beige cardstock cut 3.25 x 7".

- Cartridge(s): B is for Boy (robot cut at 4")

- Adhesives: Glue Arts Glue Glider Pro, Zig 2-way glue pen, Mod-Podge, foam tape

-Embellishments: gold brads (3/8"), ATD stickers by My Momenta "Boys Will Be Boys."


Photobucket

Photobucket

Photobucket

Baby Boy Mini Album Page 5

Here's page 5 of the Baby Boy Mini Album that I'm making and the last page for awhile using mostly primary colors. When I sketched out this book, I had originally intended this page to have an elephant on it and possibly a circus theme. However, I decided that another cute bear-like creature fit better. Plus, he took up less space than Mr. Elephant would have. The flip photo mats and safety pins add some dimension. I debated adding a title or not and decided that leaving lots of space to write seemed like a better idea.

Photobucket

Photobucket

Photobucket

Materials:

- We R Memory Keepers "Write Out Collection" paper cut at 8.5 x 7.25" and cut into two 3 5/8" squares and 4.5 x 3 5/8", beige cardstock cut at 8 x 3 7/8", and black cardstock cut to 2 x 7.25" (before punching)

- Cartridge(s): Create a Critter (koala cut at 1.74" using Gypsy), B is for Boy (ball cut at 1.74" using Gypsy), Sugar and Spice (wagon cut at 2" using my gypsy)

- Adhesives: Glue Arts Glue Glider Pro, Zig 2-way glue pen, Mod-Podge, glue dots, foam tape

-Punch(es): Crop-a-dile, MS Scallop Dot Edge

- Safety pins (1.25") from Jo-Ann's

Monday, July 19, 2010

Baby Boy Mini Album Page 4

Here's page 4 of the Baby Boy Mini Album that I'm making. This is my favorite bear from all my cartridges, so I'm happy to share him with the baby. It's dusk now, so the picture is a little dim, however I kept the flash pointed away to avoid a glare from my Mod-Podging.

Photobucket

Materials:

- We R Memory Keepers "Write Out Collection" paper cut at 8.5 x 7.25" and 3.25 x 4.75", red cardstock cut at 3.5 x 5", black cardstock cut to 2 x 7.25" (before punching)

- Cartridge(s): Create a Critter (bear cut at 3.75", balloons stretched to about 1.25 x 1.5"), Cricut Lite Carousel (flags cut at 1.5")

- Adhesives: Glue Arts Glue Glider Pro, Zig 2-way glue pen, Mod-Podge, glue dots, pop dots from Stampin Up.

-Punch(es): Crop-a-dile, MS Scallop Dot Edge, Corner Chomper

Peanut Butter Cookies with Oatmeal

Most of my cooking this summer has been exclusively from my stand-by recipes collection. This one is as well, however I added in some oatmeal, which makes it a bit new. Be careful not to overbake these cookies as they will get hard. If that happens, I recommend a tall glass of milk as they are still very tasty.

Photobucket

1/2 c granulated sugar
1/2 c dark brown sugar
1/2 c peanut butter (creamy)
1/2 butter, softened
1 egg
3/4 c all purpose flour
1/2 c whole wheat flour
1/3 c oatmeal (quick cooking)
1/2 tsp salt
3/4 tsp baking soda
1/2 tsp baking powder

1. Cream sugars and butter together until light and fluffy. Add in egg and peanut butter. Beat until smooth.

2. Sift together flours, baking powder, baking soda, salt. Add to butter mixture, being careful not to overmix.

3. Gently stir in oatmeal.

4. Chill dough in refrigerator for 1 hour.

5. Preheat oven to 375 degrees.

6. Place tablespoons of dough at least 2 inches apart on a cookie sheet covered in parchment paper. Use the back of a fork to make hash marks, if desired.

7. Bake for 8-10 minutes until golden brown.

Makes 2.5 dozen.

Photobucket
I couldn't resist a bite.

Sunday, July 18, 2010

Baby Boy Mini Album Pages 2-3

Hello there. Today's post is the second and third pages of the mini album I'm making for my best friend's new baby boy. I skipped the inside cover and the first page as I'm still working on those. These two pages whipped up fairly quickly using Create a Critter and B is for Boy once I decided how I wanted to arrange the train. I love the bright colors and hope that I can continue them throughout the album even though I have a few more themes planned within this album. Comment and let me know what you think.

Photobucket

Photobucket

Photobucket

Materials:

- DCWV All About Boys paper stack cut to 8.5 x 7.25", blue cardstock cut to 2 x 7.25" (before punching)

- Cartridge(s): Create a Critter (train cut at 3", giraffe cut at 3", frog at 1.75", seal at 2", special delivery at 1.75"), B is for Boy (lion cut at 2.75")

- Adhesives: Glue Arts Glue Glider Pro, Xyron, Zig 2-way glue pen, Mod-Podge, glue dots

-Stamps: Peachy Keen Critter Faces stamps, Colorbox Chalk ink

-Punch(es): Crop-a-dile, MS Arch Lattice, Fiskars slots


Photobucket

Saturday, July 17, 2010

Baby Boy Mini Cover

Hello. I'm making a mini album to give to my best friend who just had a baby boy. I know she checks out my recipes blog, but I don't know whether she visits my crafts blog too. Even if she does, I'm counting on her being too busy with new baby to grasp that this is for her! Anyway, I'm having a blast making this even though it designed in a flash, but is taking some time to make all the little pieces. For the most part, I'm using the Cricut Lite B is for Boy and Create a Critter cartridges throughout the entire mini album. The paper is from the DCWV All About Boys paper stack with a few sheets of paper from We R Memory Keepers "Write Out Collection." Here's the cover which is probably the most involved part of the book (I hope). Stay tuned for a new page or two a day.

Photobucket

Photobucket
(Naturally, I used Mod-Podge for gloss)

Materials:

- Cartridge(s): B is for Boy (toys cut at 1.65" using my Gypsy, Baby Boy cut at 1"), Alphalicious (name cut at 1.25" and welded with my Gypsy)

- Adhesives: Glue Arts Glue Glider Pro, Xyron, Zig 2-way glue pen, Mod-Podge, glue dots

- Embellishments: Jolee's Boutique Dimensional Stickers ("Toddler Boy")

- Punch(es): Crop-a-dile

Friday, July 16, 2010

What a Pear

Happy Friday! I'm still being inspired by my new My Pink Stamper set called "Fruit and Veggie Puns." As usual, I Mod-Podged the die cuts for a little shine and also distressed the edges with black ink. Fortunately, I learned from my Spanish class (which uses a ton of cheesy graphics for visual learning) that if a face has eyelashes, then it's a girl! If it doesn't, then it's a boy. The "Critter Faces" stamp set from Peachy Keen stamps follows this rule.

Photobucket


Materials:

- Paper: A2 white card base, pattern paper (Making Memories "english garden") cut 5.25 x 4", strip of blue card stock (cut 2 x 5.25 before punching)

- Punch(es): MS Doily Lace

- Cartridge(s): Cricut Lite Savory (pears cut at 3")

- Adhesives: Tombow mono adhesive, Zig 2-way glue pen, Mod-Podge, glue dots

- Stamps: My Pink Stamper "Fruit and Veggie Puns", Peach Keen Stamps "Critter Faces" using Colorbox Chalk ink

- Embellishments: Ribbon scrap, pearls


Photobucket

Thursday, July 15, 2010

Thanks a Melon

One of the things I love most about summer is a slice of cool refreshing watermelon. Over the weekend, I saw a bunch of great picnic cards on Pink Cricut's Picnic Blog Hop on Saturday, so that got me thinking about picnic foods. Then guess what arrived in yesterday's mail? My new set of My Pink Stamper stamps called "Fruit and Veggie Puns."

Photobucket

Materials:

- A2 white card base, pattern paper cut 5.25" x 4"

- Cartridge(s): Block Party (watermelon cut at 4")

- Adhesives: Glue Arts Glue Glider Pro, Zig 2-way glue pen, pop dots

- Stamps:: My Pink Stamper "Fruit and Veggie Puns"

- Ribbon from Michaels


Photobucket

Wednesday, July 14, 2010

Ice Cream Bear

This bear has got to be my favorite critter on the Create a Critter cartridge. The ice cream cone is from Carousel. While I'm getting the hang of working with an A2-sized card rather than the larger 5 x 7", sometimes I have difficulty saving room for the greeting. For the horizontal bear, I simply put the following message on the inside, "Sending warm fuzzies." Too cute, right? It's for my husband, so it'll do.

Photobucket

Photobucket

Materials:

- A2 white card base, pattern paper cut 5.25" x 4", another strip of patterned paper cut 4 x 1.75"

- Cartridge(s): Create a Critter (bear cut at 3"), Carousel (ice cream cone cut at .75")

- Adhesives: Glue Arts Glue Glider Pro, Zig 2-way glue pen, foam tape

- Stamps:: Hero Arts "Friends"

- Ribbon from Michaels


Another look:

Photobucket

Photobucket