

Monday, May 31, 2010
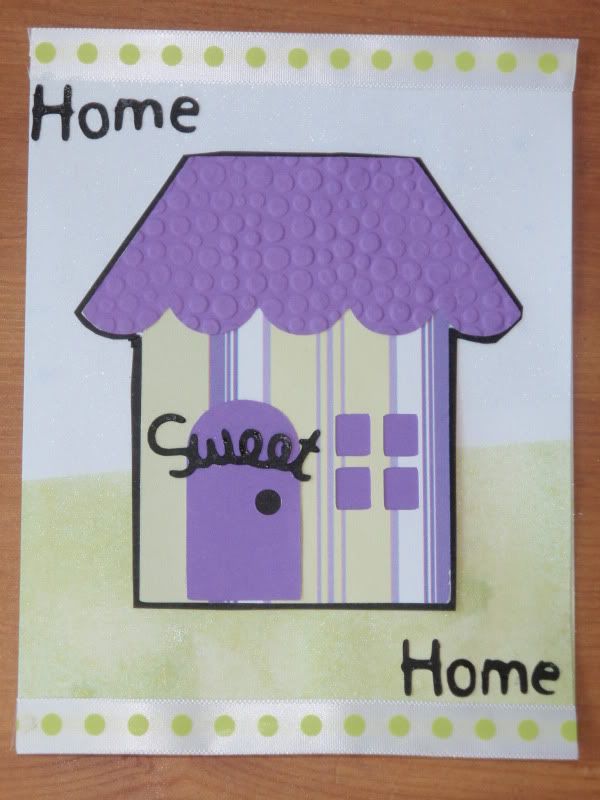
Home Sweet Home
I'm still using my Create a Critter cartridge! The house is found on p. 28 and is an accessory to the pink pig. After cutting them both, I decided that pink, purple, and green do not go to together. Actually, I'm not sure if the purple and green pattern paper looks right either, but pink definitely didn't go. One of the thing I need to get is a color wheel ;) Anyway, the house is cut at 2 1/4". I ran the roof through an embossing folder and really rather like how it came out. I glimmer-misted the grass (sweet clover) and sky (glacier, hitting it immediately with a heat gun so the paper didn't warp too much. The "Sweet" is the accompanying phrase for the skunk on p. 61 and "Home" is cut using my Pooh font cartridge. The ribbon is again from the Target dollar bin.
New pocket pie mold
You might remember all the fun I had with the William Sonoma pocket pie molds last year. Well, they released a new mold for the summer! It's called the Lattice Pocket Pie Mold. For whatever reason, I could not find them on the William Sonoma website yet, so I've linked above to the ones from last year. However, my auntie bought one for each of us in store! She tried her out for the first time over the weekend with these gorgeous results:
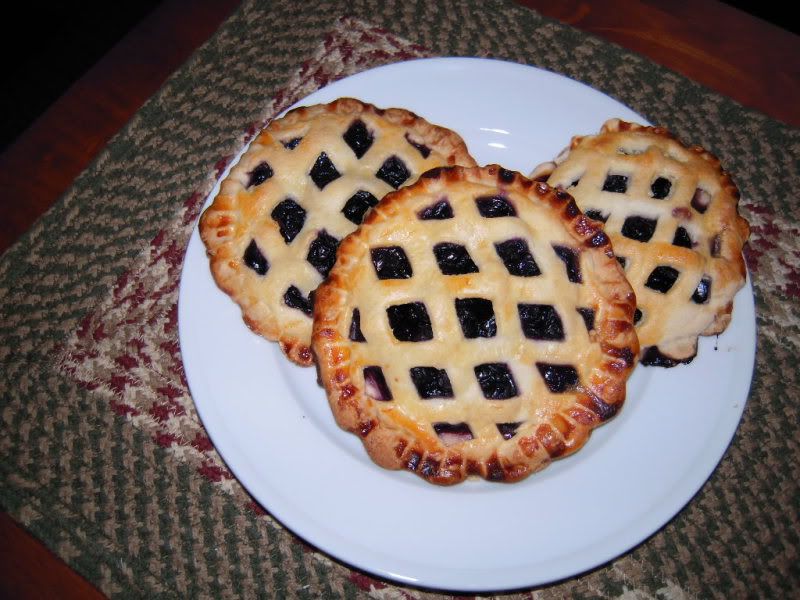
Aren't those beautiful? I can't wait to try mine.

Aren't those beautiful? I can't wait to try mine.
Sunday, May 30, 2010
Ham & Spinach Pasta
This is the second time this week that I tossed an egg with pasta, so I thought I'd share. I know that an egg goes in carbonara sauce, but I don't know what all else. My method is just a quick way to use leftovers out of the fridge using the egg as a binder.
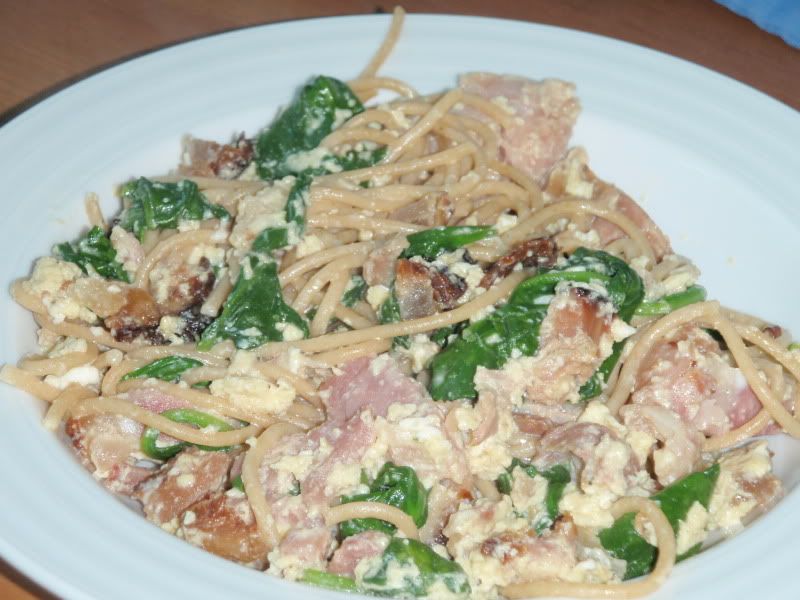
1/2-1 c diced cooked ham
1 c fresh spinach
1 egg
2-3 tbs milk
salt and pepper
2-3 tbs grated parmesan cheese
1 c cooked pasta
In a medium non-strick skillet, saute the ham to take the chill off and brown it a little. Meanwhile, cook/reheat the spinach and pasta in the microwave for 1-2 minutes covered with a wet paper towel.
In a small bowl, beat together the egg, cheese, milk, and a sprinkle of salt and pepper.
In the skillet, toss everything together with the ham. Cook for about 3 minutes, tossing the mixture with tongs or stirring with a spoon, until the egg is cooked.
Serve with additional cheese, if desired.
1 serving if main dish, 2 if served as a side
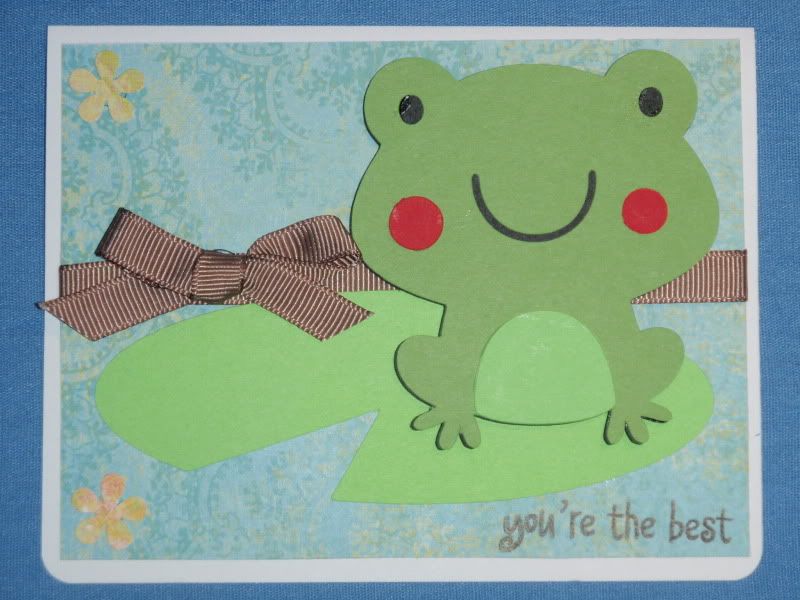
Froggy card
The goal is to work my way through my Create a Critter cartridge, or at least until I get tired of all it's cuteness. (Doubt that will happen anytime soon.). The frog and lily pad are found on p. 24 and are cut at 3 inches.

Cricut cartridges--I think I have an addiction
I have six Cricut cartridges!!! Can you believe that I've only had my Cricut machine for a little over two weeks? I might have been late to the Cricut party, but I'm certainly going out of my way to make up for lost time. To be fair, one came with the machine and one was the gift, so I've only bought 4, all on sale at $39.99 or less.
Here they all are:

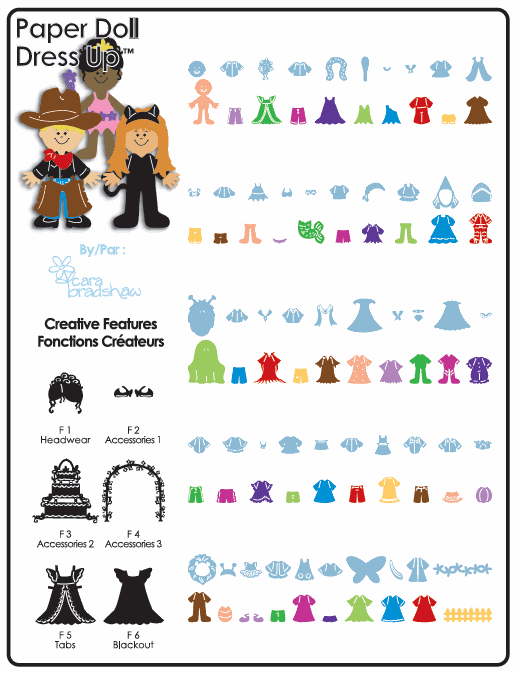
Last night I went to Michaels with some friends. Although I had a 60% off coupon for Cricut cartridges, it only applied to cartridges that were not on sale and regularly priced $69.99. As you may know, regular price for most Cricut cartridges is $89.99, so there was a limited selection and I wound up not using the coupon. However....one cartridge was only $19.99!!! Paper Doll Dress Up is cartridge that's being retired, unfortunately. Possibly because it seemed to have a niche market--people with little kids. What most people may not known is that in addition to great outfits, it comes with terrific accessories like a wedding cake, old-fashioned car, dinosaur, red wagon, rocking horse, unicorn, pirate ship, castle, dragon, skeleton, city skyline, rocket ship, gingerbread man, a picket fence, and grass. Here's the back of the box:
Here they all are:

Last night I went to Michaels with some friends. Although I had a 60% off coupon for Cricut cartridges, it only applied to cartridges that were not on sale and regularly priced $69.99. As you may know, regular price for most Cricut cartridges is $89.99, so there was a limited selection and I wound up not using the coupon. However....one cartridge was only $19.99!!! Paper Doll Dress Up is cartridge that's being retired, unfortunately. Possibly because it seemed to have a niche market--people with little kids. What most people may not known is that in addition to great outfits, it comes with terrific accessories like a wedding cake, old-fashioned car, dinosaur, red wagon, rocking horse, unicorn, pirate ship, castle, dragon, skeleton, city skyline, rocket ship, gingerbread man, a picket fence, and grass. Here's the back of the box:

Saturday, May 29, 2010
Balloon Birthday Card
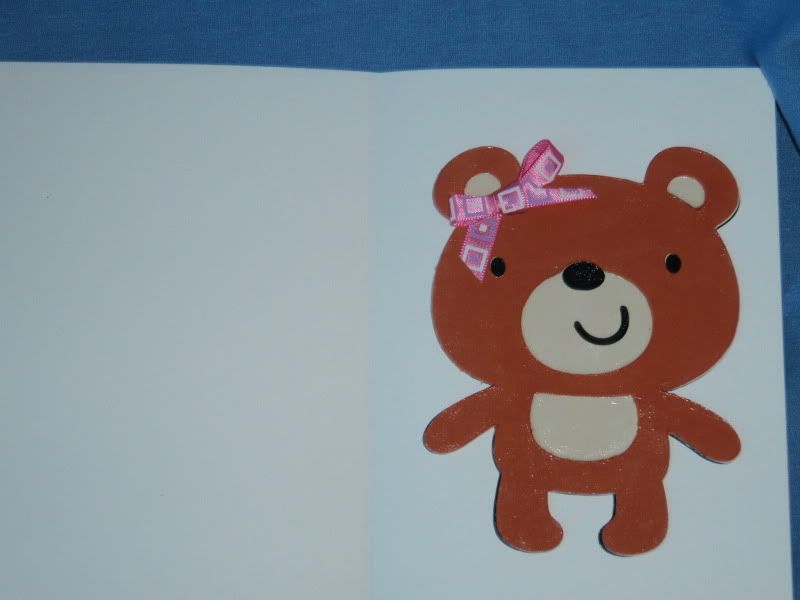
Sorry this post comes so late in the day. I finished it this afternoon, but then forgot to post it before I went out. I used my new Create a Critter cartridge! The bear is found on p. 27 and the balloon is an accessory to the snake that appears on p. 30. Since I'm sending this to my husband, I put the bear on the inside ;) The cardstock is from the paper company and the ribbon is from the Target dollar bin. I glossed all the cut-outs with mod-podge.
Here's the front:

Here's the inside:
Here's the front:

Here's the inside:

Thursday, May 27, 2010
No cards till the weekend :(
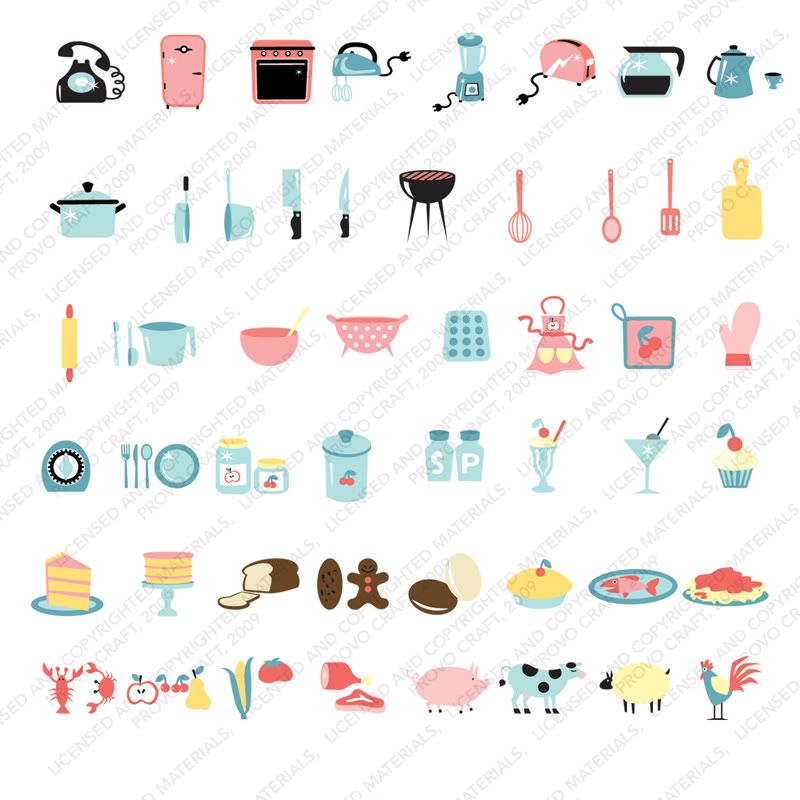
I'm finally out of posts that I had scheduled last week ;( However, this week is proving to be too busy to get more cards made. I did FINALLY receive the two cartridges that I order 2 weeks ago--Create a Critter and From my Kitchen. After letting my order hang in limbo for over a week, Joann.com finally express mailed them to me. They are both just as cute and neat as everyone had said, so I'm excited about making lots of cards with them.
I also did some (more) online shopping and should be getting some neat embossing folders, inks, ribbon and cardstock in the next few days.
Thanks for visiting and please check back on Saturday!
I also did some (more) online shopping and should be getting some neat embossing folders, inks, ribbon and cardstock in the next few days.
Thanks for visiting and please check back on Saturday!
Wednesday, May 26, 2010
Another Dog Card
Another card using the Sizzix original die and Studio G stamps from the Michael's dollar bin. The paper is K&Co, but I'm not sure which collection. I painted the bone with rock candy crackle paint and then wrapped some bronze wire around it. I am hoping that it will lay flat enough in the envelope to mail.

Here's the inside. I often add a frame on the inside to help counter-balance the weight.

Here's the inside. I often add a frame on the inside to help counter-balance the weight.

Tuesday, May 25, 2010
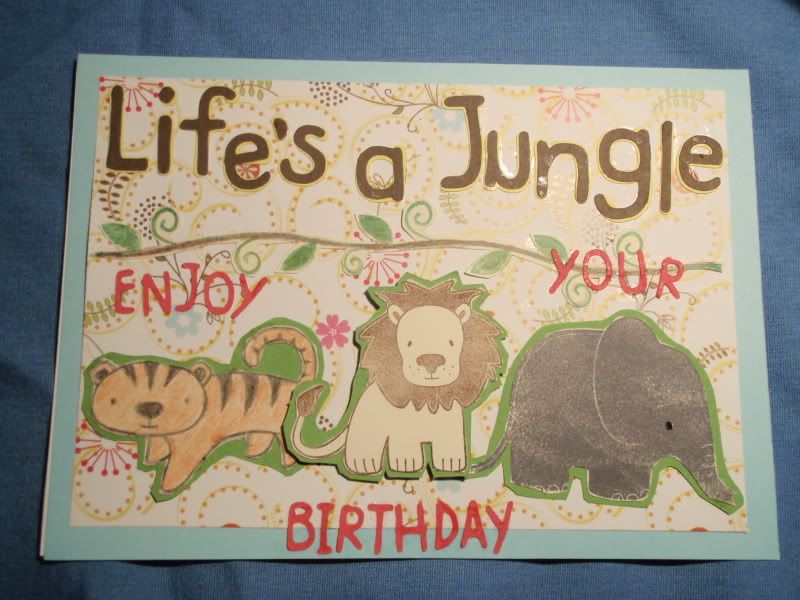
Happy Birthday - Jungle
This was cut using my new Pooh Font cartridge! It's an awesome font cartridge that even comes with honey pots and baby Poohs. The animals are from the Paper Co's Jungle clear stamp set. After all this time, I finally learned the difference between types of inks, specifically that water-based inks will not coat big images as well as chalk or pigment inks. My favorite right now are Colorbox's chalk inks and I definitely plan on getting more when I can. I put the animals on green cardstock and popped them up with foam tape. I used the Zig two-way glue to adhere all the little letters and ran the big ones through my Xyron.

Monday, May 24, 2010
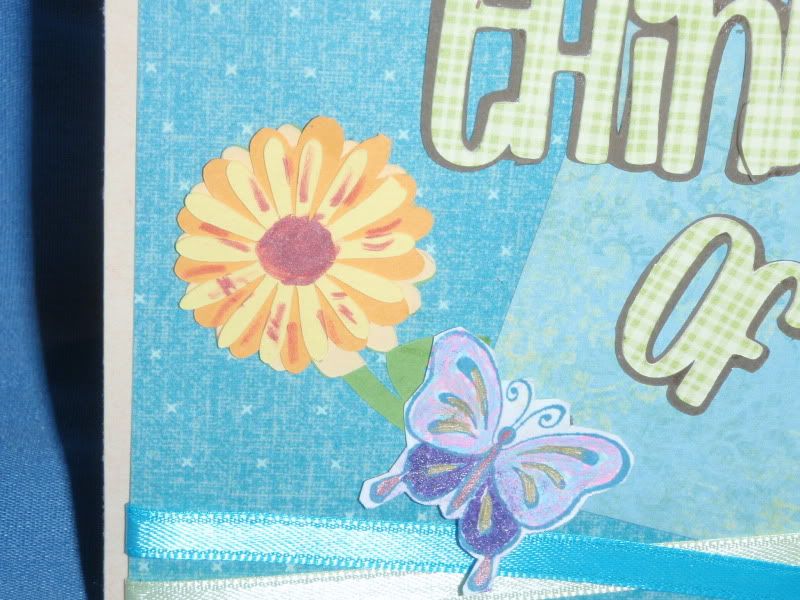
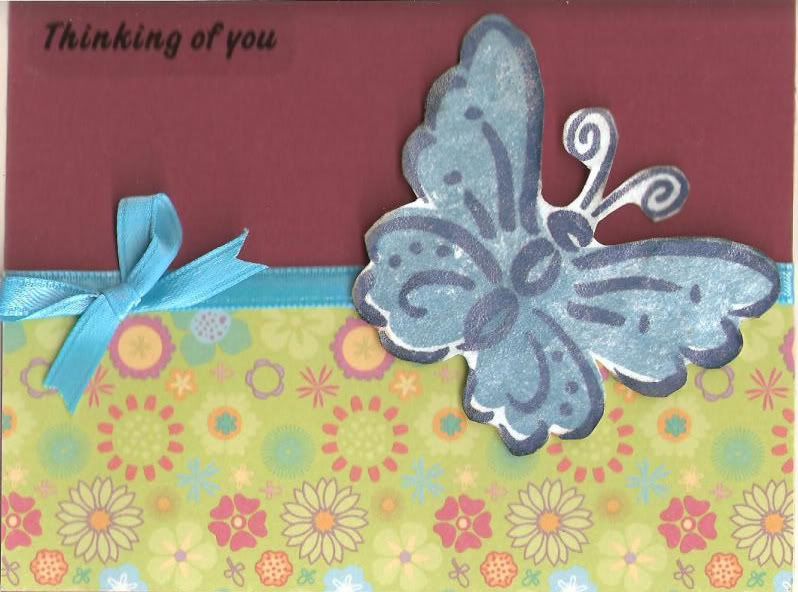
Thinking of You
This card was made using the Don Juan cartridge for the greeting and flower. I stamped the butterfly, colored with gel pens, and popped it up slightly. The paper is from K&Co's Portabella Road and Que Sera collection.


Sunday, May 23, 2010
Still Waiting....
As you know, my Cricut was ordered on the same day that I ordered the Create a Critter and the From My Kitchen cartridges from Jo-Ann's. Well, my Cricut arrived two days after it was ordered and and 11 days later, I'm still waiting on the cartridges. (I do have a tracking number and FedEx has promised them by tomorrow at 3pm. We'll see.) In the meantime, I've been playing with these two cartridges:
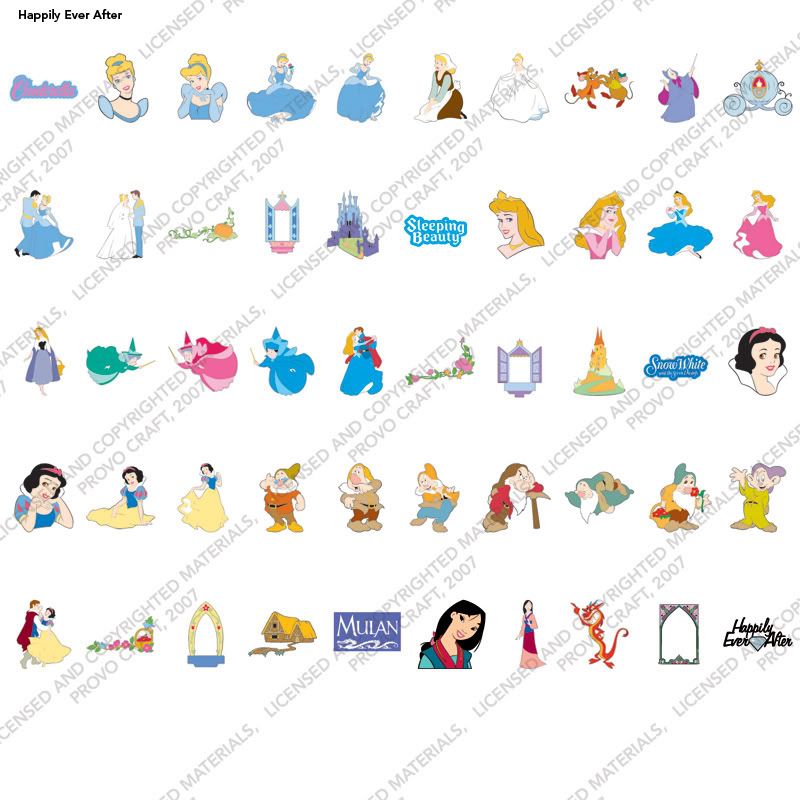
Disney Happily Ever After - lots of neat extras such as windows that will make great decorative frames, flowers, a bucket, broom, scissors, pine tree, watering can, shovel, bird, squirrel, and more. The characters are a little intricate, but I'll work on it.
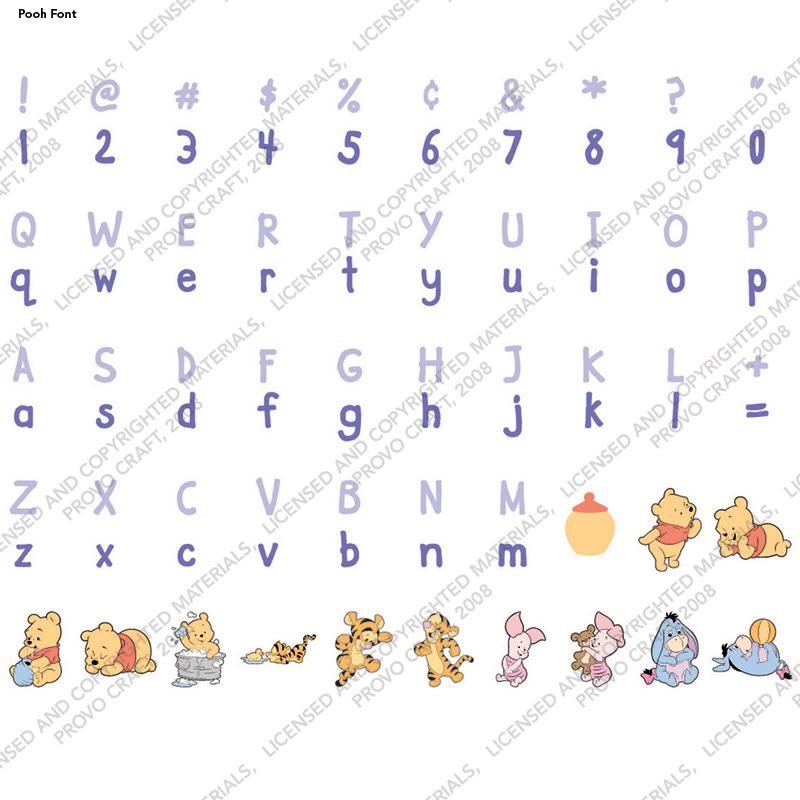
Pooh Font Cartridge-This is a great all-purpose font, similar to the Comic MS font that you're probably familiar with in Word. There are both upper and lower case letters and you can make characters that look like wood or even print the letters on honey pots. Also included are 12 baby Pooh characters! Love it.
I've already made several cards using these cartridges. I will try to get better about labeling by cartridge name. Can't wait till the other two come tomorrow. If there were only more hours in the day! Stay tuned....
Disney Happily Ever After - lots of neat extras such as windows that will make great decorative frames, flowers, a bucket, broom, scissors, pine tree, watering can, shovel, bird, squirrel, and more. The characters are a little intricate, but I'll work on it.

Pooh Font Cartridge-This is a great all-purpose font, similar to the Comic MS font that you're probably familiar with in Word. There are both upper and lower case letters and you can make characters that look like wood or even print the letters on honey pots. Also included are 12 baby Pooh characters! Love it.

I've already made several cards using these cartridges. I will try to get better about labeling by cartridge name. Can't wait till the other two come tomorrow. If there were only more hours in the day! Stay tuned....
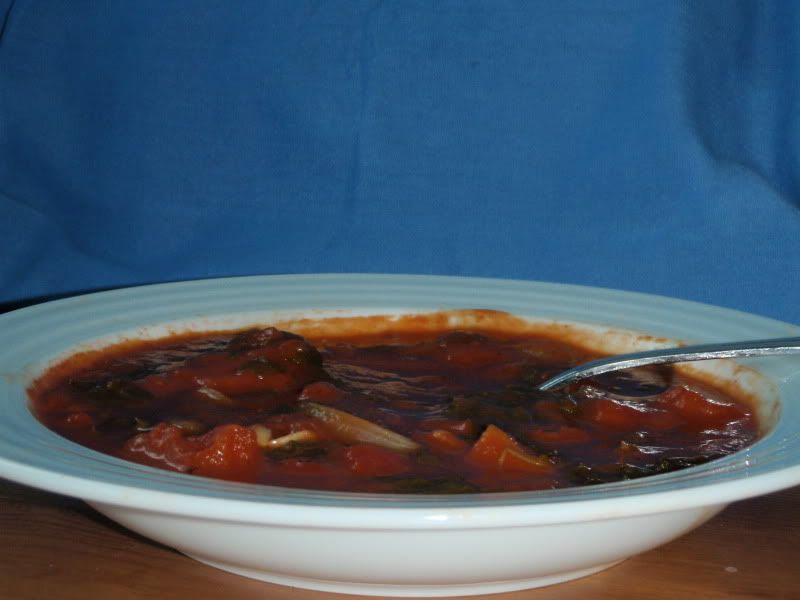
Tomato Spinach Soup
I'm sick and wanted a soup that had green veggies in it. This Rachel Ray Recipe was my inspiration, but I made a number of modifications.
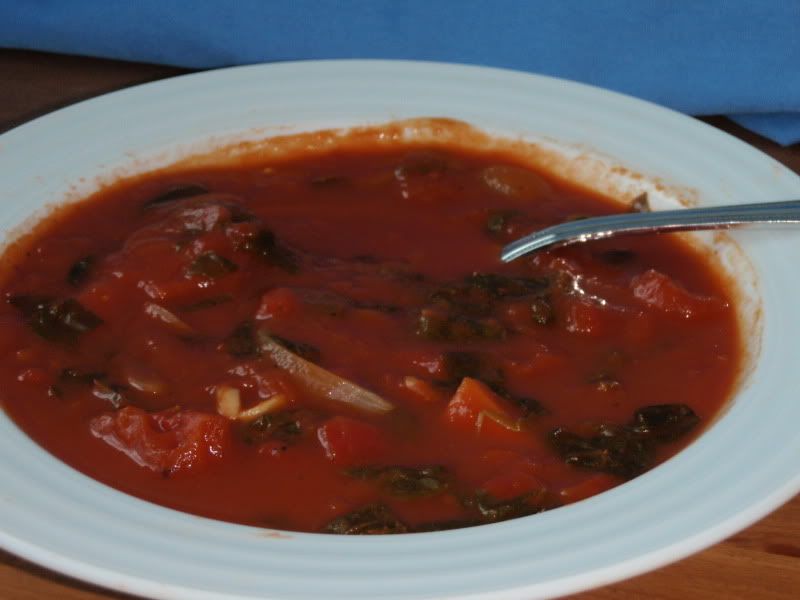
28 oz diced tomatoes, drained
28 oz tomato puree
2.5 c chicken broth
1 large onion, sliced
2 med carrots, diced
3 cloves of garlic, minced
10 oz fresh spinach (I used baby)
salt, pepper, olive oil
2 tsp sugar, if necessary
In a dutch oven over medium heat, saute onions and carrots in olive oil. Continue cooking while stirring often, over med-low until they have caramelized. This should take upwards of 20 minutes. (I got impatient so had to add sugar at the end).
Raise heat and add garlic. Cook for 1 minute.
Stir in tomatoes, tomato puree, and broth. Sprinkle with salt and pepper.
Bring to a near boil and wilt in spinach. Depending upon the size of your pot, this may take some time.
Reduce heat to low and simmer for 20 minutes. Adjust seasoning to taste. (This is where you add the sugar, if necessary).
Serves 6 (about 1 c servings)

28 oz diced tomatoes, drained
28 oz tomato puree
2.5 c chicken broth
1 large onion, sliced
2 med carrots, diced
3 cloves of garlic, minced
10 oz fresh spinach (I used baby)
salt, pepper, olive oil
2 tsp sugar, if necessary
In a dutch oven over medium heat, saute onions and carrots in olive oil. Continue cooking while stirring often, over med-low until they have caramelized. This should take upwards of 20 minutes. (I got impatient so had to add sugar at the end).
Raise heat and add garlic. Cook for 1 minute.
Stir in tomatoes, tomato puree, and broth. Sprinkle with salt and pepper.
Bring to a near boil and wilt in spinach. Depending upon the size of your pot, this may take some time.
Reduce heat to low and simmer for 20 minutes. Adjust seasoning to taste. (This is where you add the sugar, if necessary).

Serves 6 (about 1 c servings)
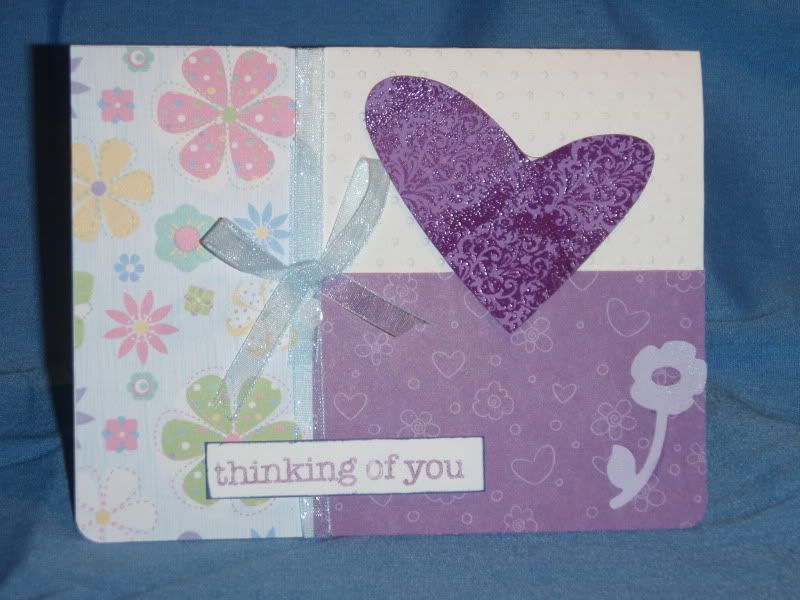
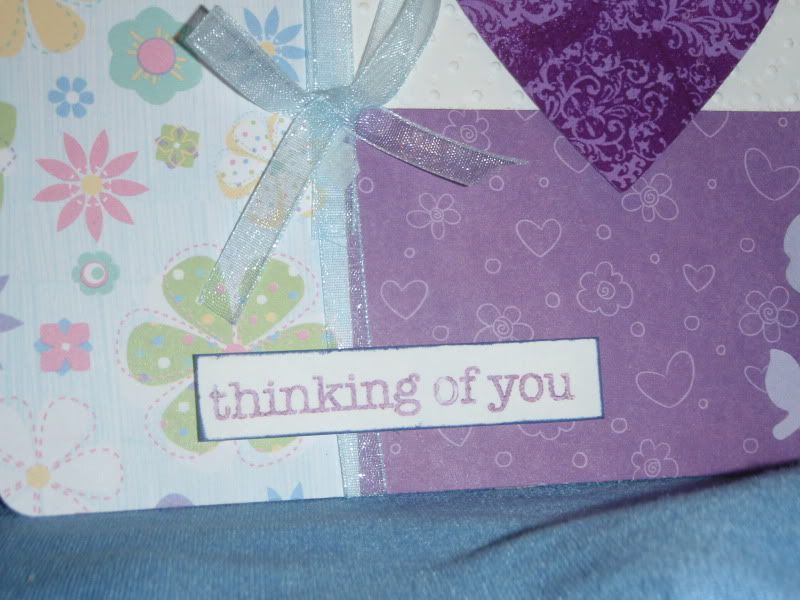
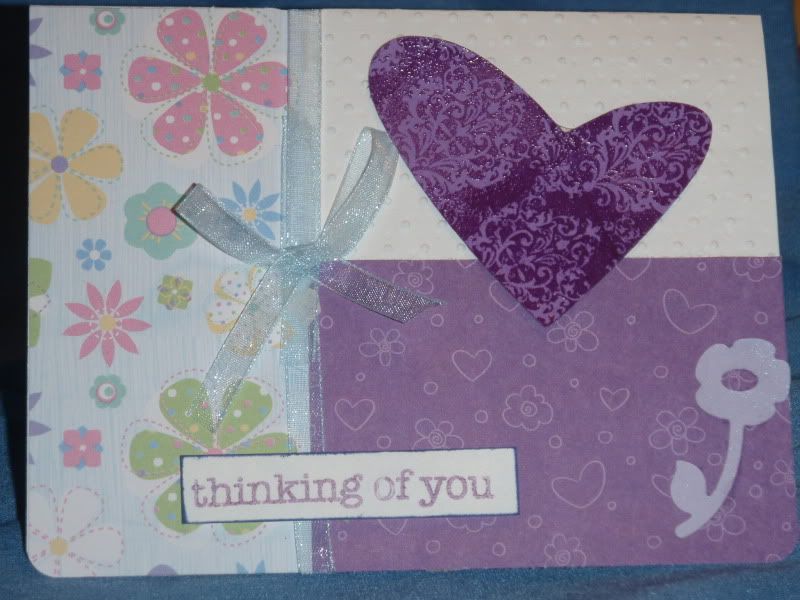
Thinking of You
Hopefully this card doesn't look too cluttered. I kept thinking it needed one more detail, so it wound up being a pretty good medium and technique sampler. The heart is cut using the Don Juan cartridge of my new Cricut at 2 inches, I think. I then stamped a pattern stamp in a purple shade using Studio G ink, then clear embossed it. Michaels had these great background stamps in their dollar bin, so I bought about 5 on Saturday. The only difficulty with them is that they're not clear, so you have to guess where in order to line them up. I had to do both sides of the heart to get it right, but the outcome works, I think. The greeting is stamped using a fantastic Hero Arts clear stamp set called "Everyday Sayings." I embossed the base of the card using a Cuttlebug embossing folder. The flower is punched using my BigKick die-cutting machine, but I'm not sure what Sizzix set it is.


Saturday, May 22, 2010
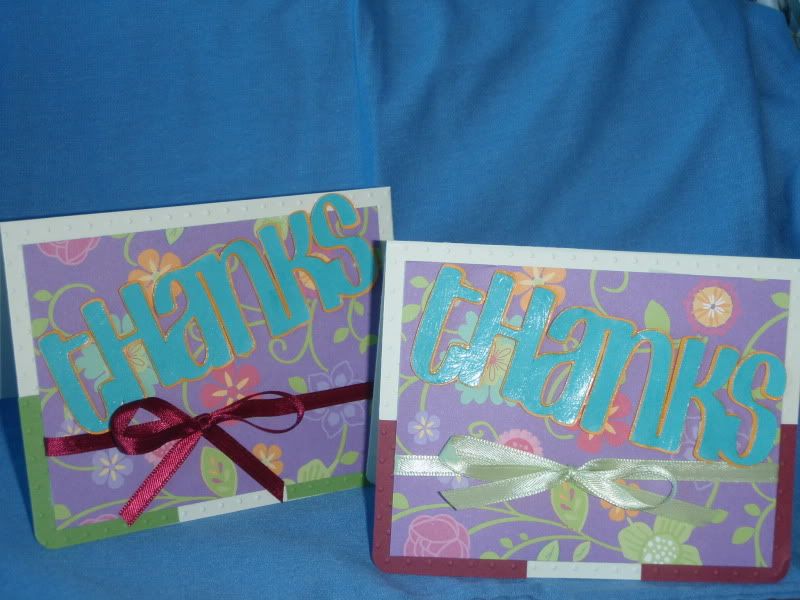
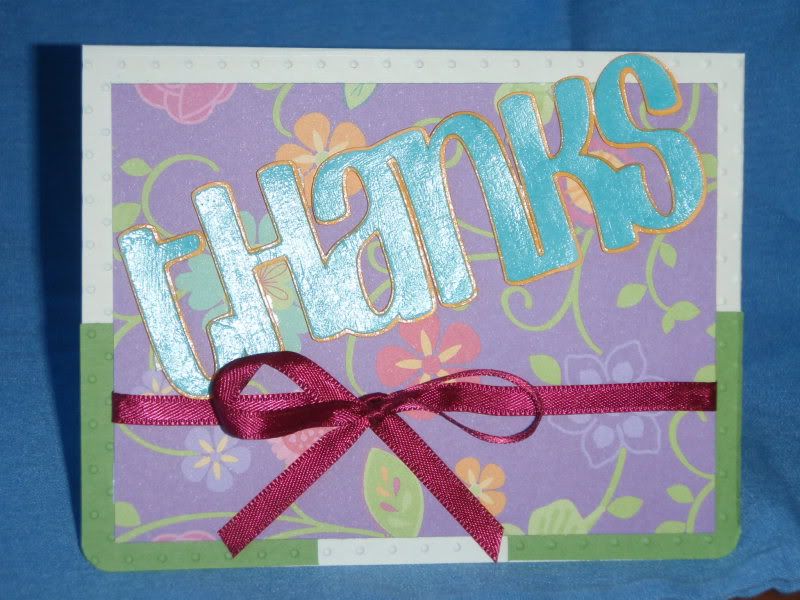
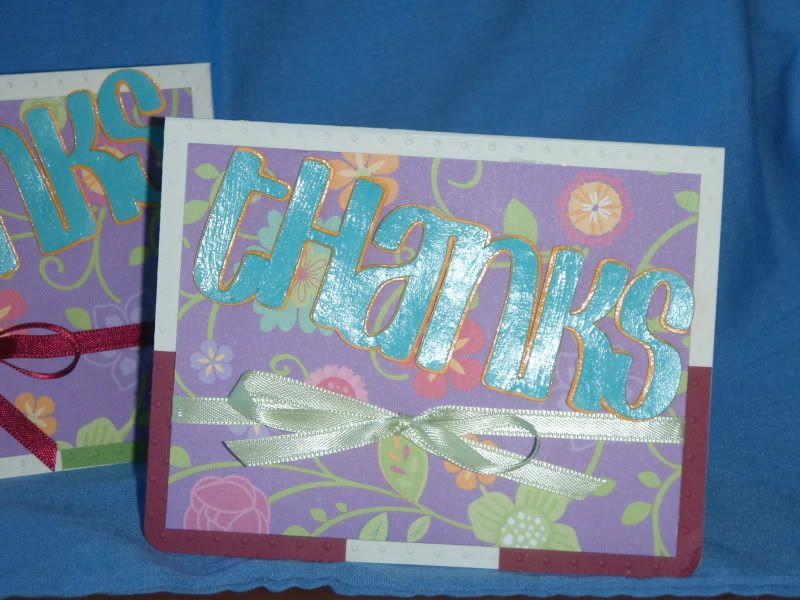
Two More Thanks Cards
Similar to the card I made for my auntie. I used the Don Juan cartridge for the thanks cut at 1.75". It's hard to tell, but I embossed using the swiss dots cuttlebug embossing folder the card after adhering the squares. I mod-podged the sentiment to give it a glossy sheen and mounted it with foam tape.


New look
I was up a little too late last night and discovered something called "Blogger in Draft" which is basically a really simple layout editor. I thought this background was kinda summery, so I will try it out for a bit. Let me know what you think.
Friday, May 21, 2010
Butterfly
I'm absolutely loving this patterned paper, which I think came with a magazine set a year or more ago. The butterfly is from a two-part Stampin Up set that is also years old.

Thursday, May 20, 2010
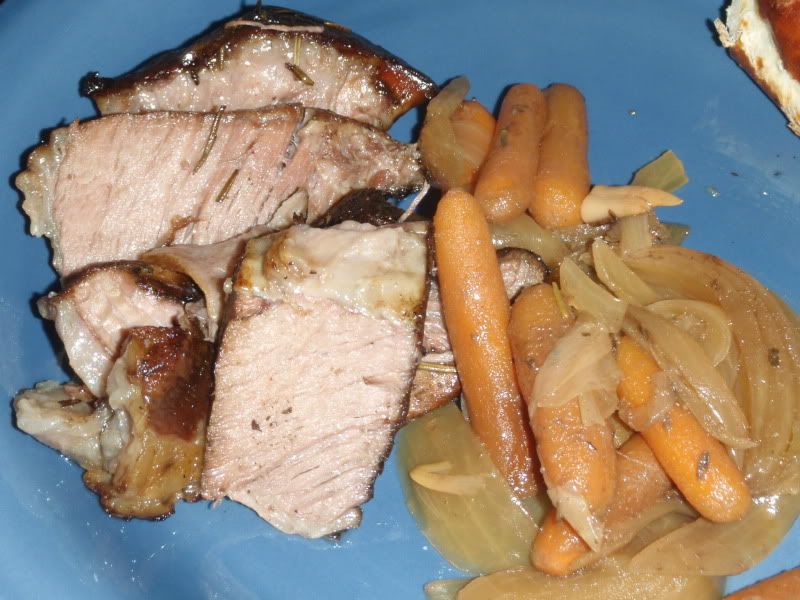
Super Simple Pot Roast
Jewel was having a two-for-one sale on boneless chuck roasts last weekend, so I couldn't help but pick up a couple. However, I couldn't decide what to do and didn't really feel like doing anything too creative, so I made a simple as can be roast. It was yummy! No gravy or additional seasonings required. One caveat should be made. While I cooked it for 8 hours, I was a tad late getting home from work, so it sat on warm for more than two hours. I do not recommend that! The meat is nice and moist right out of the crockpot, however I expect it will require a bit of doctoring upon reheat. Enjoy!
2 lb boneless chuck roast
2 c sliced onion, about 2 medium
8 cloves garlic, smashed and peeled but mostly whole
16 oz baby carrots
1 tsp dried rosemary
1/2 tsp dried tarragon
1 tsp salt
1 tsp pepper
3/4 c beef broth
Sprinkle meat with salt and pepper. Brown in an extremely hot pan in olive oil on all sides.
Place veggies in the bottom of the crockpot. Sprinkle with remaining salt and pepper.
Place meat on top of veggies.
Mix herbs with beef broth and pour over meat and veggies.
Cook on low for 8 hours until meat is tender.
Serves 4-6.
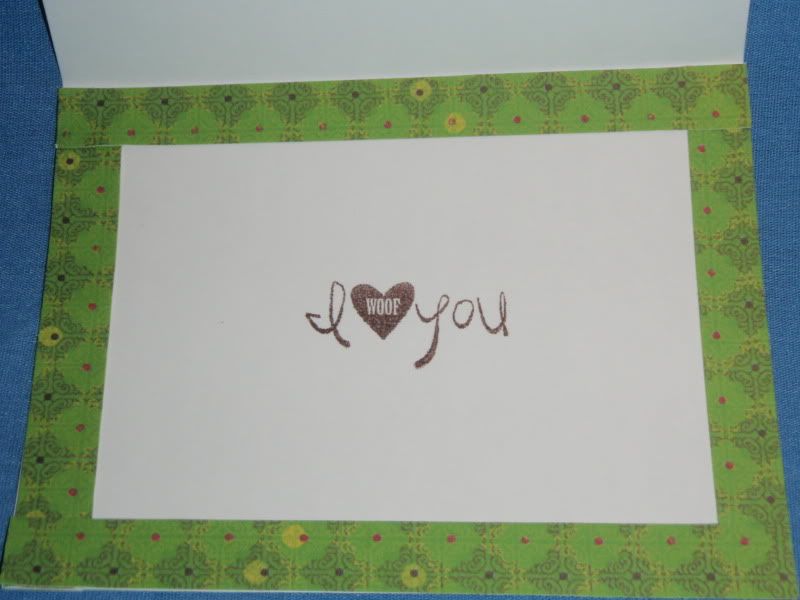
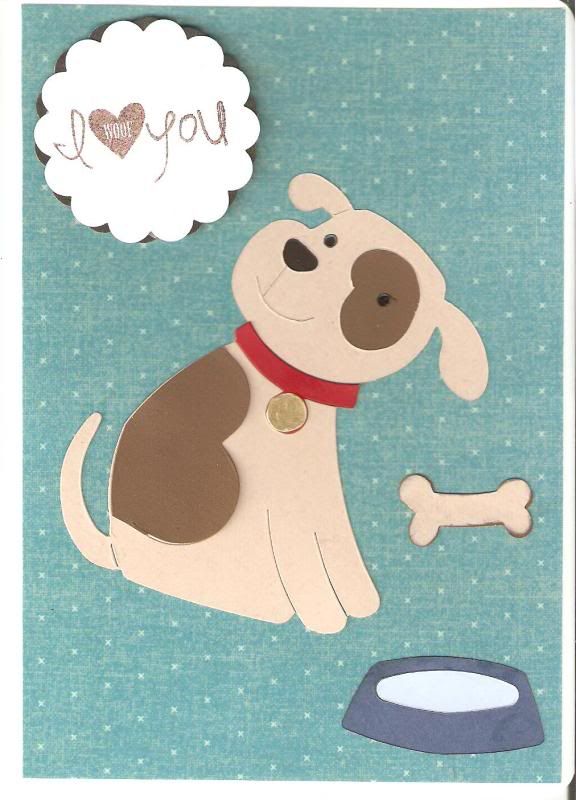
I Woof You!
I sent this card to my husband just after he deployed to Afghanistan. He loves his brother/sister-in-law's gigantic dog (who looks nothing like this guy), but I thought he'd like the sentiment, which is a clear stamp I found in the Michaels dollar bin. The dog was made using colored cardstock from the Paper Co and a Sizzix Originals die. Everything but the gold medallion on his collar, which I colored, was layered. (I have issues with layering and often use single-layer die cuts. However, I have vowed to improve upon this, especially with my very first Cricut machine!!!) Back to the card--I painted a little rock candy crackle paint on the bone and the water. It looks cuter on the bone than the water, but he won't mind. I used a 2" scallop punch, although I'm not sure who made it. The greeting is popped up using foam tape.

Wednesday, May 19, 2010
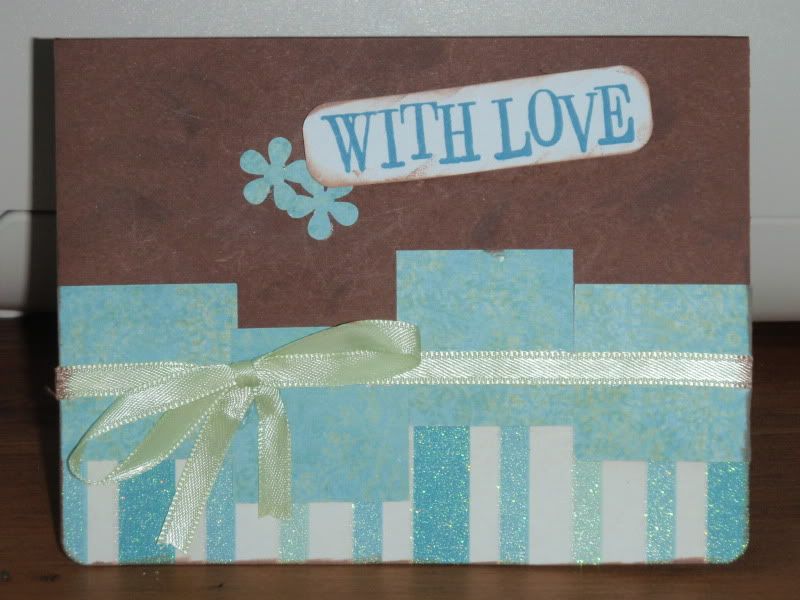
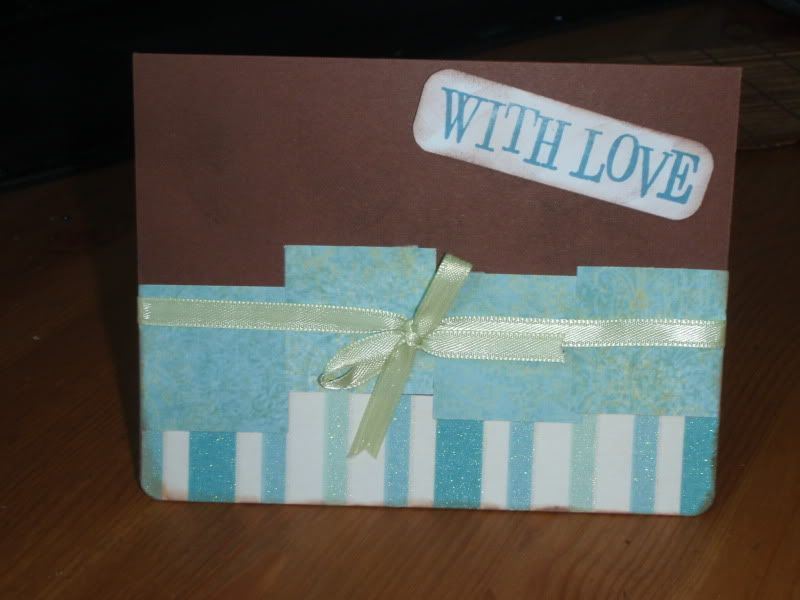
With Love Cards
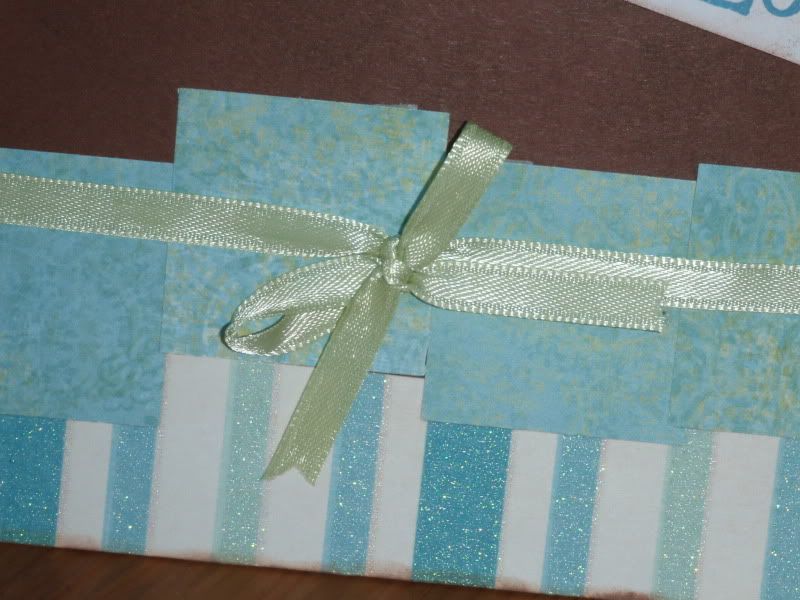
These two were made using K&Co's Que Sera Sera paper and a border strip from an older DCWV paper on brown cardstock from The Paper Co. Ribbon is a mint green from the 50 cents stuff from Michaels. (It picked up some of the colors in the squares.)I distressed the edges using colorbox ink in chestnut roan. The squares were made using the Marvy Uchida 1.5" square. I popped up the sentiment with foam tape.
Here's the first one.
And the second.
Here's the first one.

And the second.


Tuesday, May 18, 2010
Fairies
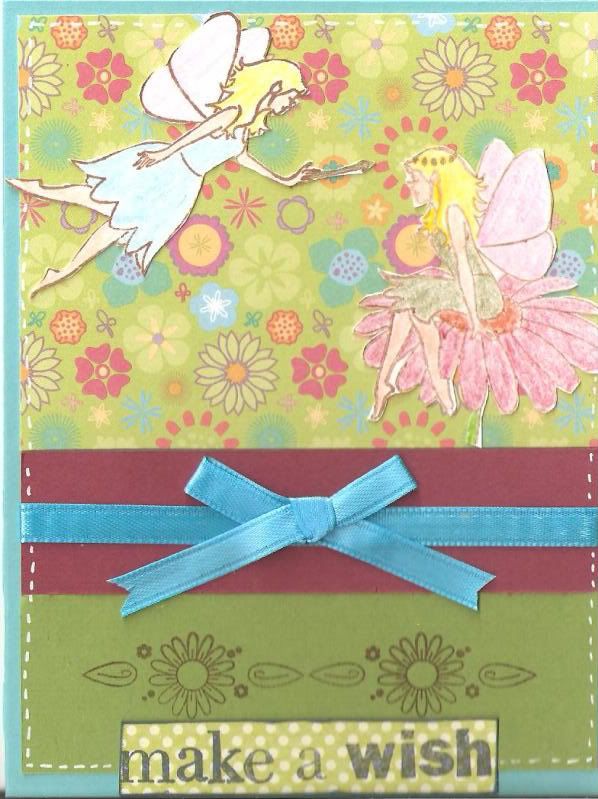
The stamps were free from Papercraft Inspirations a couple of months ago. I colored them in with pencils, but am thinking of investing in watercolor markers or crayons, or other fancy pens.

Monday, May 17, 2010
Clean Out the Fridge Veggie Marinara

I was initially very hesitant to post this recipe as it involves a rather sketchy ingredient. I googled that ingredient with spaghetti and found a number of "depression-era" and 1960s recipes.
Then I tasted it. It's really tasty, so I had to share. If you think about it, I'm not too surprised that it added the taste I was looking for as it contains tomatoes, vinegar, onion, garlic, and other spices.
No guarantees that my results are capable of reproduction. This dish began by me discovering a lot of veggies in my fridge left over from last week that would soon go bad, especially the cherry tomatoes, and throwing them all together in the same dish. Yes, cherry tomatoes are not usually the first go to ingredient in a pasta sauce, but they worked. As for the questionable ingredient, I discovered that I didn't have any canned tomato sauce or tomato paste to loosen up the sauce, I improvised.
Any here goes--measurements are approximate as I tossed in what I had.
12 oz cherry tomatoes
10 oz sliced mushrooms
1 c broccoli, steamed
1/2 c diced onion (about 1/2 medium)
2 cloves of garlic, minced
1/3 - 1/2 c ketchup
1/2 c chicken broth (or more)
1 tsp dried oregano
1/2 tsp dried parsley
salt, pepper, olive oil
Toss tomatoes in salt, pepper, and olive oil. Roast in a 400 degree oven for about 15 minutes until the tomatoes begin to shrivel and can be smushed with gentle pressure.
Meanwhile, saute mushrooms in olive oil over medium until brown and most of the excess moisture has evaporated. Sprinkle with salt and pepper. Set aside.
Next, saute onion in olive oil until soften. Add garlic and cook for 1-2 minutes. Sprinkle with salt.
Add tomatoes, mushrooms, oregano, and parsley to the onion mixture. Cook on medium low for 5 minutes.
Stir in ketchup and chicken broth. Continue adding broth until the sauce is the consistency desired. Cover and simmer on low until pasta is ready and broccoli is steamed, about 10 more minutes.
Serves two
I had mine over whole wheat spaghetti with a sprinkle of parmesan cheese.

Father's Day Card
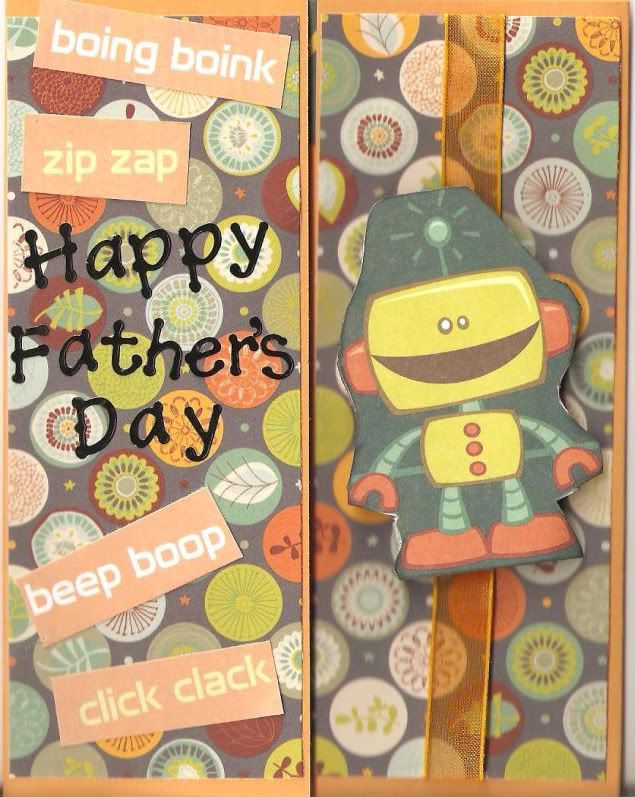
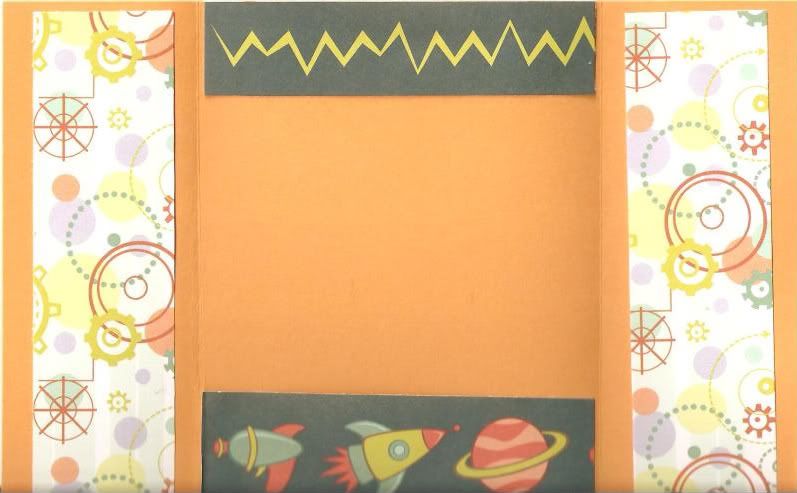
I purchased this paper from Michaels about a week ago. It's Recollections' "Rockets and Sprockets" paper line. While its makers probably envisioned it as for a little boy, I thought it would do for Father's Day. Still on my gatefold card kick, I got the idea from a Youtube video by Christina from Creations with Christina. She used the paper from that popular monster line and the Cricut cartridge, which is super cute but I don't have it yet and couldn't find the paper. This guy makes me think of the Jetsons.
Here's the inside.

Here's the inside.

Sunday, May 16, 2010
Trying to improve
As you may know from my recipe blog, TheFishie's Kitchen, I am well aware that I need to improve my photography skills in order to show off my work. I have not yet decided whether I will get snazzier camera equipment or take a class, but am at least attempting to pay attention to things such as perspective, lighting, detail and angles. Thus going forward on this blog, where possible, I will not just simply scan my cards, but actually prop them up against a backdrop and take pictures showing different parts of the card. To that end, I re-shot the photos of the Mother's Day card I posted last week using this "new" method for me. (Not a total gem because I still have major lighting issues, but some improvement.). Thanks for looking!
First Cricut Card - Thanks
As you know, I just got my very first Cricut machine yesterday and love it. Here's a quick thank you card that I whipped up to send to my very thoughtful and generous auntie. The "thanks" is cut using the Don Juan cartridge that came with my Cricut at 2 inches. It is matted on the same word shape cut using the "shadow" feature button. I glossed it up with some Modpodge and popped it up using foam tape. The heart brad is Basic Grey and the paper came in a magazine last year. The tissue paper is from Stampin Up (I know this because I got it from a friend who exclusively had Stampin Up stuff), but I have no idea what it's called. I punched two layers using a scallop punch and then sort of ruffled it to make it look more like a flower. A couple random stickers from my stash rounded it out. Hope she likes it.
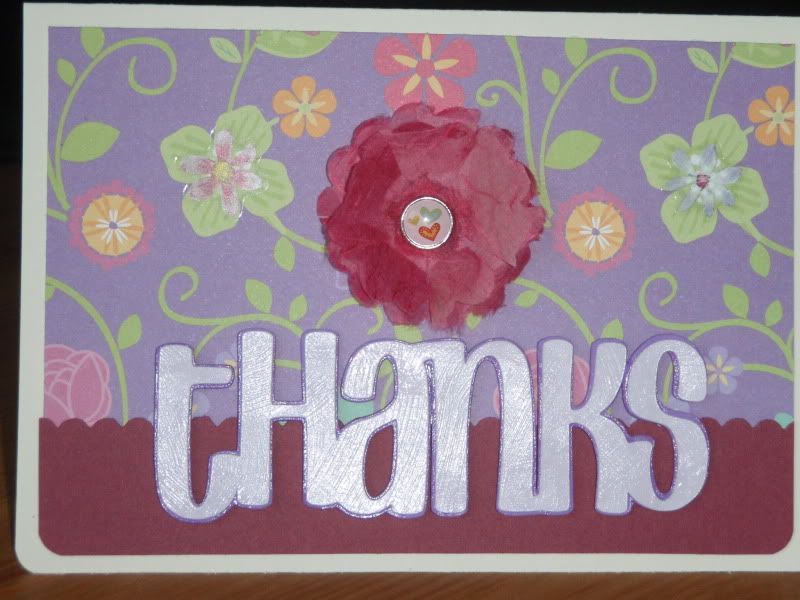
Sorry for the uncentered shot. Of the several pictures I took, this wound up being the only one that picked up the glossy sheen.

Sorry for the uncentered shot. Of the several pictures I took, this wound up being the only one that picked up the glossy sheen.
Saturday, May 15, 2010
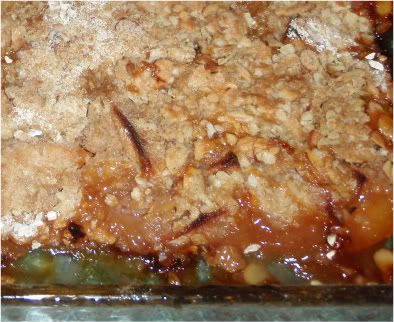
Peach Apple Crumble
Yay. Finally a new recipe! It's not quite summer, but the start of the farmer's markets and graduation got me thinking about summer food, namely pies. However when an occasion arose to make a dessert, I didn't really have time to do a pie crust and peaches definitely aren't in season. Then the idea came to me to bake a crumble--no pie crust so it whips up faster with less carbs--but something that would taste a lot like a pie. I was initially inspired by this month's Bon Appetit which has some sort of crumble or crip, but not in the flavor's I wanted. So I hit the internet to find what I needed. The following recipe was adapted from this one here. I modified the measurements and added ingredients.
Fruit mixture
1.5 lbs peaches, sliced 1/2" (16 oz frozen will do, I used about a bag and a half)
1.5 lbs Granny Smith apples, or other tart apple, peeled and sliced 1/2" thick.
1/2 c granulated sugar
1.5 tbs cornstarch
1 tsp cinnamon
Juice of half a lemon (1-2 tbs)
1 tsp lemon zest
pinch of salt
Topping
1/2 c all-purpose flour
1/2 c brown sugar
1/2 c oatmeal (quick oats)
1/3 - 1/2 c thinly sliced almonds
1/4 c butter, cut into small pieces
1/2 tsp cinnamon
Directions
Preheat oven to 400 degrees.
Spray 10" square pan with cooking spray. (I made the recipe using a 9 x 13" and the result was a little thin.)
Combine the apples, peaches, lemon zest, lemon juice, granulated sugar, and cornstarch. Toss well and pour into baking pan.
Bake for 45 minutes until fruit is easily pierced with a fork.
Meanwhile all ingredients for topping. Use a pastry knife or your hands until the mixture resembles coarse sand.
Sprinkle topping evenly over the baked fruit. (NOTE: this amount of topping was more than adequate for my 9x13" pan. You may have leftover topping, which should be discarded.
Bake for 15 more minutes until topping is golden brown. (You may still have floury patches. Just cover the crumble with tin foil for about 10 minutes and the steam will do the work.)
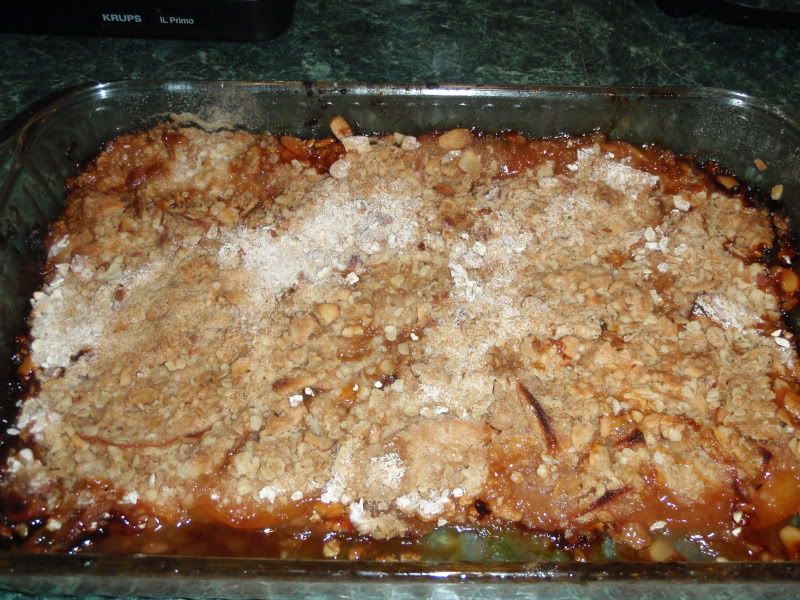
serves 6-8
It's here, it's here, it's here!!!
My Cricut Create die-cutting machine arrived yesterday--much appreciation to the Amazon vendor Craft-E-Corner for getting it to me with free shipping in a day! (The product shipped from Wisconsin and I'm in Illinois. They made no representations as to speedy shipping, so I may have just been lucky.). Of course I stayed up much of the night trying it out. Thank goodness it came with a cartridge as Joann hasn't even shipped my order yet. Oh well, patience is a virtue, right?
Without further ado, here it is:
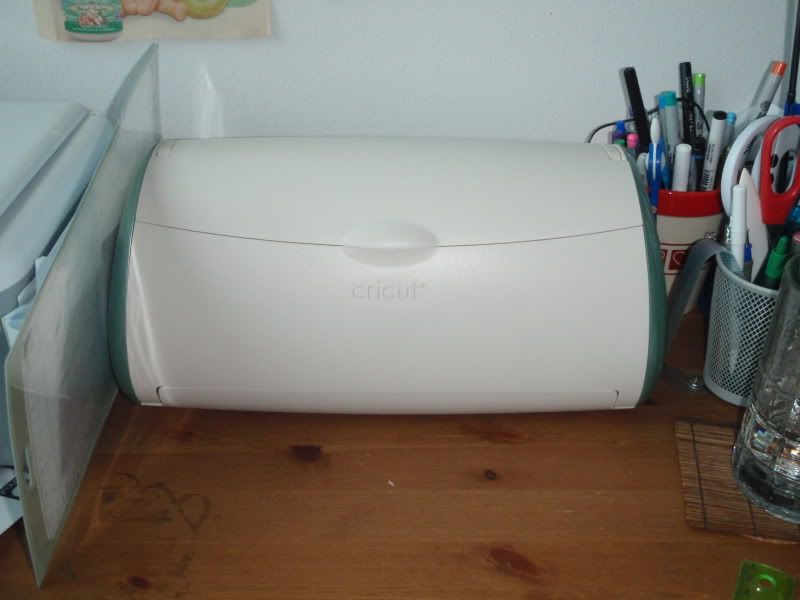
Nice and compact on my desk.
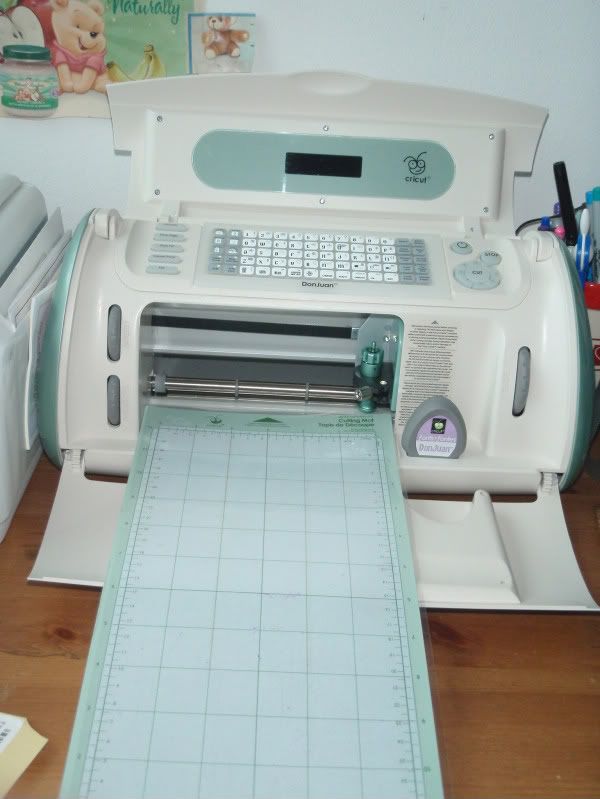
Gently lifting the lid pops it open. The device also has a handle for travel that hides nicely in back. (Ignore the pooh in the upper lefthand corner. Yes, it is an ad for baby food, but was too cute not to cut out.)
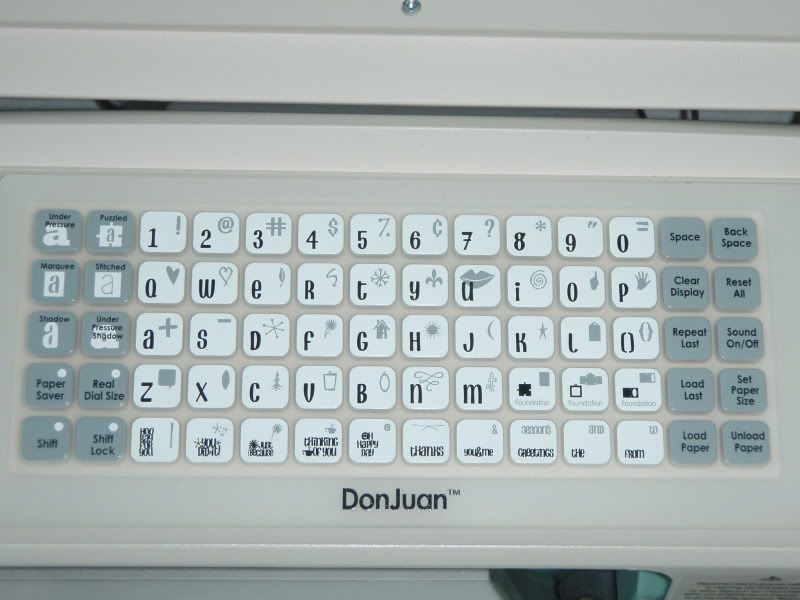
Closeup of the cartridge that came with it. There are so many different shapes to be cut using a combination of gray buttons (much more than the 100 shown on the keypad). Despite the hours I've spent with it, I certainly have much more to discover.
Love it, love it! Thank you so much Maryann! The card I'm sending you will appear in tomorrow's post.
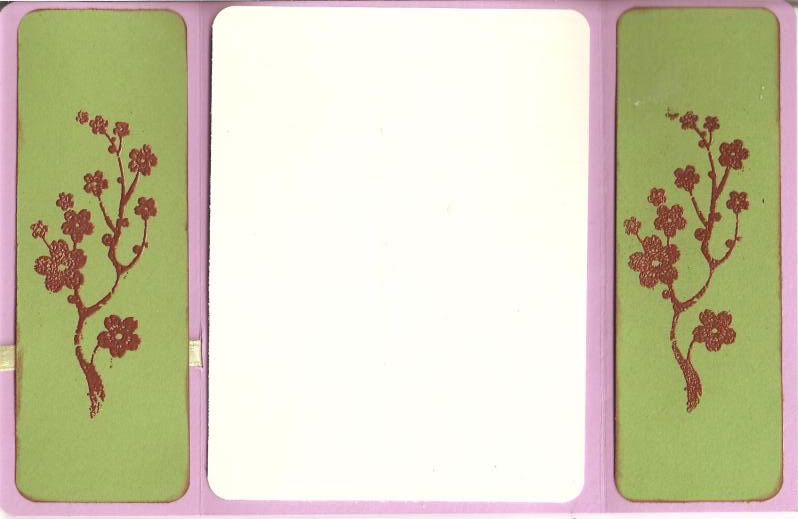
Another Gatefold
Here's another gatefold card. I used K & Co paper and some diecuts that I received free with a Papercraft Inspirations mag a few months ago.


Friday, May 14, 2010
Hang in There Monkey
I absolutely love these colors. Also, I had been wanting these Jungle stamps by the Paper Co.
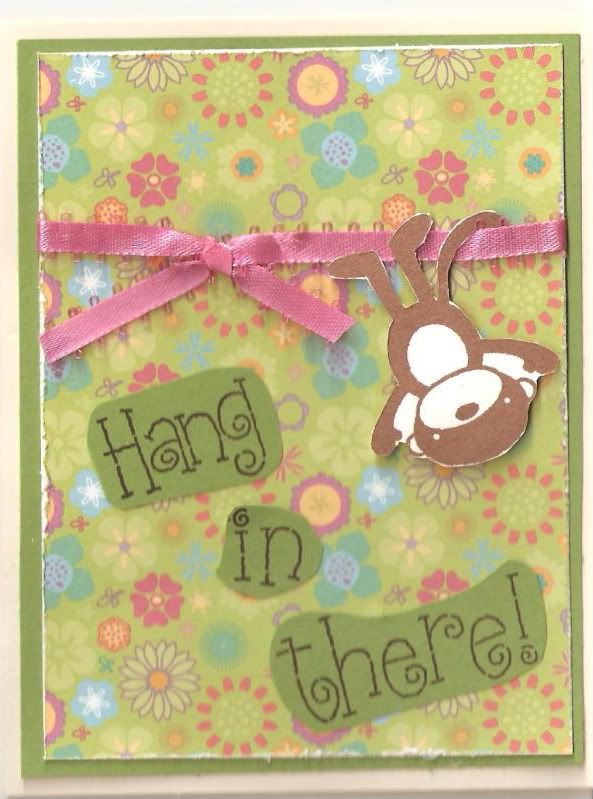
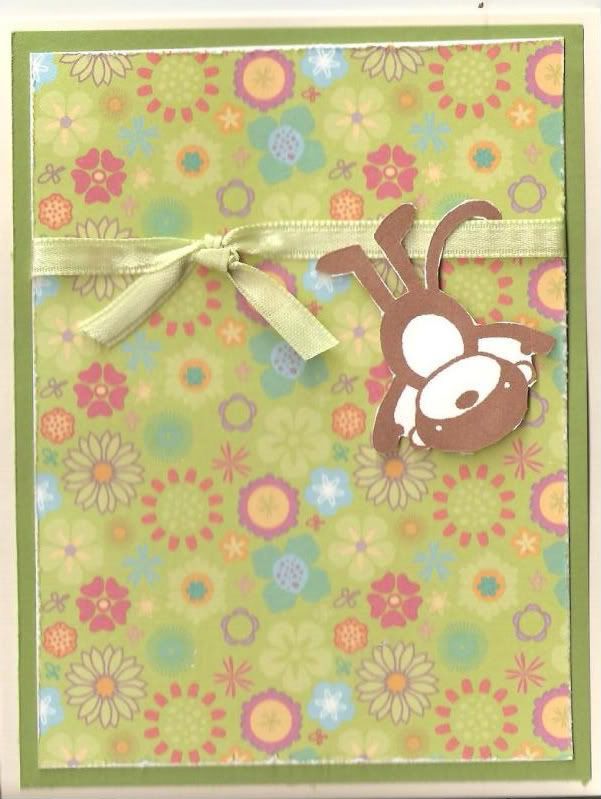
This time I put the greeting on the inside.
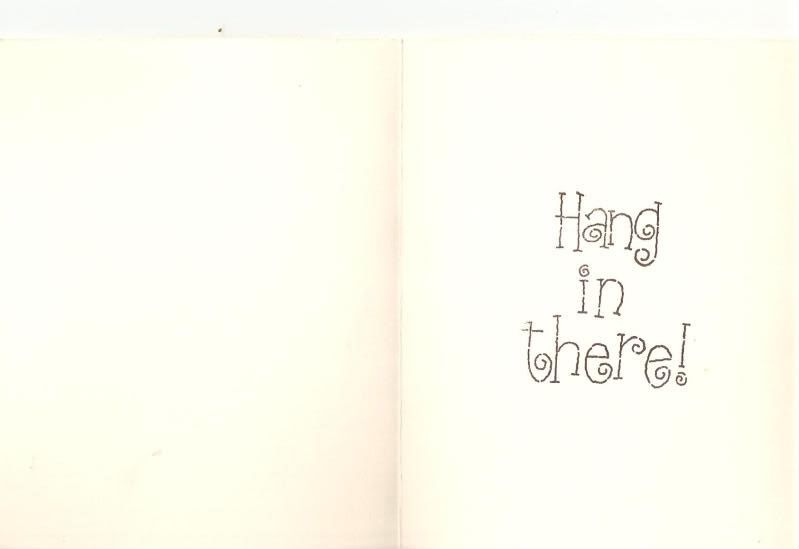


This time I put the greeting on the inside.

Thursday, May 13, 2010
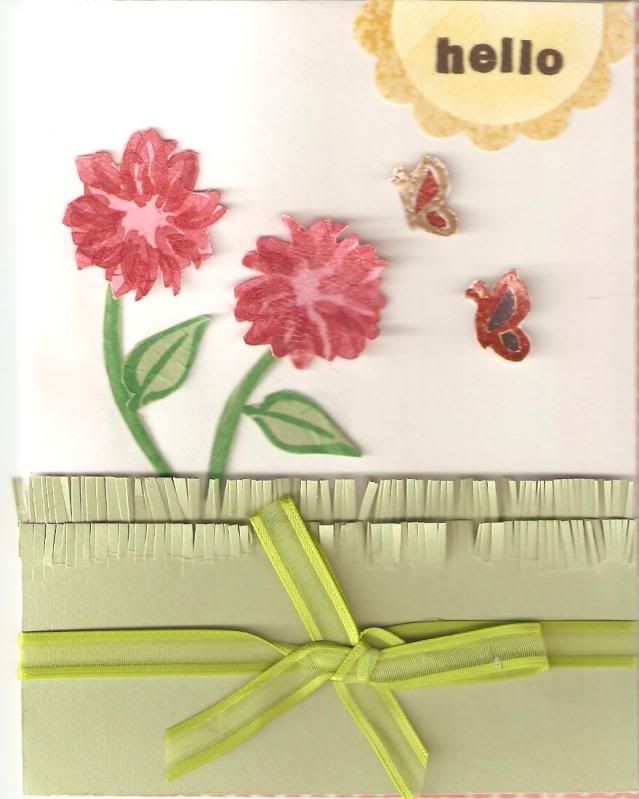
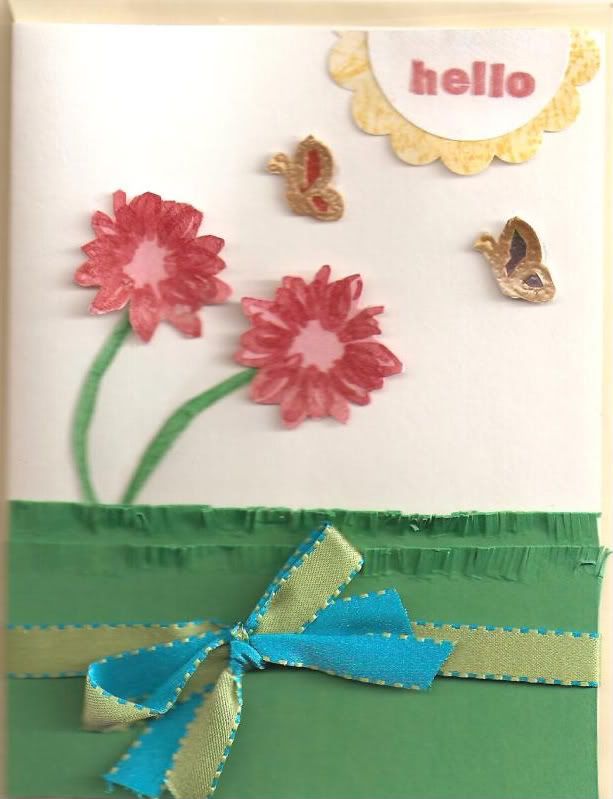
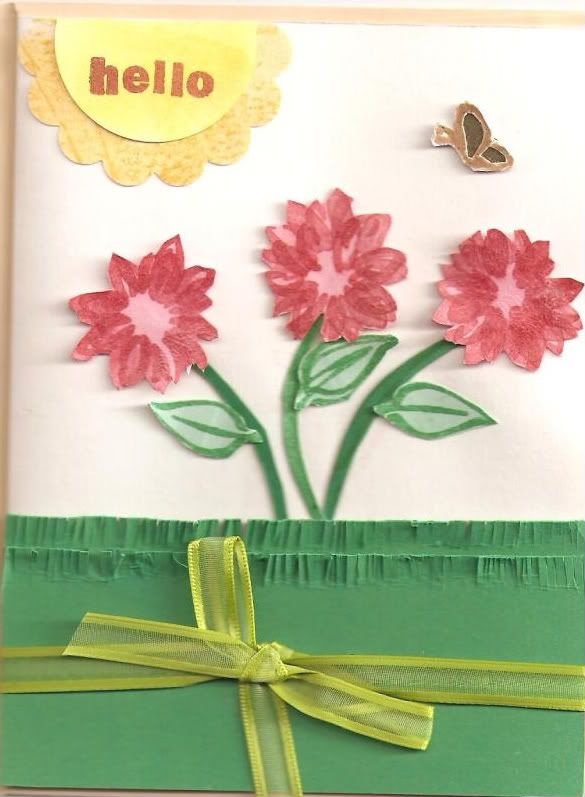
Flowers and Grass
I saw a Youtube video using this technique for grass, but naturally couldn't find it when I went back to look. I'm sure Youtube tracks viewer history, but it's long gone now--I watch a lot of Youtube. I also recently got a heat gun and can finally emboss properly.


I Can't Wait!!!
This is what I'm anxiously awaiting in the mail:
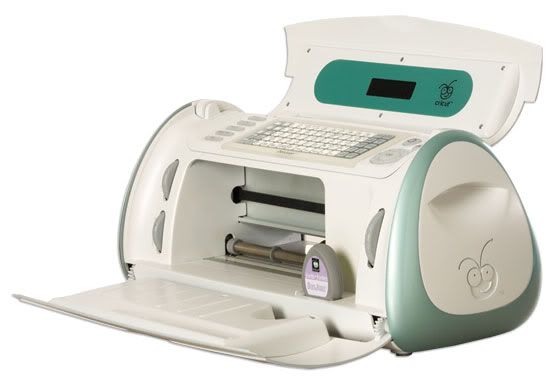
It's called the Cricut Create and is an electronic die-cutting machine. I'd resisted for about two years, but couldn't help myself.(It's also a gift from my wonderful auntie, which makes it all the sweeter.) I opted to go with the smaller model given that I have limited space.
As Joann's is having a sale, as soon as I learned it was on the way, I ordered these two cartridges:
Create-a-Critter
and
From My Kitchen
Many adorable cards and pages to come. Have I mentioned that I can't wait?!!!

It's called the Cricut Create and is an electronic die-cutting machine. I'd resisted for about two years, but couldn't help myself.(It's also a gift from my wonderful auntie, which makes it all the sweeter.) I opted to go with the smaller model given that I have limited space.
As Joann's is having a sale, as soon as I learned it was on the way, I ordered these two cartridges:
Create-a-Critter

and
From My Kitchen

Many adorable cards and pages to come. Have I mentioned that I can't wait?!!!
Subscribe to:
Posts (Atom)