I whipped this up this morning to have with my Teddy Bear bread. It's super simple, but oh so yummy! As soon as it hardens, I will hopefully post pictures, but I wanted to jot down the recipe while it was still fresh in my mind.
Honey Cinnamon Butter
1/2 cup butter, softened
1/4 c honey
1 tsp cinnamon
pinch of salt
Whip all ingredients together with a silicon spatula or spoonula. Use immediately or wrap tightly in plastic wrap in the shape of a log. Serve with your favorite bread, muffin, bagel, etc.
NOTE: The honey seemed a bit overpoweringly sweet at first, so I added more cinnamon. I seem to remember that the sweetness becomes more muted as the butter solidifies, so I am not recommending reducing the amount at this time.

Monday, February 20, 2012
Teddy Bear Challah Bread (Breadmaker Instructions)

Happy Presidents' Day! Maybe I should have put a cute little Uncle Sam hat on this guy or at least given him a flag, but I think he's cute enough as it is. On Saturday I posted that I intended to make bread and soup that afternoon. Well, somehow only the soup was made and I didn't make this bread until Sunday. It was well worth the wait as he's both CUTE and yummy. Oh, and this way there might be a little left for my husband to try when he returns home from his trip.
I found this recipe on Sweet Happy Life and basically only modified it to work with my breadmaker. Absolutely no muss or fuss with my breadmaker. I had originally intended to make two smaller bears with this recipe but I got a little impatient when putting him together that it seemed easier to make just one. Also in my impatience, I forgot to make a nose or belly button as shown in the original recipe. Goals for next time!
Teddy Bear Challah Bread

1 cup milk (whole is recommended)
2 eggs (+ 1 for the glaze)
1/2 tsp vanilla extract
4 TBS of olive oil (+1 tsp for glaze)
1 TBS honey
4 to 4 1/2 cups all-purpose flour
4 TBS granulated sugar
1 tsp salt
1.5 tsp active dry yeast
Raisins for decorations
If you have another method for adding ingredients to your breadmaker, go for it. Mine works best if all the wet ingredients are in the base of the pan, as to prevent the yeast from becoming activated too early I assume. (I just know that if I put the honey on top, sometimes my loaves of bread have dimples which is only cute to a point ;). Since I use the preheating stage, I slightly beat my eggs into the milk mixture. Set machine to "dough" cycle and plan your bear design.
Once the dough is ready, turn out onto a floured surface. Shape your bear. The original recipe recommends using 1/2 of the dough for the tummy, 1/4 of the dough for the head, and the other 1/4 for the hands, feet, ears, and nose. I kinda winged it (and forgot about the poor bear's nose).
Cover bear loosely and let rise for 30 - 40 minutes, until almost doubled in size.
Preheat oven to 350 degrees.
Cut small slits for the bear's eyes, nose, and belly button and insert raisins or other dried fruit of choice. Whisk together egg and 1 tsp of olive oil and brush liberally over bear.
Bake for 30 minutes or until bear in golden brown and sounds hollow when thumped.
Transfer to a cooling rack.
Makes one loaf or large bear.

Saturday, February 18, 2012
Tags, Bags, Boxes and More 2 !
I absolutely adore Pinterest. Saving ideas and pictures with a click of a mouse, brilliant! In today's post, I'm using Pinterest to show you an image of one of the a new Cricut cartridges just debuted on Hello Thursday this month. It's called Tags, Bags, Boxes and More (TBBM) 2 and looks super versatile. I got my first Cricut almost two years ago, sadly after the first TBBM cartridge was headed towards retirement. Fortunately, Cricut offered a great deal to encourage people to buy Gypsy machines--5 free cartridges included the retired TBBM. I won't say I use it super often as I'm kind of a new cartridge junkie (or at least I was before I imposed a bit of a ban on shopping a while ago), but it's a great resource for those necessary shapes. TBBM2 looks a little edgier and less basic, but that's what makes it even more exciting. Can't wait to get my hands on this one:

Source: cricutblog.org via thefishie on Pinterest
What's Cooking on This Bright and Sunny Day?
Happy Saturday! Somehow a tidy kitchen and freezer makes me want to cook. (Note to self: Next time you decide to organize the freezer, wear gloves!). I decided I would put my appliances to work for me and I already have a wonderfully nutritious batch of my Slowcooker Garden Minestrone bubbling away in the slowcooker. This recipe is an awesome way to use up veggies that are starting to go.


Source: thefishieskitchen.blogspot.com via thefishie on Pinterest
Later this afternoon, I plan to make this adorable guy using my breadmaker!
Source: sweethappylife.com via thefishie on Pinterest
I hope you're having a wonderful Saturday. Please cross your fingers that I'll see some snow this evening. It's not looking good despite the storm that's supposedly heading our way, but a girl can hope.
Friday, February 10, 2012
Chocolate Cinnamon Rolls
Happy Friday. Here's great chocolate cinnamon roll recipe that I found from The Naptime Chef. It's ooeey-gooey chocolatey goodness. I didn't even make the vanilla glaze provided in the original as they didn't need it. These are definitely a chocolate roll, as opposed to a cinnamon roll (I'm still looking for the perfect recipe for that). I must warn you that this recipe makes a ton, at least two dozen. Half went in my freezer...and the other half were devoured in two days. Naturally, I used my breadmaker for the dough but the original recipe has directions to use your stand mixer. Enjoy!
Chocolate Cinnamon Rolls
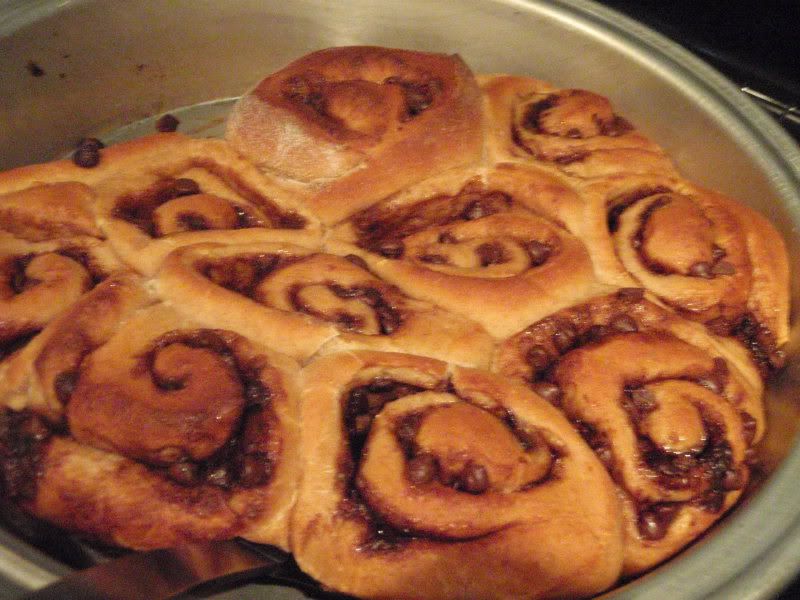
Dough
1 cup milk
3 TBS butter, melted
3 3/4 cups all-purpose flour
1/2 cup sugar
2 tsp ground cinnamon
1 tsp kosher salt
1 large egg, slightly beaten
2 1/4 tsp rapid-rise yeast
Filling:
3/4 cup light brown sugar
1 TBS ground cinnamon
1/2 stick butter, softened
1/2 cup mini chocolate chips
In my breadmaker, I added the ingredients in the order listed. The egg was a little tricky since it's important for the yeast not to get wet. I just made sure that my mountain of flour that held the yeast was tidy. Set breadmaker to "dough" cycle.
Mix brown sugar, cinnamon, and butter.
Roll dough into 14×12 rectangle. Spread the butter mixture over it, leaving a half-inch border all the way around. Then evenly sprinkle in the chocolate chips. Roll up the dough lengthwise and cut it into ½-inch wide slices.
Cover rolls with a towel. Allow them to rise for at least one hour.
Preheat oven to 375 degrees. Bake for 20 minutes until they are golden brown.
Makes about two dozen rolls.

Monday, February 6, 2012
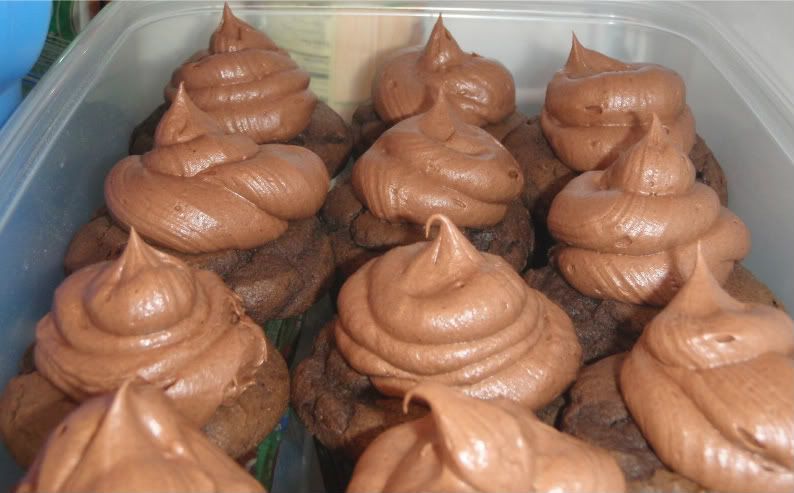
Chocolate Cupcakes with Chocolate Cream Cheese Frosting
As I mentioned yesterday, we were invited to a Superbowl party. Yes, neither my husband nor I have much interest in football, however I'll leap at at any opportunity to cook or bake something new. Since the hosting family has a bunch of kids, I immediately thought of cupcakes. These chocolate cupcakes appeared in Hello, Cupcake! by Karen Tack & Alan Richardson. The icing is an amalgamation of several cream cheese frosting recipes I saw online, and turned out quite nicely if I do say so myself. The cupcakes were super light, which was wonderful, but a bit crumbly. I'm hoping I simply overbaked them a bit so won't throw this recipe out just yet. I definitely overfilled the cupcake pan, which may have led to a longer baking time than advisable.
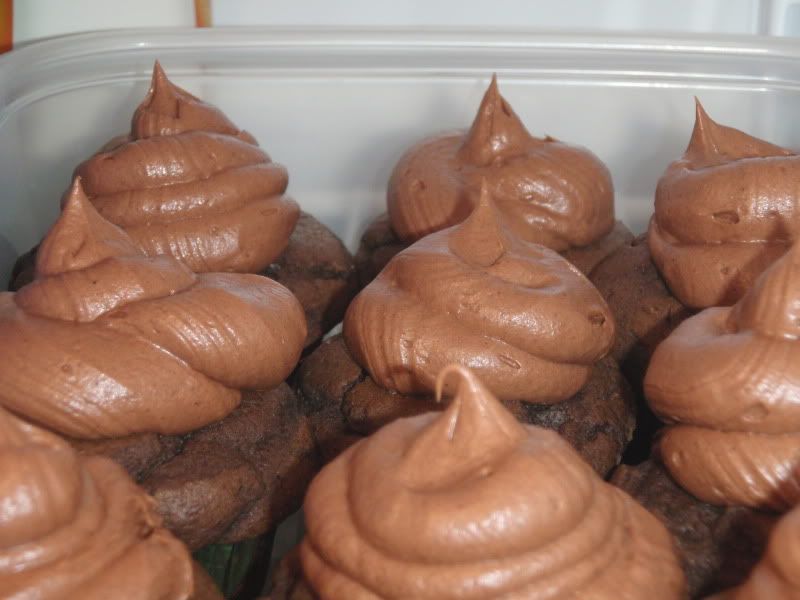
Chocolate Cupcakes
1 3/4 c all purpose flour
1/4 c unweetened cocoa powder
3/4 tsp baking soda
1/2 tsp baking powder
1/2 tsp salt
3/4 c butter (12 tbs), softened
3/4 c brown sugar
2 eggs
2 ounces unsweetened chocolate, melted
1 c buttermilk
1 tsp vanilla
Preheat oven to 350 degrees. Line muffin pans with liners.
Whisk together dry ingredients.
In a large bowl, beat butter and sugar until light and fluffy. Add eggs, one at a time. Beat in melted chocolate.
Reduce speed to low and add flour mixture alternately with milk, beating until just blended. Stir in vanilla.
Fill liners 2/3rds full (this was my mistake, I think). Bake 15 - 20 minutes until a toothpick inserted into center comes out clean.
Cool on wire rack.
Makes 16 regular cupcakes
Cream Cheese Chocolate Frosting
1/2 c butter, softened to room temperature
8 oz cream cheese (I used 1/3 reduced fat)
6tbs unsweetened cocoa powder
About 2 cups confectioner's sugar
1 tsp vanilla
2-3 tbs half and half
pinch of salt
Beat all ingredients together until desired consistency and taste is reached. I started with 1.5 cups sugar and added the last half after tasting.

Sunday, February 5, 2012
Happy Superbowl Sunday - Buffalo Chicken Bites
Well, I didn't know who was playing in this year's Superbowl until just a couple of days ago, but we're going to a party this afternoon and I had to bring something. I stumbled across this recipe at Tracey's Culinary Adventures and even though we're not overly fond of super spicy things I decided to try it. With the help of my trusty bread maker, these whipped up in a jiff and are absolutely delicious, even without any dipping sauce. Tracey has great step by step directions on her blog, so hop over and see if you're in doubt as to my directions or are making the dough by hand. She advises that you can make them ahead of time, then reheat in the oven at 350 degrees. Since someone else is hosting, I will probably ask to pop them in the microwave.
I also baked chocolate cupcakes and will hopefully post that recipe tomorrow. Gooooo Patriots and/or Giants!
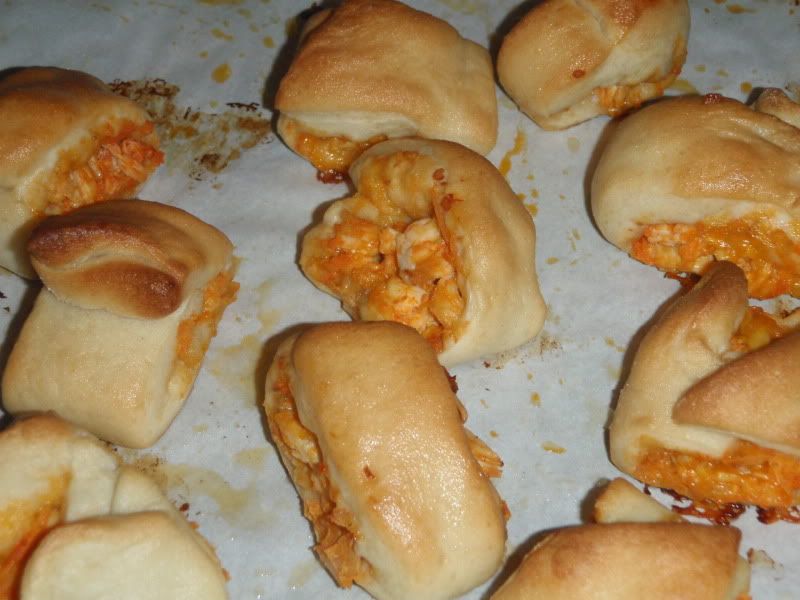
Buffalo Chicken Bites
Dough
1 cup warm milk
2 1/2 cups all-purpose flour (I use up to half white whole wheat flour)
2 TBS packed light brown sugar
1/4 teaspoon salt
2 1/4 teaspoons instant yeast
Filling
1-2 cups shredded chicken (I used 1 large chicken breast)
1/2 - 3/4 c shredded cheese
1/4 c hot sauce (I used Louisiana Original and added a couple extra dashes)
For serving
4 tbs melted butter
ranch dressing
Prepare dough in bread machine on "dough" cycle. Mine takes just under 2 hours with a preheating step. Meanwhile mix filling.
When dough is ready, divide into 4 equal portions. Roll each portion into 12" x 4" rectangle. Fill lower portion of rectangle with 1/4 of filling, leaving a 1/2" edge along the bottom. Fold top part of dough over filling and bring up lower edge to seal. Cut into 12 equal pieces.
Preheat oven to 400 degrees. Meanwhile allow bites to rise for 20 minutes.
Bake 15 minutes until golden brown. Immediately upon removing from oven, brush with melted butter.
Makes approximately 48 bites.
Subscribe to:
Posts (Atom)