Sunday, May 27, 2012

Unfrog-getable

I think this card is my favorite of all the thank you cards I've made thus far. As the first image on the Create a Critter cartridge, this little froggy has a special place in my heart. I also fondly remember this classic toy from my own childhood--not so much stacking the rings, but chewing on them. Nonetheless, it is a toy that every child has to have (hopefully the plastic will be BPA free ;). I used some miscellaneous paper from my stash. I think the green is from an old DCWV mat stack and I have no idea where the dots came from, though I wish I had more. I neglected to take a picture of the inside, but it says "Many Thanks" and has a mat with edging like a postage stamp also from the B is for Boy cartridge.

Photobucket

Photobucket

Materials:
Papertrey Ink cardstock, misc paper
Create a Critter and B is for Boy cartridges
My Pink Stamper "More Punny-licious"
Inkadinkadoo "Thanks"
Misc ribbon
Tim Holtz Distress Ink "Forest Moss"
EK Success punch

Saturday, May 26, 2012

Whisking You Well Card

Have you see the new Wild Card 2 cartridge? It's awesome. I don't have the first Wild Card cartridge, but this one combines the best of a number of cartridges. It also reminds me of the Just a Note cartridge which is only available (to my knowledge) pre-installed on the E2. Only a few are trifold cards, but tons of shape cards and fun, every day sayings. I made this card for someone who was feeling under the weather. She loves to cook, so hopefully it hit the right note.

Once it was assembled, I thought the front looked a little bare. (It's possible that the sentiment was supposed to go on the front, but it was too large in my opinion.) Thus, I had this cute little puffy sticker--I think they're called "felties" that matched the colors used perfectly.


Photobucket

Photobucket

As of this posting, the Gypsy hasn't been undated to play with Wild Card. Thus, some of the sizing might not be perfect. Just exercise some patience and use trial and error.
Photobucket

Friday, May 25, 2012

Fresh Guacamole

For about a week at the end of April and early May, avocados were on sale everywhere. Most were imported from Mexico and I'm in Virginia, so they weren't necessarily sweet and ripe yet. Thus, I decided to make guacamole. This recipe is adapted from Betty Crocker--I couldn't find the one I used which makes me think I omitted the onions or jalepenos. The first batch was great except it was a tad salty, the second and third were improvements. I mashed the avocado with a fork, but a quick pulse of the stick blender might yield a creamier result.

Photobucket

1 medium ripe avocado
1 small roma tomato, diced
1 tbs lime juice
salt and pepper to taste

Mash together all ingredients except salt and pepper. Season to taste. Serve immediately.

Photobucket

Caterpillar Onsie

This adorable caterpillar is found on the 9 Months cartridge. Who knew when I bought the cartridge last year for the cute baby images, that I would actually likely use it to scrap about my own pregnancy? (That album is still in progress, but I'm excited to use more cuts from this cartridge.) I love onesie cards, which is one of the reasons I'm thrilled that Provocraft included a onesie image in their free Cricut Craft Room Basics images. If you don't use the Cricut Craft Room which is a program similar to Design Studio or using your Gypsy (except it's free and requires an internet connection), several cartridges have onesies for you to choose from, e.g. B is for Boy, New Arrival and Wrap it Up, to name a few. I don't remember which font I used for this card but I think it might be from Baby Steps. You can weld letters (and shapes) together using your Gypsy or the Cricut Craft Room. I was also excited to use my Sew Easy to add a little trim to the sleeves.

Photobucket

Photobucket

Materials:
Papertrey Ink cardstock
Bo Bunny Blast Off paper
9 Months, Cricut Craft Room Basics cartridges
Twine
Snaps from the sewing aisle
Sew Easy

Thursday, May 24, 2012

Toy Airplane Thank You Card

I absolutely love the B is for Boy Cricut Lite Cartridge. It's definitely not just for boys and has some great toys on it. I was hoping that I had a sentiment along the lines of "flying by the say thanks" or something like that, but I didn't. However, I love the plane and had to use this image.

Photobucket

Photobucket

Photobucket

Photobucket

Photobucket

Materials:
Kraft cardstock
B is for Boy Cricut Cartridge
Inkadinkadoo "Thanks"
Twine
Stickles

Wednesday, May 23, 2012

A Huge Thanks

As I make more thank you cards for our baby shower, I'm really turning to what's probably described as a classic cartridge--Create a Critter. Incidentally, I'm decorating the baby's room mostly in animals from this cartridge, as well. Since I haven't decided whether I like purple anymore, let alone whether it falls in the "girl" or "boy" category of the universally accepted baby color scheme,and didn't have a gray pallet, I opted to go with blues. (Note: In my opinion, blues, greens, oranges, and yellows are gender-neutral. Thus, the absence of dresses is pretty much the only thing that differentiates the wardrobe I've purchased for my baby boy versus what I would have bought for a girl.) Anyway, I like how this one turned out, even though I thought Mr. Elephant was a little dark at first. My goal is to make at least six of each card to build my stash quickly. Here's the card:

Photobucket

Photobucket

Photobucket

Materials:
Recollections paper and cardstock
Papertrey Ink cardstock
Create a Critter cartridge
EK Success 2" Scallop Punch
Fiskars 1 3/4" Circle Punch
My Pink Stamper "Even More Punnylicious"

Tuesday, May 22, 2012

Thank You Monkey Card

With a new baby on the way, I'm ramping up my thank you card production. So far I've made four different designs. However, given my attention span limited, I've only made 2-6 of each design. Thus, I expect I have many more to make (which isn't a bad thing). Today's card is a standard A2 sized card.

Photobucket

Photobucket

Photobucket

Photobucket

Details:
Wrap it Up Cricut Cartridge
Papertrey Ink cardstock
EK Success punch
twine
Inkadinkadoo "Thanks" - note, these are crap if you've been using the "high quality" photopolymer stamps sold by bloggers. However, expect to see them a lot as I bought them expressly to make all my thank you cards.

Saturday, May 19, 2012

S'mores Ice Cream (Vanilla Ice Cream Recipe included)

Happy Saturday, folks! Hopefully it's feeling a bit like summer in your neck of the woods. Even though it was rather rainy last week, I made this ice cream. It was fantastic (and gone in a few days)! If you want to lighten the recipe a bit, stop after making the vanilla ice cream. All by itself, the recipe is very yummy. I also especially like the recipe because there was no heating and cooling processes required--just a good amount of whisking to make sure all the sugar has completely dissolved. Thus, if you keep your ice cream bowl in your freezer, you can have wonderful ice cream in about 35 minutes or less. I hope adapt this recipe to make cookies and cream, and possibly a cookie dough variation if I remember where I saw the no-egg cookie dough recipe.

Both recipes are from the awesome blog Finding Joy in My Kitchen. The S'mores Ice Cream is found here and the Vanilla base found here. Only minor modifications were made, such as adding a pinch of salt to the vanilla and omitting the mini-marshmallows.

Photobucket

Vanilla Ice Cream
3/4 C sugar
16 oz Half & Half
8 oz. whipping cream
1 TBS vanilla
pinch of salt

Add-Ins for S'mores Ice Cream
4 graham crackers (big sheets), crushed into coarse pieces
1/2 C chocolate chips (I used a half a large semi-sweet big bar of Ghiradelli).
1/2 C mini marshmallows {if desired}

1. Whisk together sugar, half & half, and cream until sugar is dissolved.

2. Add vanilla and a pinch of salt, to taste. (orig. recipe suggests 2-4 tsp of vanilla.)

3. Pour mixture into your ice cream maker and churn per the manufacturer's instructions. (Using my Kitchen-Aide Stand Mixer (with ice cream bowl), it took about 20 minutes.) Once you have a soft-serve consistency, stir in add-ins.

4. Serve immediately or freeze for a few hours until desired firmness is reached.

Makes about 4.5 cups, without the marshmallows.

Photobucket

Friday, May 4, 2012

Kathy's Cozies

Kathy of Kathy's Cozies has long been the queen of Cricut machine covers. She makes them for Cricut Expressions (both the original and the E2), Cricut Imagines, Cuttlebugs, and even for other non-Provocraft machines. Last year, my Cricut machine collection exploded from a little Cricut Create to two Expressions, a Cricut Cake Mini, and an Imagine. Though I had heard wonderful things about Kathy's Cozies, I just wasn't ready to take the plunge as you pay for her quality. Now that we've moved for the third time in 2 years, I'm finally ready to start my collection.

At her Etsy store, you select the type of cover you need, then follow a link in her product description to see her fabric collection, which is quite extensive, and put your selection in the message to seller box before checkout. It takes about 1-2 weeks for her to make your cozy and pop it in the mail. However, she communicated me to let me know my first choice of fabric was available within a day or two, then sent me another message that it was in the mail. Very nice person to work with.

Here's my first cozy for my Cricut E2. I think it's absolutely beautiful!

67541cce, Uploaded from the Photobucket iPhone App

Here's a closeup of the detail:
Uploaded from the Photobucket iPhone App

I picked the main fabric and asked Kathy to choose the trim. How she knew I'd love this checked lime green, I don't know. But it's absolutely perfect. I especially love the crochet daisy. Though I don't sew or quilt, the cover looks sturdily put together and will definitely keep my Cricut E2 nice and clean.

Now I just have to save up a bit so I can order covers for my other machines! (I understand from other crafters, that she'll do custom work and put together matching set at an affordable price, but I think I'll just take my time and order the rest when I feel the urge.)

Thanks so much Kathy!

Thursday, May 3, 2012

Sourdough Pretzels

As you know, I made a sourdough starter a couple of weeks ago. In efforts to keep it alive, I'm attempting to bake something with it each week. Ever since an unsuccessful pretzel last attempt last month where I essentially made pretzel-shaped bagels, I had been looking for a recipe without the boiling step. (Disclaimer: My goal is to make pretzels similar to Auntie Anne's which I usually order plain with a dipping sauce or sometimes with Parmesan cheese. Thus, I'm not necessarily aiming for traditional pretzels,).

This recipe from King Arthur Flour fits the bill fairly closely, at least in terms of texture. The sourdough flavor is quite noticeable (and yummy). Even though I started making them after 10 p.m. on Saturday night, which meant they weren't finished until nearly 1 a.m., both my husband and I had more than one.

The King Arthur recipe calls for non-diastic malt powder which is described as a secret bagel ingredient and aids a nice crust. I didn't have this ingredient so I brushed the pretzels with water before baking, just as I do for my sourdough loaves. While it did the trick, I am anxious to order some of this special malt powder to try it out.

Sourdough Pretzels
Photobucket

Dough
3/4 c warm water
1 c sourdough starter
3 c bread flour
1/4 c nonfat dry milk
1 Tbs sugar
1 Tbs vegetable oil
1 1/2 tsp salt
2 tsp yeast

Pre-Bake Topping
1 TBS non-diastic malt powder or sugar
2 TBS water

Post-Bake Topping
2 Tbs melted butter
pretzel salt

Add dough ingredients in order listed into your breadmaker. Set to "dough" cycle.

Divide dough into 12 pieces. Roll on a floured surface into 18" logs. Shape into pretzels.

Preheat oven to 350 degrees.

Brush with pre-bake topping. (I just used water).

Bake 25 to 30 minutes until golden brown.

Immediately brush with melted butter and sprinkle with pretzel salt, if desired

Makes a dozen

Photobucket
Fresh from the oven

Photobucket
Brushed with melted butter

Wednesday, May 2, 2012

Strawberry and White Chocolate Scones

I love scones! Surprisingly, I only have two recipes for scones on my blog found hereand here. The first recipe is my usual go-to recipe. However, after buying 3 lbs of strawberries for $5 a week or so ago, I was looking for new recipes to try. This one is from Good Cheap Eats. I made a few minor changes based on what I hand and came up with wonderful (and slightly lighter) results. To make my breakfast preparation quicker, I whisked together the dry ingredients before going to bed. Thus, this would be perfect for a make-ahead mix.

Photobucket

Strawberry and White Chocolate Scones
2 cups all purpose flour
1/3 c sugar
1 TBS baking powder
1/2 tsp salt
6 TBS butter, diced
1/2 c white chocolate chips
1/2 c diced strawberries
2/3 c whole milk (original recipe calls for heavy cream)
1 egg

Preheat oven to 400 degrees.

Whisk together flour sugar, baking powder, and sugar. Cut in butter using a pastry knife or in a food processor until mixture looks like coarse crumbs.

Separately whisk together milk and egg.

Add chips and strawberries. Stir in egg and milk mixture until well-combined. Try not to overmix.

Cut dough into 8 wedges or use an ice cream scoop.

Bake 18 - 20 minutes until golden brown and a tooth pick inserted in the middle comes out clean.

Makes 8 to 10

Photobucket

Photobucket

Tuesday, May 1, 2012

Strawberry Ice Cream

Earlier this week, I stumbled across the Youtube channel of Lauren Vitale. It's a well-done show and a snazzy, albeit clumsy website (at least on Chrome), however I suspect her goal is to eventually get a Food Network show. She definitely channels Rachel Ray's enthusiasm with a dose of the Italian sex appeal of Giada. According to a rather slanted Wikipedia entry, she's gained quite a bit of fame from YouTube, including recognition in Forbes, by Paula Deen and John Stewart, and a Kraft-sponsored contest in Philadelphia. Though her voice is a little grating, she explains her tasty-looking recipes clearly.

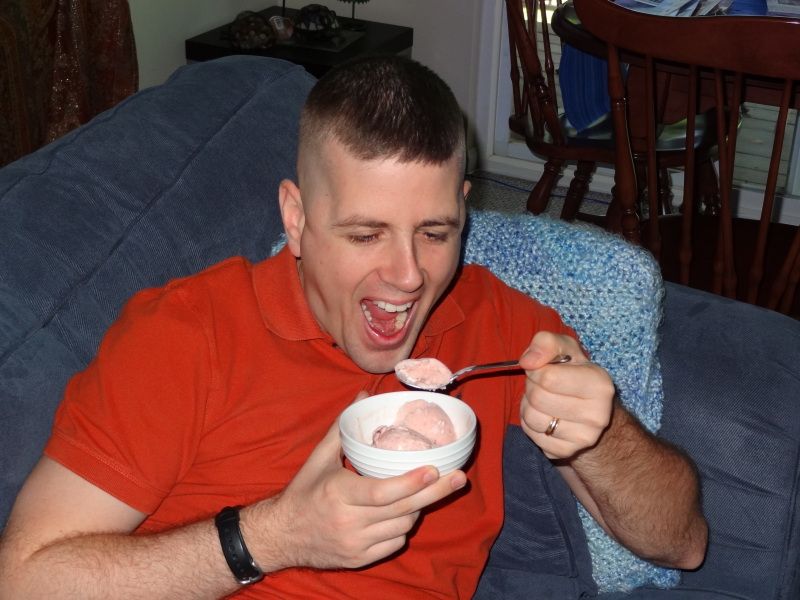
This recipe for strawberry ice cream immediately caught my eye as my husband loves strawberry ice cream. Due to eating all my fresh strawberries earlier in the day, I had none left to mix in. That would make this recipe even tastier. Nonetheless, we enjoyed this rich, creamy ice cream immensely as you can see.

Photobucket

Strawberry Ice Cream
Photobucket
3/4 c granulated sugar
5 egg yolks
1 c whole milk
1 c heavy cream
1/4 tsp salt
1/4 tsp vanilla
1 lb strawberries, pureed
1 c fresh strawberries, diced

Simmer milk and cream until just before boiling. Look for little bubbles at the edges of the pot.

Meanwhile, whisk together eggs and sugar until the mixture is pale yellow.

Temper the egg mixture with a slash of the heated milk. Whisk egg mixture into cream. Cook on low until mixture coats the back of a spoon, about 5 minutes. (One thing I really liked about the YouTube video was that she shows you what exactly that means.)

Strain through wire mesh. Add salt and vanilla.

Cover with plastic wrap making sure the plastic makes contact with the custard. Chill overnight.

Stir pureed strawberries into custard until well mixed. Fold in diced strawberries.

Freeze according to your ice cream maker's instructions.

Makes 1 qt

Photobucket