Tuesday, June 22, 2010

Summer Time

This card was made using the new Cricut Lite Cherry Limeade cartridge. I really like its bright colors. The paper is from We R Memory Keepers, the reverse side of Frenzy Rumble.

Photobucket

Materials:

- A2 white card base

- Pattern paper cut 4 x 5.25"

- Cherry Limeaide popsicle cut at 4"; message cut at 1" and 3/4"

- Adhesives: Glue Arts Glue Glider Pro, Xyron, Mod-Podge

Monday, June 21, 2010

Flapper Anya

I am so thrilled to report that all (or almost all) the websites that were blocked on Friday are now available to me. My building upgraded its wireless internet, which we receive included as part of the rent, and somehow everything under the sun was block--Netflix, Youtube, UStream, Goggle's Picasso, and Photobucket. After leaving a nasty voicemail with my management office Friday afternoon, by late evening (after 10p), I was able to get on UStream. The next morning most everything else was accessible, except for Photobucket. Regardless, it most inconvenient being without Photobucket, even though I had access to Blogger. For both posts on Saturday and Sunday I had to email the pictures to Photobucket, and then use my Iphone Photobucket app to move them to the right folder and get the url. It was a looong process, in case you couldn't tell. On a whim, Sunday evening I tried it again and yay! (Come Monday, when the manager listens to my message, he will likely think I'm nuts. Oh well.)

As I mentioned on Friday, my first Greeting Farm stamps arrived. Here's my first and extremely simple card using the limited edition stamp called Flapper Anya.

Photobucket

Materials:

- A2 white card base

- Making Memories pattern paper from the Heritage Collection called "Scroll Dark - Deep Red"

- purple and white cardstock scraps

- Greeting Farm "Flapper Anya" stamp colored with Tombow dual brush markers.

- Prima flowers

- Colorbox Chalk ink, Stampendous stamp from "Notes for a Friend."


Photobucket

Sunday, June 20, 2010

Happy Birthday Monkey

I wound up not using the dragon card for my husband's great-uncle's birthday card as I found time to make this one. It's really simple, but I really like the paper combinations, which are bold for me. (Yes, I actually kept the tiny label after I trimmed it off so I would be able to share the precise name of the paper. Very proud of myself.)

Photobucket

Materials:

-5 x 7" white cardstock base

-Stars paper from DCDW collection "All About Boys" cut at 4.75 x 6.75"

- Small strip of polka dot paper from We R Memory Keepers' White out Collection. The particular paper is called "Explore Tracks." It's cut at about 1.5" x 4.75".

- Monkey from Create a Critter cut at 3"

- Balloons are from the new Cricut Lite Carousel cartridge, cut at 3"

- The message is from a Stampendous stamp set called "Happy Messages," stamped using ColorBox chalk ink.

- Ribbon is from Michaels.

- Adhesives: foam tape, Zig two-way glue pen, Glue Glider Pro, and pop dots


Photobucket

Saturday, June 19, 2010

The Greeting Farm

I finally joined the Greeting Farm stamps craze. These two came in the mail yesterday:

Photobucket

They're called Flapper Anya and Fleur Anya. I finished coloring Flapper Ana already and hope to add it to a card to post tomorrow.

I also purchased these two in digital form:

Photobucket
50s Sweetheart

Photobucket
HG Rain

Check back for cards using these gorgeous stamps.

Father's Day Card

I was inspired by this card from Cassie's Sweet Creations post here. This card is to give my father-in-law. The dinosaur might have been more appropriate for his b-day, but I was in stamping mode back then and don't think my Create a Critter Cartridge had come in the mail yet.

Photobucket

Materials:

-5 x 7" white cardstock base

-Cornflower blue cardstock cut at 4.75 x 6.75"; a strip of beige cardstock about 1" x 6.75" embossed with the pebbles embossing folder. (I need to buy a gray stamp pad to brush over the embossed edges now that I've really gotten into embossing.)

- The volcano and dinosaur appear on p. 50 of the Create a Critter booklet. Both are cut at 3".

- The message is from the Don Juan font cartridge, cut at 1". I then used a white Galaxy Marker to add some detail. (I need to look for a serif-font cartridge as I just realized that all the ones I have are sans-serif.)

- Adhesives: foam tape, Zig two-way glue pen, and Glue Glider Pro, Xyron


- Corner-rounder

Friday, June 18, 2010

You Slay Me

This card will likely be a birthday card for my husband's great-uncle who turns 93 next week. I intended to make this a A2 card, but then cut the shapes a bit too large. While I am not 100% pleased with the colors, I like the end result well enough.

Photobucket

Materials:

-5 x 7" white cardstock base

-Yellow cardstock cut at 4.75 x 6.75"; a strip of beige cardstock about 1.5" x 6.75" embossed with the pebbles embossing folder.

- The boy is the "prince" found on p. 46 of the Paper Doll Dress Up booklet, cut at 3.75". The castle is an accessory to the princess on p. 47 and cut at 3", then trimmed a wee bit from the bottom. The dragon and sword at accessories to the knight on p. 48, cut at 3.25".

- The message is cut at .75" using the new Cherry Limeaide cartridge! I ran the letters through my Xyron. I will likely stamp "Happy Birthday" on the inside, once I've decided this is the birthday card.

- Adhesives: foam tape, Zig two-way glue pen, Glue Glider Pro, and Xyron


- Corner-rounder

Thursday, June 17, 2010

Cricut Lite Cartridges!!!

Here's what came in the mail today:

Photobucket

As I shared last week, my wonderful auntie went to Walmart at first thing last Saturday morning to hunt for some of the new Cricut Lite cartridges for me since I don't have Walmart nearby. These are the 5 from my wishlist that she was able to find. I'm still on the lookout for Savory and Celebrate with Flourish, but these will keep me well-occupied for now. Thanks so much!!!

Sea You Soon - Mermaid

I'm not so much a fan of puns, but I am trying to jump on the Create a Critter band wagon for such cutesy expressions. This card was made using Paper Doll Dress Up cartridge.


Photobucket

Materials:

-A2 (4.25 x 5.5") blue cardstock base

-Blue cardstock cut at 4 x 5.25" and ran through my BigKick in the D'Vine Swirl embossing folder.

-Small strip of tan cardstock cut at 4 x .5" and embossed with another folder (think it's "pebbles" or something like that.

-Cut in waves using scissors or a craft knife to look more natural

- Mermaid appears on p 43 and is cut at 3.5." I popped her with foam tape.

- Shells are accessories and are cut at .5" and .75." I adhered them with glue dots.

- Message is cut at .75" using the Pooh Font cartridge. I ran the letters through my Xyron.

- Adhesives: foam tape, glue dots, and Glue Glider Pro, Xyron


Photobucket

Wednesday, June 16, 2010

Slowcooker Teriyaki Chicken

Sorry for the late post. I actually made this recipe yesterday and took pictures the same day, but then neglected to schedule the post. This was adapted from this recipe from a Year of Slow Cooking. I don't do a lot of chicken in the crockpot because it generally falls apart. This recipe holds its shape long enough to plate and only falls apart when you take a bite. Chicken was super-moist and even appeared to "brown." The secret may be to cook the chicken on high for a shorter period of time, although I will include the low setting cooking time estimates.

Photobucket

2 lbs chicken pieces (I used 4 legs and 4 thigs)
1/2 c soy sauce
3 Tbs brown sugar
1 inch ginger, grated
1 TBS rice wine vinegar

Turn slowcooker to high.

Mix all ingredients except for chicken in a small bowl with a whisk. Toss chicken with sauce and layer in slowcooker.

Cook on high for 3.5-4 hours or 7-8 on low. Turn the chicken during the last hour of cooking.

Serves 3-4 with rice and a veg.

Nuts About You

Photobucket

Materials

5 x 7" white card base
Pattern paper cut 6.75 x 4.75"
Grass cut 6.75 x .5"
Create a Critter - p. 32 Squirrel cut at 3.5", acorns and phrase cut at 2"
Adhesives - Zig glue pen, foam tape, Glue Glider Pro


Here are two more that I made A2 size:

Photobucket

Squirrel is cut at 2.5" and the phrase is 1.75.
White ribbon

Tuesday, June 15, 2010

Rain duck

Still making my way through the Create a Critter cartridge. Since it rained for most of the day, I thought this card was appropriate. Love my new embossing folders, too!

Photobucket

Materials

- 5 x 7" white card base

- Cardstock cut at 4.75 x 6.75"

- Duck and umbrella, found on p. 31 of the Create a Critter cartridge, cut at 3"

- Cloud is the cupcake top found on p. 36, cut at 2.5"

- Ribbon is by Offray, purchased at Micahael's

- Adhesives: Glue Glider Pro, foam tape, pop dots


Photobucket

Quick Catfish

Out of sheer impulse, I bought catfish at the market on Sunday. Being too lazy to search for a recipe, I breaded it and sauted in a bit of butter.

PhotobucketPhotobucket

1.5 lb cat fish fillets
1/2 c all-purpose flour
2-3 TBS seasoning of choice (I used McCormick's Smoky Sweet Pepper Blend, which has garlic, onion, tomato, green pepper, red pepper, smoked paprika, black pepper, sugar, and salt)
1/4 tsp salt
1-2 eggs
1-2 tbs butter

Mix dry ingredients in a bowl, then distribute evening onto two breading plates.

Scramble egg(s) in a bowl and place between your two breading plates.

Melt butter in a large saute pan.

Cover fish in flour mix, then egg, then flour again.

Saute in butter until golden brown, then flip. If you are using a nonstick pan, the fish is ready to turn when it scoots around without effort when nudged with a spatuala.

Total cooking time, about 10 min depending upon the thickness of your fish.

Serves 2-3 with rice and veggies.

Monday, June 14, 2010

Blueberry-Oatmeal Buttermilk Pancakes

Despite my best intentions and productive grocery shopping Sunday afternoon, when dinnertime rolled around I was in a breakfast mood. Thus, I modified a pancake recipe I made a few months ago, adding oatmeal and blueberries. Here is what I had for dinner last night:

Photobucket

1 c flour
1/4 c oatmeal (quick-cooking)
2 Tbs sugar
1 tsp baking powder
1/4 tsp baking soda
1/4 tsp salt
1 egg
1 c buttermilk
3 Tbs butter, melted
1/2 c blueberries (this is approximate, I threw in 2 large handfuls)

Whisk together dry ingredients, except oatmeal. Make a well in center; add the egg and beat it slightly. Gradually pour in the buttermilk and melted butter, whisking until well batter is smooth. Stir in oatmeal and blueberries.

Drop 2-3 TBS of batter on a preheated skillet coated with cooking spray. Cook for 2 minutes per side, until golden brown. This is a thick batter, so you will need to watch the pancakes carefully.

Photobucket


Serves 2-4

Froggie - Thinking of You

Here's another 5 x 7 card. Since my auntie loved the two froggy cards I've made, even though I have a bunch of critters left to try on the Create a Critter cartridge, here's another frog.

Photobucket

Materials

- Frog cut at 2.5", page 24 of the Create a Critter cartridge

- 5 x 7" white card base

- K & Co pattern paper from the Que Sera Sera collection, cut at 4.75 x 6.75"

- Red cardstock cut at 2 3/8 x 1 3/8"

- Martha Stewart Doily Lace Punch

- Adhesives: Glue Glider Pro, Glue Dots, foam tape, Mod-Podge for gloss

- Stampendous stamp - "Happy Messages"

- Ribbon from Michaels


Photobucket

Sunday, June 13, 2010

New Look

For those of you following my blog(s) in Google Reader or a similar feed aggregator, please pop on over and see my new look. I finally decided to embrace tabs and a spent a lot of time this morning selecting snazzier backgrounds. I also updated by blogroll/link lists.

Please let me know what you think by commenting or sending me an email.

Thanks for visiting.

Dragonfly - Thinking of you

I'm making a few cards for my auntie to send to her friends. Since they're not for Operation Write Home, they can be bigger than the A2 cards.

Photobucket

Materials
- 5 x 7 white card base

- DCWV glitter cardstock, cut at 4.25 x. 6.75

- Pattern paper from my stash cut at 4 x 6.5"

- Dragonfly, p. 24 of Create a Critter, cut at 3.75"

- Stampin Up embossing powder, Tuscan Sun Glimmer Mist on the dragonfly

- Making Memories paper flowers, buttons and ribbon from my stash

- Stampendous stamp - "Happy Messages"

- Adhesives: Glue Glider Pro, Glue Dots, foam tape, Mod-Podge for gloss

- Martha Stewart Punch


Here's the inside:

Photobucket

Saturday, June 12, 2010

Easy Ribs Method

It was chilly and rainy today, but since it's June, I wanted something summery. Luckily, I had a couple of slabs of baby back pork ribs in the freezer and some of my favorite rub in the cupboard. I posted this recipe last summer here, but took a lousy picture. I didn't make the sauce this time, but really enjoyed the KC Masterpiece, original flavor. (I selected it because high fructose corn syrup wasn't the first ingredient on the label--it was the second, but tomato puree was first and that made me feel a bit better about using a store-bought sauce.)I adjusted the method from last year, just a bit. The broiling step allowed for a finished, slightly charred outcome. Yum!
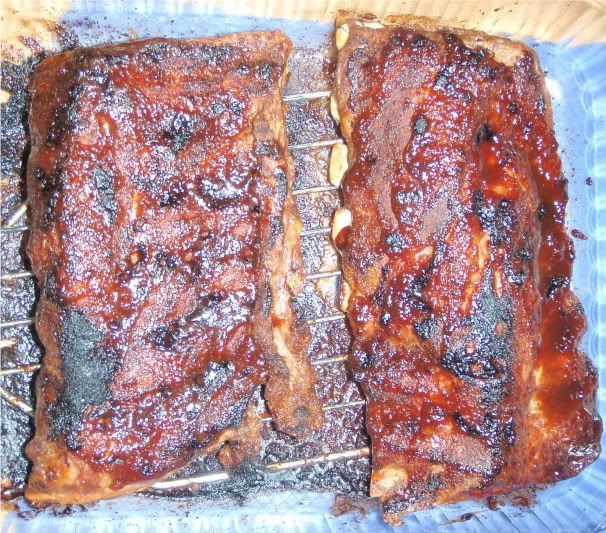
Photobucket

Here's the dry rub recipe. Place all ingredients in an air-tight container and shake well to combine. It will keep on the shelf for months.

1/2 cup paprika
1/4 cup kosher salt
1/4 cup sugar
1/4 cup powdered mustard
1/4 cup chili powder
1/4 cup ground cumin
2 tablespoons ground black pepper
1/4 cup granulated garlic
2 tablespoons cayenne pepper

1. Preheat oven to 350 degrees.

2. Rub ribs generously on both sides.

3. Place on a rack in a baking pan, cover tightly with foil. Bake for 90 minutes or until tender.

4. Remove foil and brush with sauce. Broil for 5-7 minutes or until you see slight charring.

I made two slabs of ribs, about 2 lbs, but the rub will cover probably 10 lbs.

Congratulations

I needed a last minute card for a retirement party, so here is what I made. The recipient was a male, which was part of the reason for the dark colors--and I like blue and purple.

Photobucket

Materials:

Paper--Assorted cardstock and pattern paper from my stash.

Punch--One of my brand new Martha Stewart punches called Arch Lattice.

Stamping--Embossing powder from Stampin Up; cherry blossom from a Inkadinkadoo stamp collection called "Asian by Design;" "Congratulations" stamp from Hero Arts collection called "Everyday Sayings."

Ribbon--White inexpensive stuff, probably from Michaels (what I had was a bit too skinny, so looped it around three times).

Adhesive--My new Glue Glider Pro


Here's the inside. I made a simple pocket for the gift card.
Photobucket

Cricut Lite Wishlist

On Hello Thursday, June 10th, Cricut announced 24 new "lite" cartridges! Grrr, made exclusively for Walmart. Not fair as there is no Walmart near me and I hate shopping for popular items in stores. See all of the cartridges here. These are the ones that go on my wishlist, in order of preference:

Cricut Lite B is for Boy Cartridge
Photobucket

Cricut Lite Savory Cartridge
Photobucket

Cricut Lite Celebrate with Flourish
Photobucket

Cricut Lite Cherry Limeade Cartridge
Photobucket

Cricut Lite Sugar and Spice Cartridge
Photobucket

Cricut Lite Block Party Cartridge
Photobucket

Cricut Lite Carousel Cartridge
Photobucket

Cricut Lite Chore Chart Cartridge
Photobucket