Wednesday, October 24, 2012

Naan (Breadmaker)

Since I plan on trying another recipe this evening, I figured I'd better get this one up. Taken from my favorite bread machine cookbook, The Bread Machine Bible, this recipe was quite tasty (there were no leftovers to photograph) but a tad blander than what I've enjoyed at happy Indian or Middle Eastern restaurants. It also didn't brown much before I worried about burning the bottom so it could have been less chewy. Finally, the yogurt component makes whipping this recipe up on a whim possibly challenging as I don't always have plain yogurt on hand. All in all, this is a nice and easy recipe that I would try again. (The recipe I plan to try this evening requires just milk, so I'll report back with the comparison hopefully in the near future.)

Naan (bread machine recipe)

1/2 c milk, room temperature
4 TBS plain yogurt, room temperature
1 TBS oil (I used canola)
2 c + 2 TBS bread flour
1 tsp salt
1 1/2 tsp sugar
1 tsp instant dry yeast
3 TBS melted butter for brushing

Add all ingredients except melted butter in the order called for by your bread machine. (mine is in the ordered listed). Set to "dough" cycle.

When dough is ready, divide into 4 portions. On a floured surface, roll into oval shape at 1/4" thick and 9" long. Cover and let rise for 15 minutes.

Preheat oven to 450 degrees with two large cookie sheets or a pizza stone in the oven.

Place dough on preheated pans and brush with butter. Bake for 10-12 minutes until golden brown. Serve warm.

Makes 4 large breads.

Tuesday, October 23, 2012

Indian Butter Chicken

I enjoy Indian food, but for whatever reason do not have very many recipes in my repertoire. Thus, when I came across this recipe at Mel's Kitchen Cafe I had to try it. In general, the dish was very yummy but I thought it a bit heavy on the ginger. The original recipe called for jalapeno which I didn't have so I omitted--perhaps that would have offset the ginger but since I'm not much of a ginger person in general, I'll likely half the amount the recipe calls for when I make this again.

Uploaded from the Photobucket iPhone App

1 medium yellow onion, diced
1 tablespoon fresh ginger, finely chopped
2 cloves garlic, finely minced
1 jalapeño, seeded, and finely chopped
1 tablespoon canola oil
2 teaspoons garam masala
1 teaspoon chili powder
1 teaspoon cardamom
1/2 teaspoon coriander
6 oz tomato paste
2 cups chicken broth
1/2 cup fat free half-and-half
1 1/2 pounds boneless, skinless chicken breasts, cut into 3/4-inch chunks
1/2 teaspoon black pepper
1 teaspoon salt
3 tablespoons butter

In a large 12-inch skillet, heat the oil over medium heat until hot. Add the onion, ginger and jalapeno. Cook until the onion is translucent, about 4-5 minutes. Stir in garlic, garam masala, chili powder, cardamom, and coriander. Cook while stirring for another minute.

Using a stick blender, puree the mixture until smooth. Mix in tomato past and broth. Pour the sauce back into the skillet and add the half and half. Bring the mixture to a simmer over medium heat and add the chicken pieces and the salt and pepper.

Keep the sauce at a simmer, stirring occasionally, and cook for 10-15 minutes, until the chicken is cooked through and the sauce has slightly thickened.

Stir the butter into the sauce until melted. Serve the chicken and sauce over hot rice, preferably jasmine.

Leftover sauce goes great with naan. (Recipe to come!)

Uploaded from the Photobucket iPhone App

Monday, October 22, 2012

Summer Vegetable Minestrone

As the crisp, cool weather of fall rolls in, I'm starting to think soup. However, since the markets are not entirely devoid of summer veggies (e.g. zucchini, yellow squash, colored peppers, etc.) and since I had quite a few veggies that were aging, last week I decided to whip up a quick vegetable minestrone. (Note: Most minestrone soups have beans, but I wasn't in the mood. However, this would be great with some northern or navy beans.) Though I looked at quite a few recipes, I really just threw everything in a pot and kept seasoning until it tasted good.

Photobucket

Here's more or less the ingredients used:

1 medium onion, diced
3 carrots, diced
2 cloves garlic, minced
1 medium zucchini, diced
1 medium colored bell pepper (red, yellow or orange preferred)
1 c mushrooms, diced
14.5 oz diced tomatoes or 4-5 roma tomatoes
1/2 c shells
4 c chicken broth
1-2 c water
1/2 tsp dried oregano*
1/4 tsp dried basil*
1/2 tsp dried parsley*
1-2 tsp salt
fresh ground pepper
olive oil
*I eyeballed the measurements. Alternatively, use 1 tsp Italian Seasoning.

Saute onions and carrots in olive oil until tender. Add mushrooms and cook until liquid has evaporated.

Add remaining ingredients and bring to a boil.

Cover and simmer on low for 20 minutes or until pasta is tender.

Photobucket

Monday, October 15, 2012

Menu Plan for Week of October 15th

During the last week of August, I made a 30-day menu plan. It was more of a list of 30-some odd meals which relied on tried and true recipes and utilized what I had in my freezer. The intent was that each week I'd go through the list and select a week's worth of meals. Though I only posted the weekly menu three times, I more or less relied on this master list for about 6 weeks, which included leftovers and a few spontaneous dishes that weren't in the plan. All and all it was a decent success as I made at least 75% of the dishes listed. It was so handy to always have an idea as to what to make for dinner and a quick resource to make my shopping list. Plus, I cleaned out the vast majority of my freezer stash paving the way to restock with goodies for fall and winter.

It is my intent to make another 30-day list, however I don't really have the time at the moment. Thus, I'm going to share what I have so far for this week. Since last month relied heavily on familiar recipes, I will incorporate some of them, particularly with stuff that will likely stock the freezer for lunches, but also some new recipes that have been lurking on my Pinterest board waiting to be tried. You'll note that the list includes tons of chicken and a few meatless dishes. That's because we just returned from visiting my husband's parents where it's red meat, red meat, and red meat.

Here's what I'm thinking about for this week:

Monday - Slower Cooker Shoyu Chicken, broccoli, and brown rice

Tuesday - Indian Butter Chicken with naan (breadmaker) and zucchini

Wednesday - Roasted Veggie and Black Bean Burritos

Thursday - Baked Plum Chicken

Friday - Taco Salad, Nachos or Pizza

Saturday - Roast Chicken with Paprika and Shallots, mashed potatoes, and tossed salad

Sunday - Unstuffed Bell Peppers

I also want to make some Potato Cheddar Soup, French bread, and vanilla yogurt for lunches this week.

Sunday, October 7, 2012

Lamb Lettuce Wraps

Though it seems that fall has finally arrived, I thought I'd share a dish we enjoyed in August--lamb lettuce wraps. Though I often enjoy lettuce wraps when dining out, especially for Thai food, I never think to make them at home. This recipe appeared in the August 2012 Cooking Light caught my eye, so I decided to try it. Other than omitting mint and using butter lettuce instead of Boston lettuce, I followed the recipe precisely. The result was very tasty, though I recommend that you accompany it with a hearty side dish or treat it as an appetizer when serving a meal. I paired it with toasted tortillas, but we were still a bit peckish later.

DSC00771
Apologies for the terrible pictures. I was too hungry to make sure they were actually in focus.

Ingredients
2 teaspoons canola oil
1 cup finely chopped onion
2 teaspoons minced fresh garlic
1 teaspoon ground cinnamon
3/4 teaspoon kosher salt
1/4 teaspoon freshly ground black pepper
6-8 ounces lean ground lamb
1/2 cup chopped fresh parsley
1/2 cup chopped tomato
1/2 cup chopped cucumber
1/4 cup plain fat-free Greek yogurt
1/4 cup hummus, red pepper recommended
8 lettuce leaves, Boston lettuce recommended
2 tablespoons torn mint leaves (I omitted)
1 tablespoon pine nuts, toasted

Directions
Heat a large skillet over high heat. Add oil to pan; swirl to coat. Add onion and next 5 ingredients (through lamb) to pan; sauté 5 minutes or until lamb is done.

Combine parsley, tomato, and cucumber in a medium bowl. Stir in lamb mixture.

Stir together yogurt and hummus in a small bowl.

Place about 1/4 cup lamb mixture in each lettuce leaf. Top each wrap with 1 tablespoon hummus mixture. Divide mint and pine nuts evenly among wraps.

4 servings, 2 wraps each

Photobucket

Monday, September 24, 2012

Risotto Primavera

I finally made risotto by myself!!! It's one of my auntie's specialties and I've seen her make several varieties many times, but I've always been intimidated of making the dish on my own. It was about time that ended. While browsing my food blogs, I stumbled across this recipe from Ree at the Pioneer Woman. With a veggie drawer full of goodies, I decided to try it. For the most part, it was a roaring success and my husband and I both had several portions. It took exactly 5 cups of broth, although I will reduce the wine in the future as the flavor was too strong. (Ree's recipe calls for 1.5 cups of wine; I reduced that to 3/4 cup but that was still too much.) Also, I used all Parmesan cheese instead of half goat cheese.

Here's the recipe as I plan to make it next time. Yes, there will be a next time.

Photobucket

Ingredients
5 cups Low Sodium Chicken Broth
1/2 whole Large Yellow Onion Finely Diced
3 whole Carrots, Peeled And Finely Diced
1 Zucchini or Yellow Squash, Finely Diced
1 cup Mushrooms, Finely Diced
1-1/2 cup Arborio Rice
1/2 cup Dry White Wine
Butter, Olive Oil, Kosher salt
1 cup Grated Parmesan Cheese
Optional Vegetables To Substitute For Any Of The Above: Broccoli, Cauliflower, Red Bell Pepper, Zucchini, Asparagus Pieces

Directions
Pour chicken broth into a small saucepan. Heat to a simmer.

In a large Dutch oven, heat 2 tablespoons olive oil and 2 tablespoons butter. Add diced onions and diced carrots. Stir and cook for a minute or two. Add rest of veggies in order of decreasing tenderness. Sprinkle in salt and stir. Remove from pan and set aside.

Add 1 tablespoons olive oil and 1 tablespoon butter to the same pan. Heat over medium-low heat. Add rice and stir, cooking for 1 minute. Add half the wine and 1 1/2 teaspoons kosher salt. Stir and cook until liquid is absorbed. Over the next 30 to 45 minutes, add 1 cup of simmering broth at a time, stirring and cooking until each addition of broth has absorbed. Add other half of wine and cook until absorbed.

Taste to make sure rice is the right texture. It should not be mushy. Add another helping of broth if rice has too much bite to it. Check seasoning.

Once rice is cooked, remove from heat. Stir in cheese and vegetables until all cheese is combined.

Photobucket

Serves 4-6

Tuesday, September 18, 2012

Homemade Taco Seasoning (Taco Salad)

As you may have noticed, I make taco salad quite often. It's an incredibly simple, filling, and relatively nutritious dish, particularly if you ignore the salt element. Today, I'm going to share my recipe for taco seasoning, as well as my "method" for making a taco salad. Unfortunately, I don't have any pictures even though we just had this last evening. However, I'll do my to grab a snap next week. First a little bit on how this dish made its way into my regular menu.

At a Superbowl party in January (? - I have no idea when the Superbowl rolls around), the host served a make-your-own taco salad with melted cheese bubbling in the crock pot, a big bowl of seasoned ground beef, lettuce, tomatoes, salsa, sour cream, and chips. It was so simple, casual, and tasty! I had to try it at home.

Since a blog I regularly follow had been featuring ground beef recipes since last fall when Lynn's Kitchen Adventures, I turned to her blog for inspiration. I modified this recipe to my tastes. (Basically, I just use her seasoning and omit the tomato step which allows her recipe to more closely replicate a packaged variety.)

Here's my version. It works with both ground beef and ground turkey. Moreover, it freezes beautifully--as the ground meat doesn't clump together, you just remove however much you need.

Taco Seasoning
1 TBS chili powder
1 tsp cumin
1/2 tsp oregano
1/2 tsp salt
1 tsp garlic powder

To prepare seasoned ground meat, use 1.5 TBS taco seasoning and 1/2 tsp salt per pound of ground meat (beef or turkey). Sprinkle seasoning over raw meat, then break up into crumbles using a silicon or wooden spoon. Cook until completely browned. Drain, if necessary. Allow to cool completely before freezing.

Taco Salad
seasoned ground meat
lettuce
cheese (melted or shredded)
other veggies (diced bell peppers, tomatoes, avocados)
salsa
sour cream
tortilla chips

To prepare salad, heat meat and melt cheese, if necessary. Crumble chips and layer on bottom of a deep bowl. Sprinkle with (in this order works best for me) meat, cheese, lettuce, and other veggies. Top with a generous dollop of salsa and cream cheese.

Monday, September 17, 2012

Menu Plan for Week of September 17th

Another Monday rolls around. Can you believe that September's more than half over? Time flies! Last week's menu plan wasn't quite as successful as the week before, though everything we ate was on the menu plan except for steaks which we had with the wild rice I'd originally planned to go with the garlic balsamic chicken. We ate buttermilk oven-fried chicken, pasta with turkey meatballs, garlic balsamic chicken, hearty chicken noodle soup, and pizza. I also tried a new french bread recipe in my bread machine and made more ice cream and yogurt. Once again, we did not get to the stroganoff or hamburger helper so they are being carried over to this week's menu:

Monday - Taco Salad

Tuesday - Chicken Brown Rice Bake

Wednesday - Homemade Hamburger Helper with salad or other green veg.
For next day: Defrost chicken and marinate.

Thursday - Chicken Tikka Masala
For next day: make pizza dough; defrost wings

Friday - Homemade Pizza (using my trustworthy dough recipe) and wings.
For next day: Defrost chicken

Saturday - Chicken Florentine (pan-seared chicken breast served with sauteed spinach, pine nuts, parmesan)
For next day: Defrost stroganoff.

Sunday - Beef Stroganoff (freezer) with salad or other green veg.

Thursday, September 13, 2012

Bread Machine French Bread

Warning: This recipe still needs some tweaking, but it is so tasty that I'm posting it despite its flaws.

Photobucket

With the new baby and life in general, I've been more than a little behind on my blog reading. Let's just say that the Google Reader count of unread posts probably surpasses the GDP of many a developing nation and probably one or two industrialized ones. The other day, I stumbled across this recipe for French Bread at the Naptime Chef. It sounded super easy and we love French bread, so I pinned it immediately. (Check out my Pinterest boards.) I tried it Tuesday night and we had large slices with big bowls of my hearty chicken noodle soup. Soft and chewy with a nice crunch in the crust, it tasted fantastic fresh out of the machine and I'm still snacking on it nearly two days later.

On to the problem...

When I pinned the original recipe, I thought it a bit strange that the picture is oddly staged for a loaf of bread--neat little slices, sure, but they looked too trimmed. The Naptime Chef usually demonstrates a fair amount of photography expertise. Sure enough, there was an obvious reason that became apparent once the loaf began baking--it makes a HUGE loaf of bread! Way too big for my Zojirushi bread machine which accommodates a 2 pound loaf. The loaf rose all the way to the roof of my machine where it can't cook completely and makes a bit of a mess if you open the lid like I did during baking. Unfortunately, I'm not good with bread troubleshooting but according to my bread machine user manual, the problem could be too much flour, yeast, liquid or sugar. Helpful, right? My guess is that it's the yeast and the flour as most of my other recipes require only 1.5 tsp of yeast and 3 cups of flour. But, did I mention this bread is tasty? As such, I'm posting the recipe as written--for all i know, you might have a large enough bread machine or I measured incorrectly. (I'm thinking that next time I'll use the "dough" setting and then bake the bread in the oven, possibly in two loaves. If I'm successful, I'll be sure to post an update.)

Photobucket

Photobucket

Bread Machine French Bread
1 1/3 cup warm water
1 ½ tablespoons olive oil
4 cups bread flour
1 ½ teaspoons salt
2 tablespoons sugar
2 teaspoons yeast

Combine ingredients in the order listed or as required by your bread machine. Set machine to a french bread setting if you have one. I used "Basic" with a medium crust.

Tuesday, September 11, 2012

Automatic Yogurt Maker (Homemade Vanilla Yogurt)

Sometime in June on one of the many food blogs I follow, I stumbled across a recipe for homemade yogurt using a slowcooker. Fascinated, I searched for more recipes and found that people make their own yogurt in all sorts of ways, including a curious-sounding plastic cooler method. Though the ideas sounded neat and super economical as we eat yogurt daily, I shared SnoWhite's (Finding Joy in My Kitchen) apprehension about making yogurt using such methods and I set about to find a yogurt maker. At the Williams Sonoma outlet in Leesburg, Virginia, we found this automatic yogurt maker by Euro Cuisine for a great deal (under $40, I think).


It took a couple of tries to get a good product, but now I'm hooked! I just wish it made more than the seven six-ounce servings because its so yummy both my husband and I eat it during the week. Depending upon yogurt sales, it may not be a money-saver. However, being able to control the quality and content of the ingredients is a huge plus for me. Here's the vanilla yogurt recipe that we've been using for the last 5-6 batches:

Homemade Vanilla Yogurt
1 quart skim or 2% milk
6 tbs granulated sugar
1.5 TBS vanilla
6 oz commercial plain nonfat yogurt

Over medium, heat milk until it reaches 180 degrees. Remove commercial yogurt from fridge while you wait for the milk to boil.

Whisk sugar and vanilla into the milk and cook for 2 minutes.

Remove from heat and cool in a water bath until temperature reaches 110 degrees.

Stir in commercial yogurt and pour into glass jars. Place jars, uncovered, in your yogurt maker. Follow the directions for your yogurt maker for cooking time--mine is 9 hours for 2% milk and 10 hours for skim.

Cover and refrigerate for at least 3-4 hours before enjoying.

Yogurt lasts about 10 days.

Monday, September 10, 2012

Menu Plan for Week of September 10th

Last week's menu plan went fairly well. Of the seven dinners I'd planned, I prepared all five of the meals scheduled for Monday through Friday, though we had taco salad on Thursday and the turkey bolognese on Saturday. Sunday was leftovers which leaves two meals to carry over to this week.

I also made all three ice creams, although only the Coffee Chocolate Ice Cream from MyRecipes.Com was a hit out of the ice cream maker. The Chocolate Ice Cream from Tracey's Culinary Adventures is good but a bit grainy even though I was certain my chocolate melted completely. Finally, I will give the Brownie Batter Frozen Yogurt another shot as I think the fault lay with my using Yoplait yogurt rather than Dannon (or generic) as my base--Yoplait has a really strong taste which out-shined the chocolate.

Here's what's cooking this week. In addition to listing the meals I expect to prepare for dinner, I'm also noting what I need to do the evening before which will hopefully help me remember. Below you'll also find an assortment of desserts and other goodies which I hope to make to finish ingredients on hand or for the freezer.


Monday - Buttermilk Oven Fried Chicken with mashed potatoes and broccoli.
For next day: Defrost ground turkey.

Tuesday - Pasta with Turkey Meatballs and broccoli
For next day: Defrost shredded beef.

Wednesday - Beef Enchiladas (shredded meat in freezer), will try with flour tortillas instead of corn, and salad.
For next day: Defrost chicken breasts and marinate

Thursday - Garlic Balsamic Crusted Chicken with Wild Rice and Zucchini.
For next day: make pizza dough; defrost wings

Friday - Homemade Pizza (using my trustworthy dough recipe) and wings.
For next day: Defrost ground beef

Saturday - Homemade Hamburger Helper with salad or other green veg.
For next day: Defrost stroganoff

Sunday - Beef Stroganoff (freezer) with salad or other green veg.

Also Cooking:
Hearty Chicken Noodle Soup
Blueberry Corn Muffins
Vanilla Yogurt in my awesome yogurt maker (recipe to come)
Make more Coffee Chocolate Ice Cream and maybe try Dark & Delicious Chocolate Ice Cream

I hope everyone has a great week!

Monday, September 3, 2012

Menu Plan for Week of September 3rd

As you may know, my attempts at meal planning have met with sporadic success at best (see last fall). However, with a new baby and the departure of my wonderful auntie who prepared nearly all our meals for over a month, my days of shopping every other day and leisurely deciding what we'll have for dinner are things of the past. Thus, before she left I wrote my very first month-long meal plan. Sort of. Rather than plan the meals, e.g., Day 1 - roast chicken, Day 2 - lasagna, etc., I made a list of 31 meals to prepare taking into account what provisions I had on hand and in the freezer, recipes I wanted to try, and tried and true favorites. Then when preparing to shop for the week, which I have to do because perishables such as milk and produce must be restocked weekly, all I do is select a week's worth of meals from the list to make my menu. Here is what's on the agenda for this week:

Monday - Shredded Beef Chili (slow cooker) with cornbread muffins and salad.

Tuesday - Sweet and Sour Chicken with sauteed zucchini.

Wednesday - Beef Broccoli (slow cooker)

Thursday - Turkey Bolognese (sauce in freezer)

Friday - Homemade Pizza (using my trustworthy dough recipe)

Saturday - Buttermilk Oven Fried Chicken with mashed potatoes and broccoli

Sunday - Beef Enchiladas (shredded meat in freezer)

I also plan to try one or more of the following frozen goodies now that I finally have room to store my ice cream bowl as well as ice cream in the freezer:

Coffee Chocolate Ice Cream

Brownie Batter Frozen Yogurt

Chocolate Ice Cream

Tuesday, August 21, 2012

Potato Gnocchi with Sage Brown Butter

My husband claims that this recipe isn't for actual gnocchi, even though he found it tasty. I suspect that is because he is used to his mother's gnocchi which uses leftover mashed potatoes and a northern Italian marinara sauce, which is very distinctive (it contains cloves X0). However, every recipe I've stumbled upon consists of the ingredients such as I used--baked potato, eggs, flour, and some seasoning, so I'm calling it gnocchi. Specially, I followed this Michael Chiarello recipe. Since I had some sage that was on its way, I whipped up a quick sage browned butter sauce as an accompaniment.

Photobucket

For Gnocchi
1 lb russet potatoes, baked
3-4 large egg yolks (I used 1 whole egg and a couple yolks)
1/2 c parmesan
1/2 tsp salt
1/4 tsp pepper
1 c all purpose flour

Scoop insides of potatoes and mash with a fork. Alternatively, pass through a grater or ricer. You should have about 2 cups.

Mix flour, eggs, cheese, and salt and pepper as you would make pasta treating the potatoes like flour. Make a well in the middle of the potatoes for all ingredients except flour and press together with hands. Sprinkle the flour over the mixture in parts, pressing it into the potatoes as you go and until the dough holds its shape. If it is too dry, you can add a little liquid (water or egg) or flour if too wet.

On a well-floured surface, cut the dough into 4 pieces. Roll each piece into a rope about 1/2-inch in diameter. Cut into 1/2-inch-long pieces. Lightly flour the gnocchi as you cut them. You can cook these as is or form them into the classic gnocchi shape with a gnocchi board, ridged butter paddle, or the tines of a large fork turned upside down. (For more instructions on how to shape the gnocchi, see the original recipe.) Allow to dry for 15 minutes before cooking.

Bring a large pot of water to a boil and salt, as desired. Drop in the gnocchi and cook for about 90 seconds from the time they rise to the surface.

For Sage Browned Butter Sauce
1/2 c butter
large handful of sage leaves
salt and pepper

Melt butter on medium low until it begins to brown, which is just past the melting stage. For a nice tutorial on how to brown butter go here. After the butter has melted, add the sage. Salt and pepper to taste.

Serves 4

Photobucket

Monday, August 20, 2012

Peach Muffins

Wow, it's been more than a month since I've posted. The whole having a baby thing kept me a little busy--not too busy to cook, but too busy (or exhausted) to blog about it. If you'd like to meet my little one, hop over to my Project Blueberry to meet him.

Here's a quick recipe for muffins that I whipped up yesterday by modifying this recipe for blueberry muffins. I was inspired to bake my own peach muffins after having a fantastic peaches and cream muffin at Starbucks on Friday. (Note: The "cream" part was simply icing piped into the middle, which you could easily add to this recipe.) In modifying my blueberry oat muffins recipe, I omitted the oats. However, I think either oats or nuts would be a yummy addition.

Photobucket

2.5 c all purpose flour (I used 1 c white whole wheat and 1.5 c all purpose)
2 tsp baking powder
3/4 tsp cinnamon
1/2 tsp salt

1/2 c butter, melted
1/2 c brown sugar
3/4 c granulated sugar (I used slightly less)

2 eggs (or 1 egg + 2 whites)
3/4 c milk (I used 1/4 c skim milk and 1/2 c half and half)

2 c peaches, diced (frozen or fresh)
1/2 c oatmeal (quick cooking) or nuts, if desired.

Preheat oven to 375.

Whisk together flour, salt, baking powder, and cinnamon in a small bowl.

In stand mixer or larger bowl, beat together sugars and butter until well-mixed and fluffy. Add in eggs, one at a time.

Add in half of flour mixture, then milk, then remaining flour. Scrap down bowl, as needed.

Stir in peaches and nuts/oats, if using. You may wish to mash some of the peaches.

Divide evening into muffin cups. Tap pan on counter to eliminate air bubbles.

Bake for 25-30 minutes until a tester comes out clean.

If desired, sprinkle with a couple teaspoons of sugar (larger granules, preferred) and/or cinnamon as soon as they come out of the oven.

12-18 muffins

Photobucket

Saturday, August 11, 2012

Homemade Chicken Stock

One of the staples in my kitchen is chicken stock or broth. I use it for soups, sauces, and even making rice. I don't really know the difference between chicken stock and broth, however commercial stock tends to be a fuller-flavored product than broth. While I usually keep a carton or two in the pantry for emergencies, I love making my own. It's so simple and it makes me feel better to know that I'm controlling the ingredients of something I cook with so much. This recipe is more of a method than an actual recipe. Honestly, it's as simple as throwing (leftover) chicken in a pot with some veggies, seasonings, and water. You then simmer the whole lot for a few hours and viola!

If you must follow a recipe, here's generally what I do:

Sorry, no pictures!

*1 whole chicken (or 2-3 lbs chicken bones, preferably with a little meat)
1 medium onion, quartered
2 carrots, cut into 1" pieces
2 ribs celery, cut into 1" pieces
1 bay leaf
1 TBS peppercorns
1-2 tsp salt
Handful of fresh herbs (e.g. parsley, thyme, rosemary), if desired

Place all ingredients in your largest stock pot and cover with as much water as possible.

Bring to a boil. Cover and reduce heat. Simmer for 2-3 hours until the liquid is a lovely golden color.

Strain and skim the fat before portioning for the freezer. I do this process twice--once before refrigerating the stock and again before freezing in 2 cup portions.

*I prefer to use a whole chicken so I get two products out of one cooking process--at least 4 cups of cooked meat which I shred for salads, enchiladas, and casseroles plus about 14 cups of stock. After Thanksgiving, I use the entire turkey carcass to make turkey stock.

Sunday, July 22, 2012

Baby Thank You Clothesline Card

Here's another baby-themed thank you card. There's something about onesies--you can never have enough whether they be actual baby clothes or crafts which feature them. Oh, I also made one for baby's wall, which I'll show as soon as I affix it.

Anyway, inspired by the card feature from the Welcome Baby image on Life's a Party, I used the negative cuts to make this card, strung a clothesline out of twine, and cut clothespins from Straight from the Nest. Cardstock is PaperTrey Ink and assorted bits from my stash. The sentiment is cut using the Cricut Alphabet cartridge which came with my E2. The simple scallop edger is from Stampin Up!

Photobucket

Have a great week!

Saturday, July 21, 2012

You're a Hoot!

I've been hard at work decorating the baby's room, making dozens of birth announcements, and thank you cards. In between, I've made a couple of anytime cards like these. Carolanne at Logan's Crafty Logan's Crafty Momma jumped the Cricut ship and purchased a Silhouette Cameo. As a result, she sold all of her cartridges. I couldn't resist so I bought Hoot and Holler and Life's a Beach.

Today's card features Hoot and Holler and My Pink Stamper's Punnylicious stamp set. Ribbon and cardstock are from Joann's.

Photobucket

Photobucket

Photobucket

Sunday, July 8, 2012

Another Whole Wheat Oatmeal Pancake Recipe

Well, it's Sunday morning. How about some pancakes? Periodically, I attempt to find a healthier pancake recipe. However, I'm not brave enough to go for the oat bran sort or super fancy grain. However, a little wheat germ or oatmeal seems harmless enough. A few months ago, I tried this recipe, adapted from Tracey's Culinary Adventures. It call for pre-soaking the oats (like most recipes which incorporate oatmeal), and I wasn't especially keen about the texture--it was incredibly hearty, rather than light and fluffy. Today's recipe is originally from The Happy Housewife and calls for grinding the oats in your food processor prior to incorporating them into your batter. I probably ground them too fine as this recipe was almost too light--in other words, because they were "oatmeal" pancakes, I was looking for some extra texture. However, it you're trying to "sneak" oatmeal into your family's diet. One of the things I especially like about this recipe, however, it that it was perfectly proportioned for 2-3 people. After breakfast, I had about 4-5 pancakes leftover for the freezer. Try it and let me know that you think!

Photobucket

1/2 cup oatmeal
3/4 cup whole wheat flour
1/4 c all purpose flour (or you could use all wheat)
1/4 cup brown sugar
2 teaspoons baking powder
1/2 teaspoon salt
1 egg, lightly beaten
1/4 cup applesauce
1 1/4 cups milk*

Grind oatmeal in food processor until desired texture is reached--not too fine if you want it to add texture. Whisk together flours, baking powder, sugar, and salt.

Add egg, applesauce, and milk. (I make a hole in the center of my flour mixture and gently incorporate egg and apple sauce before adding the milk.) Stir well to combine.

Cook on a preheated griddle until golden brown and cooked through.

*Note: you may want to use more or less milk than called for in the recipe, depending on the desired consistency of your batter, humidity, and types of flour and oatmeal. The original recipe calls for 1 1/3, although many commentators reported using much less. I was happy with 1 1/4 c.

Serves 2-3

Friday, July 6, 2012

Pavlova - (aka big marshmallow with fruit)

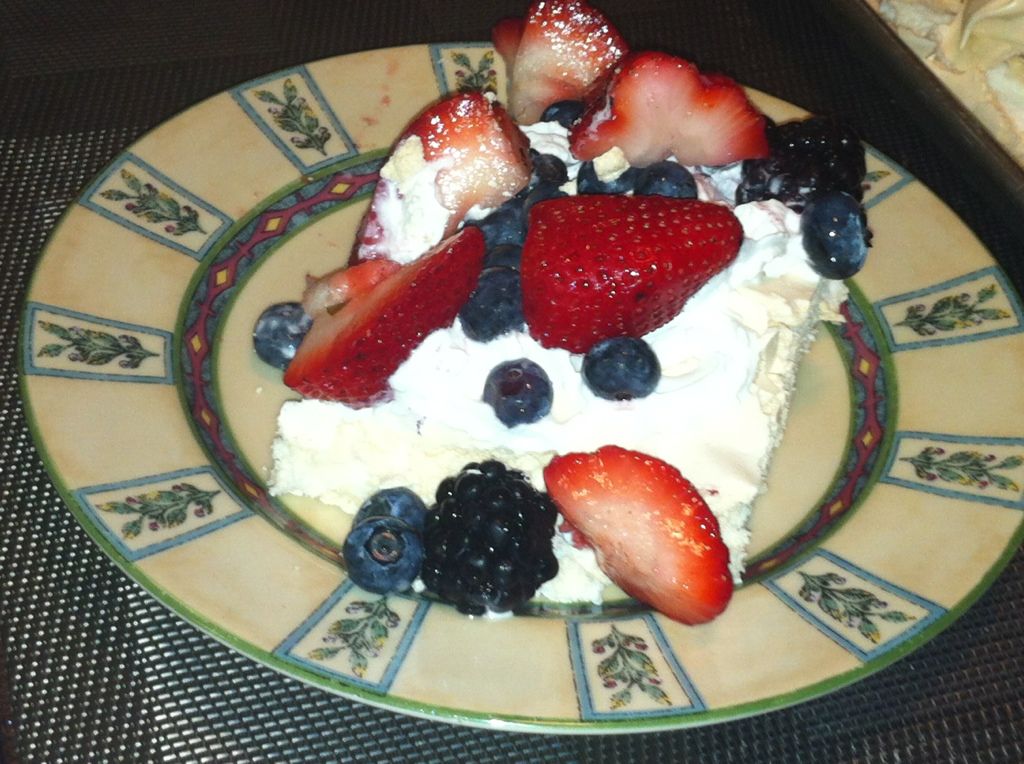
While I was in Hawaii last month, my office threw me a surprised baby shower. Although the whole affair was fun and so incredibly thoughtful of them, the absolutely highlight for me was the dessert my former secretary made--a baked meringue covered in berries. First, a little background on Jane--she's a plucky Brit who's been living in the states for a couple decades and in Hawaii for I believe the last 7-10 years. She's now probably in her 50s, though it's rather difficult to tell because acts like a crazy school girl (and I do mean crazy) 90% of the time. However, she has a big heart and I love her. Among her many talents is baking, mostly recipes from home using time-tested recipes. For dessert, she made this gorgeous baked meringue loaded with berries. Though I typically stay far clear of meringues because I associate them as being flavorless things with a strange texture, knowing her talent, I tried her dessert. It was one big fruit-laden marshmallow! With just the crust of the typical meringue, the inside was delightfully soft and chewy. Although she refused to share the recipe, she did confirm her "secret" ingredient (vinegar) which appears in this recipe from Joy of Baking.

I had to attempt my own version.

It was hit! Not to mention, it was incredibly easy with a stand mixer. I didn't even have to use cream of tartar to whip my egg whites into peaks in minutes. The vinegar keep them chewy on the inside, just as promised. I will say that fruit which is a bit on the tart side (fortunately what we had) is required as the recipe as written makes a very sweet marshmallow. I will likely play around with this recipe in the future to make the it less sweet so I can nibble on the marshmallow by itself :) Although there's a full cup of sugar in this recipe, I think it falls on the non-lethal side as it's made with all egg whites and no fat, unless you add whipped cream, of course.

Without further ado:
Uploaded from the Photobucket iPhone App
My apologies for the terrible picture of the final product. Since we were taking it to a dinner party, I didn't want to dress it with the berries until we were ready to eat and the lighting was terrible.

Pavlova
4 large egg whites
1 cup superfine (castor) sugar*
1/2 teaspoon pure vanilla extract
1 teaspoon white vinegar
1/2 tablespoon cornstarch
3 cups fresh fruit (e.g. strawberries, blackberries, blueberries)

*To make superfine sugar, I pulsed granulated sugar in my food processor.

Preheat oven to 250 degrees. Line a baking sheet with parchment paper.

In the bowl of your electric mixer, with the whisk attachment, beat the egg whites on medium speed until soft peaks form.

Add sugar, a tablespoon at a time, and continue to beat, on high speed, until stiff and shiny peaks form. (Test to see if the sugar is fully dissolved by rubbing a little of the meringue between your thumb and index finger. If it feels gritty the sugar has not fully dissolved so keep beating until it feels smooth between your fingers).

Beat in the vanilla extract. Sprinkle the vinegar and cornstarch over the top of the meringue and gently fold in.

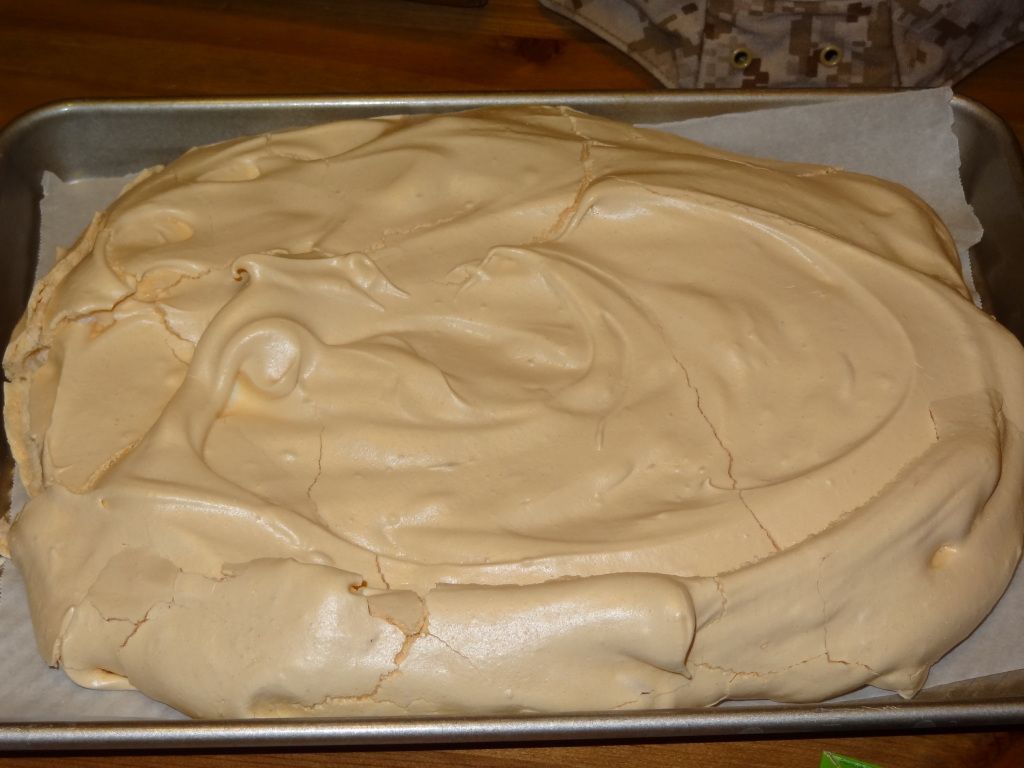
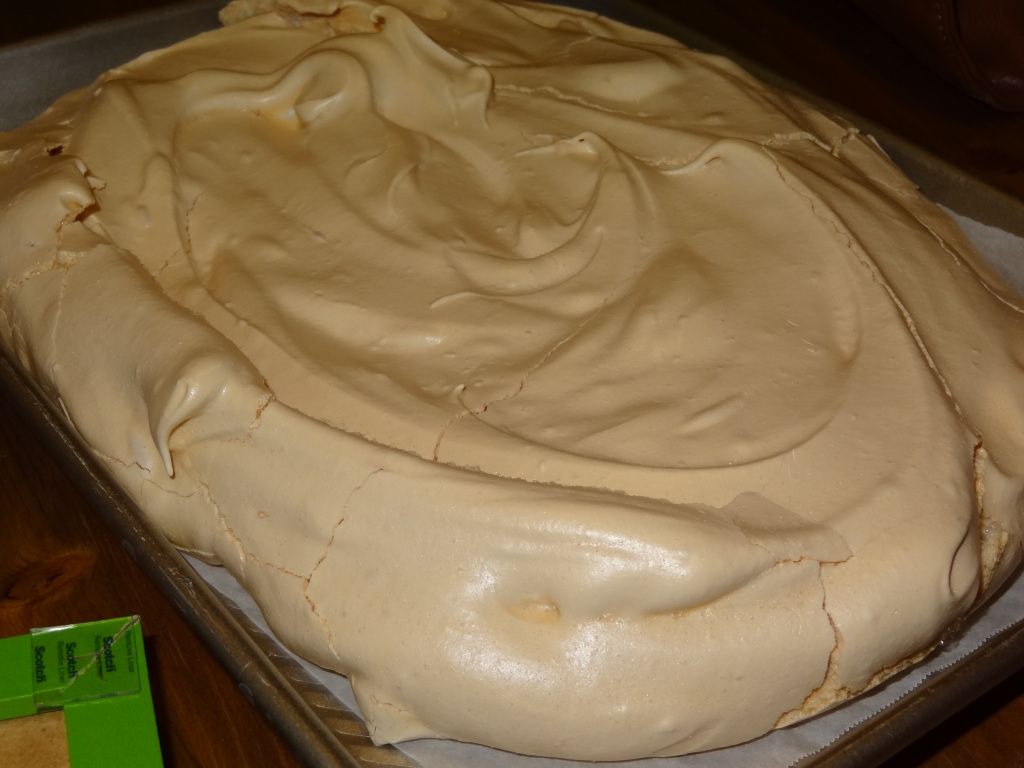
Pour meringue onto parchment paper, smoothing the edges, making sure the edges of the meringue are slightly higher than the center. (You want a slight well in the center of the meringue to place the fruit--something I did not do very well.)

Bake for 60 to 75 minutes or until the outside is dry and is a very pale cream color. Turn the oven off, leave the door slightly ajar, and let the meringue cool completely in the oven. (The outside of the meringue will feel firm to the touch like a traditional meringue, but the inside will be marshmallowy.)
Photobucket

Photobucket>

When ready to serve, top with fresh fruit (and whipped cream, if desired).

The cooled meringue can be made and stored in a cool dry place, in an airtight container, for a few days if it lasts that long.

Monday, June 18, 2012

Strawberry Frozen Yogurt

I love my ice cream maker, but sadly had not had the space to make homemade ice cream in at least a month. it might be because there have been fantastic sales on Breyer's Blasts, which is a lowfat ice cream product loaded with candies. The Snickers and Oreo Cookies & Cream Chocolate flavors are my favorites, but they have more than a dozen--nearly all at less than 5 g of fat per serving. But I digress.

My auntie has a separate freezer of which I'm sorely envious. Because of all the space, she keeps not one but two ice cream freezer bowls frozen at all time! (In my little freezer, I can either had ice cream or a freezer bowl in the freezer due to minimal space). Thus while visiting her, I had to make ice cream! (or rather frozen yogurt)

This recipe is actually one for raspberry frozen yogurt which I found at the blog Finding Joy in My Kitchen. Frozen raspberries were ridiculously expensive, so we went with a mixture of frozen and fresh strawberries. The recipe calls for 3/4 c sugar, but I think you could get away with closer to 1/2 c of sugar. However, my auntie likes things sweet and it is true that once frozen the flavor becomes a bit muted so we used the whole amount with good results. However, if you're worried about the amount of sugar, I'd start at a tablespoon or two more than 1/2 c and go to slightly sweeter than taste.

the recipe made about 50% more than the 1.5 qt Cuisinart ice cream bowl could hold. I think it will be okay in my 2-qt bowl at home or at least most the mixture. We used the leftovers to make popsicles. All were quite yummy.

Photobucket

Strawberry Frozen Yogurt
2 C plain yogurt
3 C raspberries (or strawberries)
3/4 C sugar
1/2 C milk (I used 1/2 and 1/2)

Puree berries in a blender. If you are using frozen, put some of the milk and yogurt mixture in the bottom first or allow the berries to melt a bit first.

Whisk together remaining ingredients.

Pour into ice cream bowl and churn as directed by your ice cream maker's instructions. Serve as soft serve immediate or freeze until firm.

Makes about 10 cups.