Thursday, July 8, 2010

Two Fish Thinking of You

I was finally able to update my Gypsy Tuesday evening! The Provocraft server was down all weekend, which had me and many others in quite a tizzy as we feared our brand new machines would be forever useless (or at least limited only to the most basic of features). However, having learned on Youtube that certain folks were successful, I raced home from work, plugged in my Gypsy, clicked the Gypsy Sync program, and waited. I was in luck! As though the past weekend was a figment of my imagination, my new firmware and content (read: all those Cricut Lite cartridges) were uploaded to my machine in minutes. One more step to update my Cricut, and my new toy was all set to play. This is a simple card using Create a Critter and my Gypsy.

Photobucket

Materials:

- A2 blue card base

- strip of Bazzil textured cardstock in tan 5.5" long and cut in peaks and valleys to resemble sand.

- Cartridge(s): Create a Critter - Greenery is an accessory to the Octopus cut at 5" and 4", also stretched using my Gypsy), fish cut at 3")

- Adhesives: Tombow Mono Adhesive, Zig 2-way glue pen

- Stamps: Peachy Keen Stamps - "Critter Faces," Inkadinkado - Kathy Davis "Expressions" using and Colorbox chalk ink

- Cuttlebug embossing folder: Tiny bubbles

- Corner Chomper


Photobucket

Wednesday, July 7, 2010

The Greeting Farm: Rain Rain

It's been hot as heck these past few days, easily into the 90s with the heat index. We had also been promised thunderstorms as a result of the heat. After three days of promised storms but nothing, we finally got a couple of brief cloud bursts last evening. Since five new Copic markers had arrived in the mail, I saw it as an opportunity to work on my coloring technique (which still has miles to go, unfortunately).

Photobucket

Materials:

- A2 kraft card base

- dark blue cardstock cut at 4 x 5.25"

- Cartridge(s): Gypsy Wanderings - Stem1 (Decor Tag Feature) cut at 4", then cut in half to make an oval, also cut at 1.5" and 1/75"; Fleur2 (Decor Tag Feature) cut at 4 x 5")

- Adhesives: Tombow Mono Adhesive, Zig 2-way glue pen, tape

- Stamps: Stampendous "Notes for a Friend," The Greeting Farm "HG Rain Rain," using Copic markers, Colorbox chalk ink, and Tim Holtz Distress Ink "Old Paper"

- Stickles, ribbon (1/8")

- Corner Chomper


Photobucket

Tuesday, July 6, 2010

Pirate Birthday

This card is a second edition version of the one I made my sister-in-law for her birthday. That card was bigger and super cute, however we had some technical difficulties with the picture-taking that I did not learn of until after it was signed and sealed. Tragedy yes, but inspiration to make one even better. Hers was roughly 5 x 7" while this one is A2 sized. I did a staggered gatefold so it would be heavier and stay closed without a fastener. (As you can see from the first picture, that isn't quite the case, but oh well).

Photobucket

Photobucket

Materials:

- A2 white card base

- white cardstock cut at 1.25 x 3", black cardstock mat cut at 1.5 x 3.25"

- Blue bubble paper, cut at 2.5 x 5.25", 1 5/8 x 5.25"

- Cartridges: Create a Critter (Octopus and seahorse cut at 3", crab at 1"); Paper Doll Dress Up (Pirate cut at 4")

- Adhesives: Glue Glider Pro, Zig 2-way glue pen, foam tape

- Stamps: Stampendous "Happy Messages," Peachy Keen "Critter Faces," using Colorbox chalk ink

- Stickles


Photobucket

Photobucket

Photobucket

Photobucket

Monday, July 5, 2010

Savory Buttermilk Pancakes (with Bacon)

Here's yet another rendition of this pancake recipe that I first used here back in February. One of the reasons I probably gravitate to this recipe is because it only makes enough for 2 with a couple of leftovers for snacking later. Also, it has buttermilk and I go through buttermilk kicks, as you know. This time I added bacon and swapped in some whole wheat flour. I wish I could find the bacon waffles recipes that I came across probably about a year ago, but since I didn't feel like looking for it in my recipe clippings, I had to wing it. The result was quite tasty and filling--suitable for lunch, brunch, or even dinner.

Photobucket

Ingredients:

1/3 c whole wheat flour

2/3 c all-purpose flour

1 tsp baking powder

1/4 tsp baking soda

2 Tbs sugar

1/4 tsp salt

1 egg

1 c buttermilk

3 Tbs melted butter

4-6 strips of bacon, cooked and minced (I cooked mine under the broiler for 5 min)

Directions

1. Mix dry ingredients together.

2. Add butter around the edges. Make a well in the center for the egg and scramble slightly. Add buttermilk gradually while whisking the mixture together. Do not over-mix, but make sure to elminate all floury lumps. Stir in bacon.

3. On a preheated griddle (medium to medium high), drop two heaping tablespoons at a time for large mini pancakes. Cook about 3 minutes per side, flipping when visible side begins to bubble.

4. Serve with fruit and choice of syrup.

Serves 2-3

Little Princess

I promise to try to start scheduling posts again so they're there first thing in the morning. It's just been difficult to be social with my auntie in town (well, as social as I get), and take care of the little pleasures like blogging. We have done a whole lot of papercrafts with my Cricut and I think she's as enamored of it as I am! As I noted last week, she designed a number of the 4th of July cards that we gave to my inlaws. Anyway, here's a baby card I made for the new grand-baby of one of her friends. She was supposed to design it, but didn't get much farther than remarking how cute "Little Princess" was before the 4th of July fireworks over Lake Michigan began outside my window. I didn't get back to the baby card until after she'd gone to bed. Anyway, the majority of the card could have been made using the Cricut Lite Sugar and Spice cartridge, however I didn't notice the crown until after I had cut one from Paper Doll Dress Up. The onesie is from B is for Boy, however it's fairly simple to draw a onesie. Hope she likes it!

Photobucket

Materials:

- A2 white card base

- Mint green card stock cut at 4 x 4 3/8"

- DCWV paper, I think it's the baby girl stack, cut at 3.75 x 4.25"

- Cartridges: B is for Boy (onesie cut at 3"); Sugar and Spice (Little Princess and Rattle cut at 1"); Paper Doll Dress Up (crowns cut at 1 and .5")

- Adhesives: Tombow Mono Adhesive, glue dots of varying sizes


- ribbon, pearls

- Corner Chomper

Photobucket

Sunday, July 4, 2010

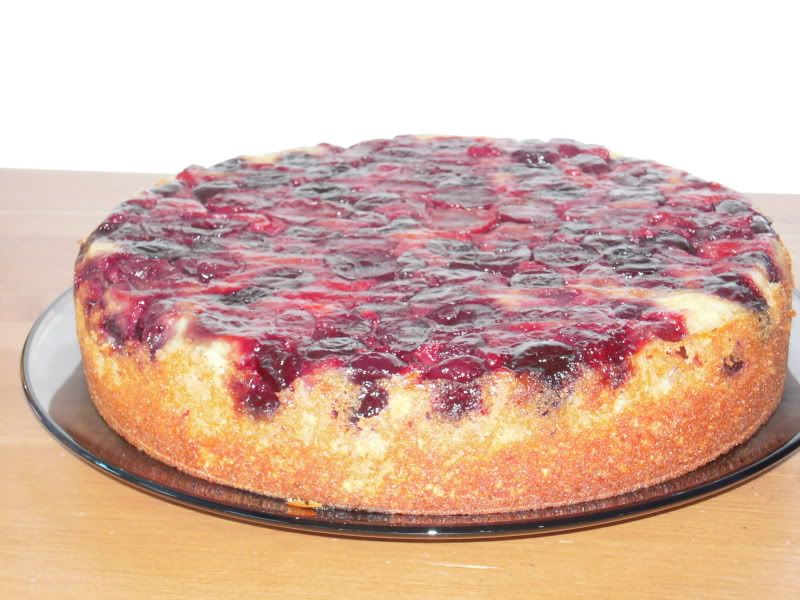
Cherry Upside Down Cake

This recipe is adapted from one found in this month's Olive. I made it for a 4th of July bbq and it was a big hit. This one requires you to bust out your electronic scale and do a lot of weighing, but again worth it. I actually like measuring things because it encourages me to do mis en place and then just whip up the dish in minutes. This cake a spongy and best served with a dollop of whipped cream, greek yogurt, and/or an orange liqueur such as Cointreau or Grand Marnier. (Thanks to my father-in-law for the liqueur idea).
Photobucket

Ingredients

200 g softened butter (this is about a tablespoon or two less than 1 cup)

3-4 Tbs apricot preserves (stir rapidly first to make spreadable)

500 g pitted sweet cherries (I halved mine)

200 g granulated sugar (or caster superfine)

Zest of large orange (4-5 tsp)

100 g ground almonds (used my food processor)

150 g self-raising flour

1/2 tsp salt

1 tsp vanilla

100 g Greek yogurt

2 eggs + 4 egg whites (or 4 eggs)

Directions

1. Preheat oven to 320 degrees. Spray 10" springform pan with cooking spray and cover bottom with parchment paper, cut to fit.

2. Pre-measure all your ingredients into separate bowls. This will help you make sure every ingredient is added.

3. Spread cherries in an even layer in bottom of pan.

4. In your stand mixer, beat all ingredients together until thoroughly combined. (Mix butter and sugar together first, then add rest of ingredients, turn a couple of times with a spatula to moisten flour, then use mixer on medium high to thoroughly combine. Be very careful not to overbeat).

5. Bake for about 60 minutes or until a skewer comes out clean.

6. All to cool in pan for 30 minutes. Flip onto a cake.

7. Serve warm or at room temp with a accompaniment of your choice (e.g. greek yogurt, whipped cream, Grand Marnier)

Photobucket

Serves 8

Happy 4th of July

Here's a simple 4th of July card using the Block Party Cricut Lite cartridge. It was given to my husband's great-uncle. I finished the card this morning, however have been on the since the moment I woke up around 530am. We just got home from a bbq at his parents' house, so I can finally do some quality blogging and crafting.

Photobucket

Materials

- A2 white card base

- Red card stock cut at 4 x 5.25"

- Pattern 4th of July themed paper from the Target dollar bin, I think, cut at 3.75 x 5"

- Rockets from Cricut Lite Block Party cartridge cut at 4" and 5"

-Sentiment cut using the Gypsy font at .75", welded together

- Adhesives: Glue Glider Pro, Glue Dots, Xyron, Mod-Podge (for gloss), Zig 2-way glue pen

- corner chomper


Photobucket

Saturday, July 3, 2010

My Pink Stamper Challenge

This is my first time participating in a My Pink Stamper Color Challenge. The challenge was to use Pink, Brown, Orange, Green. As I was browsing through my scrap file, I discovered this awesome dot paper that had...what do you know? Pink, orange, and brown. Perfect! And since the price is her new stamp set called Buggy Punnies, what could be more perfect than a cute green bug? Here's my card:

Photobucket

Materials:
- A2 pink card base
- Pattern paper cut at 4 x 5.25" and 4 x 1.25"
- Create a Critter Caterpillar cut at 3"
- Sentiment from Stampendous stamp set called "Happy Messages"
- ribbon (Michaels)
- Adhesives: glue dots, Glue Arts Glue Glider Pro
- We R Memory Keepers Corner Chomper
- Colorbox chalk ink


Photobucket

Now I just have to figure out how to link it. Have a great day!

Friday, July 2, 2010

What's Up Giraffe?

Yesterday was a wonderful mail day. I received my We R Memories Keeper Corner Chopmper, Critter faces stamp set from Peachy Keen Stamps, and My Pink Stamper's Punny-licious stamp set. Here's a simple card using both the corner chomper and one of the MPS stamps. Since getting all those Cricut Lite cartridges, I felt as though I had been neglecting Create a Critter, which is simply terrible! It was fun to break him out.

Photobucket

Materials

- A2 white card base
- pattern paper, cut 4 x 5.25"
- Create a Critter giraffe and vine (monkey accessory) cut at 4" and 3", respectively
- Misc paper flowers, brads, and twill ribbon (all Target, I think)
- My Pink Stamper Punny-Licious stamp set
- Colorbok chalk ink
- We R Memory Keepers Corner Chomper
- Adhesives: Xyron, Zig two-way glue pen, Glue Arts Glue Glider Pro, foam tape, glue dots


Photobucket

Thursday, July 1, 2010

No card today, but goodies from Scrapbookpal.com, Gypsy, and Corner Chomper

No card today, but I've been doing some shopping. My auntie and sales have been fueling my Cricut addiction. This is what we're waiting to come in the mail:
Photobucket
I don't think I've made a card in the last year without rounded corners. If I wait till the last minute and round the corners as a finishing touch, with my current mini punch I run the risk of not being able to fit the card into the punch slot because of the number of layers or a random thick embellishment. As I understand it, the We R Memory Keepers Corner Chomper will go through chipboard.

Photobucket
Yes, that's a Gypsy. I've had my Cricut Create less than 2 months and I'm already charging ahead to the next level. This nifty little gadget allows you to store all your cartridges in one place, similar to the idea of loading all your music CDs to your ipod. I will never have to insert a cartridge into my machine again as I can access them all from this little handheld. More importantly, the machine comes with great design features such as the ability to black out elements that I do not want (such as faces), so I can use nifty face stamps from Peachy Keen Stamps.

While I'm waiting for these two bigger items, I did a little shopping at what is fast becoming my fav scrapbook supplies store on the web: Photobucket.

Scrapbookpal.com offers free shipping for orders over $25!!! This is an incredible boon for me as other than Amazon where most scrapbooking supplies are priced to the max, I can find no other place on the web that requires such a low amount to obtain free shipping. They specialize in Cricut Cartridges, Cricut machines, and other scrapbooking supplies! While I'm trying not to buy a new cartridge until I've spent more time with the ones I have, I have bought an array of smaller items such as a variety of adhesives, punches, and embossing folders. Just this morning I took the plunge and bought....Copic markers because there's a sale right now that seemed too good to pass ($4.79 ea for the Copic Sketch markers). As you may know, I had begun a collection of the Tombow Dual brush markers which are much cheaper usually, but had been having difficulty finding the colors I wanted at a reasonable price. In other words, even if a pen costs $2, if I pay $5-7 in shipping, I'm not saving a lot unless I buy many many pens. Copics are widely touted on the net for their superiority and have a million colors, so I think this was a good investment.

Can't wait for the mail to arrive!

Wednesday, June 30, 2010

Cricut Lite Block Party

I was sorely tempted to schedule this card for the 4th of July as I'm not sure I will have time to make more cards before Independence Day rolls around. However, since the darn thing took me quite a lot of time, I wasn't able to make any others. I will have to attempt to make more tonight or tomorrow. This card features that Cricut Lite Block Party cartridge. I was initially hesitant about this card, but it's turning out to be a wonderful summer-themed cart. That being said, making the picnic table was a pain in the butt because I couldn't "see" what colors each layer was supposed to be. I really wish Cricut would provide suggestions as to color choices for images besides the main image. Here's my card.

Photobucket

Materials:

- A2 white orange base. If using orange or other dark color, use a lining. Mine is punched using Martha Stewart's scalloped and dots punch.

- Pattern paper cut a 4 x 5.25"

- Picnic table from Cricut Lite Block Party, cut at 3.5". The hotdog is cut a 1/2", and the watermelon and burger are both cut at 3/4". The food is adhered using a glue dots for a bit of dimension.

- Grass is from Paper Doll Dress Up and cut at 3/4". I am so pleased with the extras on this cart--I've only made one doll, but used the accessory many times.

- Sentiment cut at 3/4" using the Alphalicious cartridge with the Short Stack feature key on. I then ran the letters through my Zyron.

- corner rounder

- Adhesives: Zig glue pen, Glue Arts Glue Glider Pro, glue dots, Xyron


Photobucket

Photobucket

Tuesday, June 29, 2010

You're My Cup of Tea

I have been hunting a tea pot for ages and was thrilled to see one on the Cricut Lite Savory cartridge. I have the From My Kitchen cart, but that didn't have a tea pot, just a coffee pot. I collect tea pots, so the fact that my cartridge collection didn't include a tea pot was tragic. Now that the issue is resolve, here's my card:

Photobucket

Materials:

- A2 white card base. (I inadvertently used a glimmer cardstock)

- Pattern paper from DCWV's Nana's Kitchen paper pad, cut a 4 x 5.25"

- Teapot from the Savory Cricut Lite Cartridge cut at 3.5" on DCWV textured cardstock, distressed on the edges with black chalk ink, and popped up with foam tape.

- Sentiment cut at 3/4" using the Alphalicious cartridge with the Short Stack feature key on. I then ran the letters through my Zyron.

- corner rounder, small flower punch

- Gossamer ribbon from Michaels, small adhesive pearl

- Adhesives: foam tape, Glue Arts Glue Glider Pro, glue dots, Xyron


Photobucket

Monday, June 28, 2010

The Greeting Farm: Flapper Anya

Hello everyone. Here is another card featuring a stamp from The Greeting Farm. I'm really liking how just a different color scheme creates a completely different card. Here's my first card using this stamp, and as you can see it looks very different. Today's card looks a little more springy and youthful, while last week's card might be a bit more sophisticated. I also used mostly scraps for this card, along with some fun dollar bin ribbon from Michaels.

Photobucket

Materials:

- A2 white card stock base

- Small scrap paper from DCDV Nana's Kitchen collection, cut at 4" x 2.75"

- Blue card stock, cut 3.5 x 3.5" and embossed using a Cuttlebug folder "Spots and Dots"

- The Greeting Farm Stamp: Flapper Anya colored with Tombow dual brush markers

- Ribbon from Michaels

- Message from Stampendous stamp set "Happy Messages"

- corner rounder

- Adhesives: foam tape, Glue Arts Glue Glider Pro, glue dots

Sunday, June 27, 2010

The Greeting Farm: Fleur Anya

Good morning. Here is another card featuring a stamp from The Greeting Farm. Sorry for the washed out pix, but it's an incredibly bright and sunny morning. The paper is from a DCWV collection called "Nana's Kitchen." even though the paper wasn't too dark, I decided to put a lining on the inside and use a new corner punch from Fiskars.

Photobucket

Materials:

- A2 blue card stock base

- Mint green card stock cut at 4 x 5.25," punched using the Martha Stewart Edge "Scallop Dot Edge " punch

- DCWV pattern paper from the Nana's Kitchen paper pad, cut to 4 x 5"

- white or cream card stock for lining, cut at 4 x 5.25" and punched with Fiskars twist and flip 2-in1 corner punch (scalloped edge design)

- The Greeting Farm Stamp: Fleur Anya colored with Tombow dual brush markers

- Colorbok adhesive gems

- Ribbon from Michaels

- Message from Hero Arts stamp collection called "Everyday Sayings"

- corner rounder

- Adhesives: foam tape, Glue Arts Glue Glider Pro, glue dots, tape


Photobucket

Saturday, June 26, 2010

BBQ Grill

Here's another card that my auntie and I made this morning. We've been so busy all day that I'm just getting around to posting it now. Anyway, it's made using the Cricut Lite Block Party cartridge. There's a lot of good summer-related stuff like picnic tables, burgers, etc on this cartridge. This one will likely be a 4th of July card.

Photobucket

Materials:

- 5 x 5" white card base

- Tan cardstock cut at 4.75 x 4.75"

- DCWV pattern paper from the Nana's Kitchen paper pad, cut to 4.5 x 4.5."

- Grill 2, cut at 4". It's a 4-layer cut with some small pieces that I ran through my Xyron. The steak and greeting are cut a 1". I glossed the grill with Mod-Podge.

- corner rounder

- Adhesives: foam tape, Zig two-way glue, Glue Arts Glue Glider Pro


Photobucket

Photobucket

Friday, June 25, 2010

Chicken Stuffed with Goat Cheese and Sun-Dried Tomatoes

Here's the wonderful dinner my auntie had waiting when I came home from work. It's an Ina Garten recipe found here and consists of little more than the title ingredients. She paired it with a deceptively exotic but simple dish. Marvelous!

Photobucket

Photobucket

Photobucket
Tagliarelle with Truffle butter

Woof Woof

My auntie's visiting me this week and next (Yay!). As you know, she bought me my Cricut Create and more than half of my cartridges. Finally, I have a chance to put her to work. Here is her very first Cricut card. (We made it together, but she designed it and did most of the cutting and gluing.) Love it!

Photobucket

Materials:

- 5 x 7" white card base

- Blue sky pattern paper (brand unknown) cut at 6.75 x 4"

- 1.5 x 6.75" brown cardstock, embossed with a Cuttlebug embossing folder, then rubbed with "Weathered Wood" Distress Ink.

- Create a Critter - Dalmation and house (p. 35) cut at 3.5".

- Sentiment - font is from the Cherry Limeaide Cricut Lite cartridge, cut at 3/4" and run through my Xyron.

- corner rounder

- Adhesives: foam tape, Zig two-way glue, Glue Arts Glue Glider Pro


Photobucket

Thursday, June 24, 2010

Sweet Dreams Lamb

This would be a cute little girl's card. I ran the card and wooly part of the lamb through my BigKick using the Swiss Dots Cuttlebug embossing folder. The lamb is popped up using foam tape. Even though I do not have kids and have no need to make a "chore chart" in my house, I'm finding great uses for that Cricut Lite cartridge.

Photobucket

Materials:

- A2 white card base, embossed on the ends with the Swiss dots Cuttlebug embossing folder

- Blue card stock scallop circle from Alphalicious cut at 3.75"

- Create a Critter lamb p. 71 cut at 2.75". I ran the "wooly" layer through the same embossing folder as above. It's hard to tell, but the gray/silver is glimmery. Message is cut at 1" and was run through my Xyron.

- Chore Chart bed cut at 2.75"

- Adhesives: Scrapbook Adhesives, foam tape, Zig two-way glue, glue dots


Photobucket
Sorry for the glare, but you can see that I popped up the lamb to add dimension here.

Wednesday, June 23, 2010

Thinking of You Turtle

I'm trying to get posts scheduled through the week since my auntie is coming to visit tomorrow! Actually, she doesn't arrive until after midnight Thursday morning, but since I likely won't have gone to bed yet, we'll say that she's arriving on Wednesday. Anyway, here's a simple card made using Create a Critter and some more flocking. I messed up the flocking a bit, but it isn't too noticeable unless you're looking for it. The orange flowers were intended to pick up bits of orange in the patterned paper, but then I covered most of them up and in retrospect could have used a solid ribbon. I really like how the pink card stock offsets the deeper pink flowers. I also Mod-Podged the entire turtle to give him a gloss sheen and popped him up with foam tape.

Photobucket

Materials:

- A2 pink card base

- Pattern paper cut 5.25 x 2"

- Create a Critter Turtle p. 64 cut at 2 inches

- Adhesives: Glue Arts Glue Glider Pro, foam tape, Zig two-way glue, Mod-Podge

- Ribbon from my stash

- Message from Hero Arts stamp collection called "Everyday Sayings"

Tuesday, June 22, 2010

Baked Plum Chicken

I'm still on a chicken kick, and a relatively ordinary one at that. Still, this one is quite yummy. Basically it is a more simple version of my Chicken with Dried Plums recipe that is made in a skillet. I omitted the extra liquids of chicken broth and white wine because the meat was cooking in its own juices. I probably could have sprinkled a bit of balsamic vinegar immediately after removing the dish from the oven, but I didn't think of that.

Photobucket

2 lbs chicken pieces (I used thighs and legs)
2 large handfuls of prune (about 3/4-1 cup, chopped in halves or quarters
1 large sweet onion (about 1.5 cups), cut into wedges
5 sprigs of fresh thyme (about 2 tbs)
salt, pepper, olive oil

1. Preheat oven to 400 degrees

2. Coat bottom of a 9 x 13" baking dish with a drizzle of olive oil (about 1 tbs).

3. Sprinkle chicken with salt and pepper, add to pan, and toss to coat in olive oil.

4. Place onion wedges in between chicken pieces.

5. Scatter plums and thyme.

6. Cover and bake for 60 until chicken is cooked through. Uncover for last 15 minutes to obtain a nice golden brown color.

Serves 3-4 with a starch and a veg.