Saturday, November 5, 2011

Black Bean and Rice Burritos

The recipe for this simple meatless meal comes from the Skinny Mom's Kitchen. It comes together quickly, with just a touch of heat. Sorry the pictures are terrible--I have to work on the lighting in our new apartment.

Photobucket

1 medium onion, chopped
2 cloves garlic, minced
1 tsp cumin
1/4 tsp cayenne
1 or 2 15 oz can black beans (1 can was plenty for two)
14.5 oz can tomatoes1 c chicken stock
2.5 c cooked brown rice
1 1/2 c shredded cheese
4-8 tortillas (depending on size)
salt, pepper, olive oil

Saute onion in olive oil until tender (about 5 minutes). Add garlic and cook for another 2 minutes. Season with salt, pepper, cumin, and cayenne.

Add black beans, tomatoes, and chicken stock. Bring to a boil and simmer for 15-20 minutes.

Warm burrito in skillet then fill with rice, cheese, and beans.

Serves 4

Photobucket

Friday, November 4, 2011

Chicken Brown Rice Bake

If you can believe it, I've actually finished my entire week's menu except for the Zucchini Cheese Soup which is going in the pot today! I've taken pictures of everything and will hopefully post them in individual posts soon. Last night we had Chicken Brown Rice Bake which I found at Finding Joy in My Kitchen. Basically, it's a light creamed chicken and rice dish (with veggies, of course), which is the perfect comfort food for a gloomy day. It's a great recipe using ingredients from the freezer, but also worth the effort if you want to make it all from scratch. Here's my version, which increases the amount of mushrooms, uses butter and olive oil, cooked rice, and a bit of seasoning.

Photobucket

3 c cooked brown rice
2-3 c cooked chicken, shredded (see note)
1-2 TBS butter
16 oz mushrooms, sliced
12 oz broccoli (fresh or frozen)
1 large onion, diced
1 large leek (white and green), sliced
2 T corn starch
1 C half and half + 1 TBS
1 c chicken broth
1 tsp garlic powder
1/2 C Parmesan cheese, grated
salt, pepper, olive oil

Preheat oven to 350 degrees.

Saute leeks and onion in olive oil until tender (about 5 minutes). Melt in butter and add mushrooms. Cook until most of liquid has evaporated. Season with a sprinkle of salt and pepper.

Toss in broccoli and broth. Simmer for 5-10 minutes until broccoli becomes tender. Add chicken and garlic powder. Give a good stir and cook for a minute or two.

Combine corn starch with 1 TBS half and half. Stir into mixture and cook for another minute or two. Stir in half and half and cook until mixture thicken a bit (result should be creamy).

Spread cooked rice into the bottom of a 9 x 13" pan. Top with creamy mixture. Cover and bake for 30 minutes.

Top with parmesan cheese and bake an additional 5-10 minutes until cheese is melted and golden brown.

Serves 4-6.

Photobucket

NOTE: I learned that you can cook chicken breasts, even frozen ones, in steamer bags. Place 1-2 chicken breasts per bag and cook for 7-10 minutes until cooked through.

Monday, October 31, 2011

Pumpkin Chocolate Chip Muffins

Happy Halloween! I had originally intended to make these pumpkin chocolate chip bars, but muffins seemed to be the easier option when I started baking at 11pm. I haven't tried them yet, but the batter tasted yummy and they look beautiful. I used this recipe which I found at Lynn's Kitchen Adventures, which is also posted at Allrecipes.com.

Photobucket

Ingredients

3/4 cup white sugar
1/4 cup vegetable oil (I used canola)
2 eggs
3/4 cup canned pumpkin
1/4 cup water
1 1/2 cups all-purpose flour (I used 1/2 c whole wheat, 1 c all purpose)
3/4 teaspoon baking powder
1/2 teaspoon baking soda
1/4 each ground nutmeg and ground cloves (I subbed 1/2 tsp pumpkin pie spice)
1/2 teaspoon ground cinnamon
1/4 teaspoon salt
1/2 cup semisweet chocolate chips

Directions

Preheat the oven to 400 degrees F. Prepare muffin pan.

Mix sugar, oil, eggs. Add pumpkin and water.

In separate bowl mix together the baking flour, baking soda, baking powder, spices and salt.

Add wet mixture and stir in chocolate chips.

Fill muffin cups 2/3 full with batter. Bake 20 to 25 minutes.

Makes 12 muffins

Photobucket

Saturday, October 29, 2011

Menu Planning (Week 2)

Happy Saturday! I'm a little bummed because while an early winter storm is crossing through the east this weekend carrying rain and snow, all we're seeing is RAIN. Folks just west of us have received quite a bit of snow, which just isn't fair.

Anyway, turning to the menu. Let's review last week's menu. From the list, I made chicken stock (about 12-14 cups worth), butternut squash soup, baked apricot chicken, unstuffed bell peppers, and slowcooker Moroccan Chicken. We also had turkey sandwiches, cherry and goat cheese salads, raviolis, and pasta w/mixed veggies. I didn't get around to making the zucchini cheese soup or muffin mixes so they will be carried to this week. Additionally, because they looked yummy, last night we had sweet and savory short ribs in the slowcooker with a baked sweet potato.

On the menu this week:

Main Dishes

1. Zucchini Cheese Soup (continued from last week)


2. Chicken Brown Rice Bake


3. Turkey Spinach Lasagna


4. Black Bean and Rice Burritos


5. Spaghetti and Meatballs


6. Ribs (using this rub and a bottled sauce I got while apple picking)


Other goodies:

1. Pumpkin Chocolate Chip bars


2. Muffin Mixes

Wednesday, October 26, 2011

Unstuffed Bell Peppers

About 3 months ago, I made my first ever Stuffed Bell Peppers, rediscovering something that I hated as a child. I think it may have been the minute rice that my folks used or maybe the peppers weren't par-boiled. Nonetheless, I loved the recipe which I found at What's Cooking Chicago? This time, I followed a recipe from Finding Joy in My Kitchen entitled "Unstuffed Pepper Skillet", making only minor adaptations based on what I had on hand and the order I added some of the ingredients. I loved this recipe nearly as much as the real deal, as did my husband. Plus, I was able to throw it together in about half an hour using precooked or leftover brown rice, which is always a plus for a weeknight.

Photobucket
Sorry for the poor picture. I'm still unpacking and have misplaced the digital camera.

Unstuffed Bell Peppers

1/2 lb ground turkey
1 medium onion, diced
2 medium carrots, diced
2-3 medium bell peppers (I used red and yellow), chopped
15 oz can of tomato sauce
1/3 c water (I eyeballed and used about 1/2 a can)
1/2 tsp salt
1/4 tsp pepper
1 tsp oregano
1/2 tsp basil
1/4 tsp chili powder
2 c brown rice, cooked
1 c shredded cheese for serving (I used cheddar)

Saute onions and carrots in olive oil for 2 minutes or so until they begin to become tender. Add turkey, sprinkle with salt, pepper, oregano, and basil. Continue cooking until turkey is browned and cooked through.

Add peppers and cook for a minute.

Add water, tomato sauce, and chili powder. Bring to a boil and simmer, covered, on low for 10-15 minutes until veggies are tender.

Stir in rice and cook on medium-low until heated through, about another 10 minutes.

Serve with a sprinkle of cheese.

Serves 4.

Saturday, October 22, 2011

Menu Planning! (Week 1)

Yes, I finally decided to start menu planning on my blog. For ideas on how to menu plan and more lists, make sure to check the Organizing Junkie's Menu Planning Monday. I don't know when I'll post this list each week, probably either Saturday or Sunday, so we'll see if I remember to link my list to her site. Anyway, I've made weekly lists of dishes to cook for some time, but for whatever reason never bothered to post my lists on my blog. Now with Pinterest, posting what I plan to cook should be a breeze. To obtain the recipe, click the picture which will take you to Pinterest, then click the picture again for the website where the recipe is found. Each week I'll probably include a couple favorites from my blog as well as new recipes from the web that I've been meaning to try. For recipes from my blog, I'll try to remember to hyperlink the title of the dish, as well.

Here's what we'll be eating this week, in no particular order:

Lunches

1. Zucchini Cheese Soup


2. Butternut Squash Soup


3. Sandwiches/wraps (turkey w/cranberry sauce)

4. Salads (e.g. dried cherry with goat cheese, black bean w/chicken and cheddar)

5. Stuffed baked potato (bacon, sour cream, cheese)

Main Dishes

1. Unstuffed Pepper Skillet


2. Baked Apricot Chicken


3. Slowcooker Moroccan Chicken


4. Raviolis (from Sam's Club)

4. Penne w/mixed veggies

Other Things to Make

1. Chicken stock (with leftover bones, if I remember)

2. Muffin mixes

Welcome to Northern Virginia!

Source: None via Michelle on Pinterest


Hello everyone, I know it's been over a month and I'm sorry for the long blogging silence. As you may know (or guessed from the title of this post), we've recently moved to Northern Virginia, just south of DC. After more than a month of living in-transit (with family and hotels), we finally are settling into a new home (with a ton of unpacking to do). All my furniture and stuff which was stored in Chicago has been delivered though we're still waiting on our stuff from Hawaii (which was picked up by the movers at the end of August!), but I'm happy for the breather in between.

I'm slowly adjusting to semi-suburban life, which has its pros and cons. Public transit-wise, we're just beyond the DC Metro system and thus are limited to commuter trains and buses. They're are some sidewalks, but like many suburbs, they tend to stop abruptly. However, I did make sure the sidewalks nearby go to all the important places--the gym, a grocery store (Super Walmart), and several little strip malls which house a CVS, 7-Eleven (with Citibank ATM), Dollar Tree, Five Guys (best burgers ever), Little Cesars (my husband's childhood fav), Applebees, a dry cleaners, and more.

Our new home for the present is a cozy apartment in a complex right across the street from the nicest Super Walmart I've seen, and thus far doesn't seem scuzzy at all. Somehow I've managed to live across the street from a market in every apartment I've rented in the mainland so I'm glad to continue this trend. Prices aren't as nice as the commissary, but they're close enough for many things. I'm going to do my first real bit of marketing there later today, so I'll get a better feel for the selection. (I'm not too worried, however, as there's Costco, Sam's Club, as well as Safeway and a bunch of little markets not too far away.)

I have the whole day to unpack so I'd better get moving. Check back later today to see what I'm planning foodwise for the coming days.

Sunday, September 11, 2011

Baked Macaroni and Cheese

This is modified from an Alton Brown recipe. I think there's also a video on the Food Network website in which Alton prepares it with his son. This recipe seems to have an unusually large amount of mustard powder, but it still wasn't quite flavorful enough so I added a pinch of cayenne. He also used panko bread crumbs, which I didn't have, so I used a handful of ciabatta croutons that I'd made the day before and made up the rest with sourdough bread crumbs. It was visually appealing and quite tasty.

Photobucket

Ingredients

1/2 pound pasta, cooked (I used bow ties)
3 tablespoons butter
3 tablespoons flour
1 tablespoon powdered mustard
3 cups milk (I used 2% and skim)
1/2 cup yellow onion, finely diced
1 bay leaf
1/2 teaspoon paprika
1/4 tsp cayenne pepper
1 large egg
12 ounces sharp cheddar, shredded
1 teaspoon kosher salt
black pepper

Topping:

3 tablespoons butter, melted
1 cup bread crumbs, toasted if desired

Directions

Preheat oven to 350 degrees.

Melt the butter in a small pot (large enough to make the cheese sauce) on the stove. When the bubbling stops, whisk in flour and cook for five minutes.

Stir in the milk, onion, bay leaf, mustard, cayenne and paprika. Simmer for about ten minutes or until slightly thickened. Remove the bay leaf.

Add the egg (temper it first to prevent scrambled eggs). Stir in 3/4 of the cheese and season with salt and pepper.

Combine cheese sauce and pasta in casserole dish (I used a 9 x 13" pan). Top with remaining cheese.

Melt the remaining 3 TBS

For topping, mix melted 3 TBS of butter with bread crumbs. Spread evenly over the macaroni and cheese.

Bake, uncovered, for 30 minutes.

Serves 6

Tuesday, September 6, 2011

Jamie Oliver's Roasted Tomato Soup with Croutons

Each month, sometimes twice a month, Williams Sonoma offers a cookbook class. You receive a cookbook, usually a recent one, and enjoy a meal prepared for you from recipes in the book. This month the featured cookbook was Meals in Minutes by Jamie Oliver which won't be released until October. The cookbook itself is rather interesting and quite novel. Instead of individual recipes, each page is a plan for a full meal to be prepared in 30 minutes. It gives you a list of all the ingredients for each recipe and then tells you how to prepare everything at once. It's great if you're preparing the entire menu, but somewhat challenging if you only want to prepare a component part since individual cooking times are often not listed. Nonetheless, there are a bunch of interesting dishes that seem worth the time, including this one for roasted tomato soup.

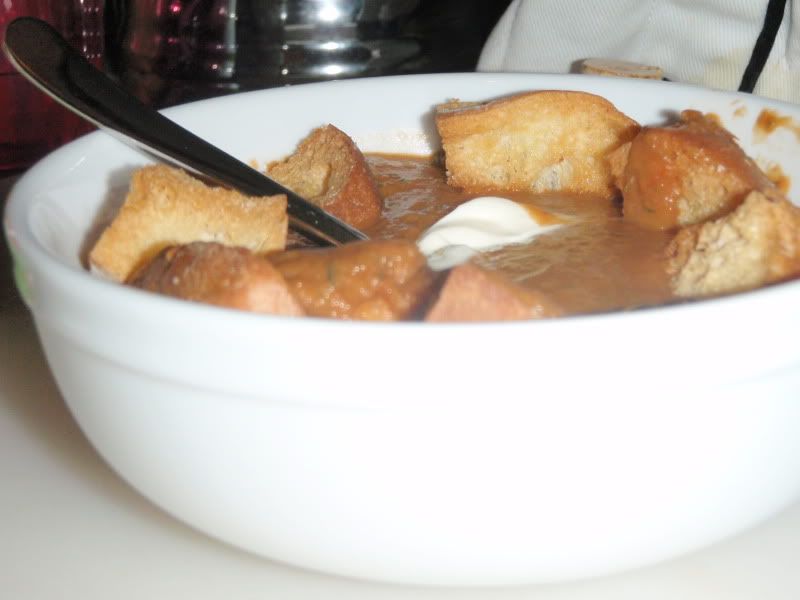
My auntie loved this recipe, although I wasn't too enthused. The balsamic vinegar certainly gave it an interesting tang. Possibly if the tomatoes were sweeter or if I had caramelized the onions, I might have liked it better, but it was just too strong as it--basil and balsamic vinegar were the most prominent flavors. Alternatively, if I made it again, I might thin it out with some chicken stock.

Photobucket

2.25 lbs cherry tomatoes
4 large tomatoes
4 cloves garlic
1 ciabatta loaf
2 small red onions, chopped
1/4 c balsamic vinegar
2 TBS tomato paste (my addition)
1/2 c - 1 c fresh basil
4 tbs of creme fraiche or to taste
salt, pepper, olive oil

Preheat oven to 425 degrees.

Chop large tomatoes in half or in quarters. Drizzle with olive oil and season with salt and pepper. Peel and crush (lightly) garlic cloves and toss together with tomatoes. Roast for 15 minutes on the top rack.

Chop or tear ciabatta into crouton-sized bites, drizzle with olive oil and a pinch of salt. Bake until golden brown 8-10 minutes.

Meanwhile, saute onions in olive oil over medium until tender. Sprinkle with salt. (You may want to caramelize them for additional sweetness to your soup. If doing so, cook on medium-low or low for 20-30+ minutes.). Stir in balsamic vinegar and let it reduce down (another 5 minutes or so).

Combine tomatoes and onions. Puree mixture in batches in a blender with basil. Return to saucepan.

Over medium, stir in tomato paste and adjust seasonings accordingly.

For serving, top with creme fraiche and additional basil for garnish, if desired. Serve with croutons.

Serves 4 (unless having as main course, then 2).

Photobucket

Friday, August 12, 2011

Fudgy Brownies

This recipe is one of Cooking Light's most popular, I believe. I remember seeing it often on promotional flyers, as well as in a couple of magazines. It's definitely more work than using a mix or making cupcakes or cookies, but I love their fudgey texture. This time I made them to crumble in my homemade chocolate ice cream. Fabulous!

Photobucket

5 tablespoons butter or margarine
1 ounce unsweetened chocolate
2/3 cup Dutch process or unsweetened cocoa
1 1/2 cups sugar
3 large egg whites, lightly beaten
1 large egg, lightly beaten
1 cup all-purpose flour
1/2 teaspoon baking powder
Cooking spray

Preheat oven to 325°.

Melt butter and chocolate in a large saucepan over medium heat. Stir in cocoa; cook 1 minute. Stir in sugar, and cook 1 minute (mixture will almost form a ball and be difficult to stir). Remove pan from heat; cool slightly. Gradually add warm chocolate mixture to egg whites and egg, stirring with a whisk until well-blended. Combine flour and baking powder; add flour mixture to chocolate mixture, stirring well.

Spoon batter into a 9-inch square baking pan coated with cooking spray. Bake at 325° for 27-30 minutes (do not overbake). Cool on a wire rack.

Yield: 20 servings

Photobucket

Wednesday, August 10, 2011

Happy Cruisin' Card

My mother-in-law recently said good by to her trusty Lincoln town car, which she drove for over a decade. This was a traumatic experience for her as apparently town cars are no longer made. However, like the loyal Detroit auto girl she is, fortunately she found a new car--a Cadillac, at a Detroit dealership. Hopefully, she will find as much pleasure driving it as she did her old boat. Here's the card we sent this week wishing her happy cruising.

Photobucket
(Note: her new car looks nothing like this one)

Photobucket

Photobucket

Details
Wrap it Up cartridge
Papertrey Ink cardstock and ribbon/twine
Quick Quotes Paper - Good Times Collection (this is from my local scrapbook store)
Scrappy Moms Stamps - Sun-Kissed
My Pink Stamper - Happiest Moments
Seeing Spots Cuttlebug folder
Sizzix Sizzlits labels #2 (oval)
Distress Ink - Vintage Photo

Tuesday, August 9, 2011

Buttermilk Oven Fried Chicken (another variation)

This is another variation of my oven fried chicken recipe. I've been trying to finish a package of Bob Mill's corn meal. It's a little coarsely ground for this use, but I would try it again with a thinner ground. It gives the chicken an added crunch. I laughed when I looked back at the last time I posted this dish and was surprised to notice that I also served it with the same sides--the wild rice is probably leftover from the same batch as it came from my freezer.

Photobucket

2 c buttermilk
2 lbs chicken pieces
1 c corn meal
1/2 c all purpose flour
1 tsp salt
1.5 tsp paprika (or more to taste--I use heaping tsp)
1/2 tsp ground pepper
1 tsp garlic powder (I used toasted garlic powder)
4 tbs melted butter

1. Marinate chicken in buttermilk for two hours up to overnight. (Alternatively, skip this step and simply dip the chicken in buttermilk before dredging in the flour mixture).

2. Preheat oven to 400 degrees.

3. Whisk together flour, salt, paprika, pepper, and garlic powder in a plastic bag or bowl/tray large enough to accommodate chicken.

4. Drain chicken and coat liberally in flour mixture. Shake off excess flour.

5. Place chicken on a rack in a 9 x 13 baking pan or jelly roll pan. The rack allows the fat to drip away and makes for crispier chicken. Brush or drizzle liberally with melted butter.

6. Bake 30 minutes, turn, and cook for another 20-30 minutes or until cooked through. If chicken becomes too brown, cover loosely with tinfoil.

Serves 4.

Photobucket

Photobucket

Monday, August 8, 2011

10 year old Birthday Card

I made this shaped card using my Gypsy for a special ten year old. There are tons of cupcakes and butterflies, but I used Create a Critter for both. The font is from Pooh Font.

Photobucket

Photobucket

Photobucket

Details
Create a Critter (butterfly at ~2" and cupcake at 3.5"), Pooh Font (~2")
Martha Stewart Brights Mat Pad
Little Yellow Bicycle - Sweet Love Collection
Misc daisy punch
Scrappy Moms Stamps - Simple Sentiments

Sunday, August 7, 2011

Buttermilk Whole Wheat Banana Pancakes

The pictures aren't terribly flattering, but these were fantastic! On an impulse, I searched Marthastewart.com for a new buttermilk pancakes recipe as I had some buttermilk to finish. I had never tried a pancakes or waffle recipe with brown sugar and I think that's what made all the difference. For the last couple pancakes, I mixed in some chocolate chips which are my husband's favorite. I don't recommend using a Circulon pan because you get those silly rings like a tree trunk, but taste is what counts.

Photobucket

Photobucket

1.5 tbs butter
2 TBS vegetable oil
1 c and a splash of buttermilk (start with 1 c and thin if necessary)
1 egg
1/2 c all purpose flour
1/2 c whole wheat flour
2 tbs brown sugar
1/2 tsp baking powder
1/4 tsp baking soda
1/4 tsp salt
1 banana thinly sliced
handful of chocolate chips, if desired

Stir together flours, sugar, baking powder, baking soda, and salt in a medium bowl. In a separate bowl whisk together all liquids, including egg.

Pour batter onto preheated griddle or skillet. When bubbles begin to form, sprinkle bananas. Flip and finish cooking.

Serves 2

Jolly Holly Elves

One of the most identifiable image from the Jolly Holly cartridge is the elf. Actually, there are about 4 or 5 different ones. Something about the hat, I think. Anyway, this is the third of the three different Christmas cards I made in July. I also did a couple of winter layouts, but other than that am not as far along on my cards as I'd like. One of my close friends had their first baby early throwing my paper crafting schedule a little off :) I'm still using up holiday paper from last year. Actually, unless I do a ton of layouts and mini-albums, I won't have to buy new paper this year at all. Well, I won't have to buy any more paper. I bought a huge DCWV collection pack (180 sheets) from Joann's for $5 not too long ago, but I'm not really counting that. . . ;) Anyway, I hope everyone's having a great Sunday. Here's my card:

Photobucket

Photobucket

Photobucket

Photobucket

Photobucket

Details
Jolly Hollys Cricut Lite Cartridge (images cut at 3.5")
October Afternoon (not sure of the name, but it's a holiday stack from last year)
Papertrey Ink cardstock and twine
EK Success Large Slim Paper Punch - Journal Plate & Bracket
Distress Ink - Antique Linen
Scrappy Mom's Winter Wishes stamps
Peachy Keen Stamps - Wide-eyed kids
Stickles
Misc ribbon and embellishments

Wednesday, July 27, 2011

First Christmas Cards of the Year

In efforts to jump-start my holiday card-making and celebrate "Christmas in July", I participated in a swap hosted by the fabulous Dusti of Scrappin With Cricut. Here are two of the three cards I make using the Cricut Lite cartridge Jolly Hollys. When it was released just before Christmas, this cartridge was impossible to find. Fortunately, Cricut released it on their website just in time for "Christmas in July" projects. The paper is leftover from last year, but I if you like it, so retailers may still have some on clearance.

Photobucket

Photobucket

Photobucket

Photobucket

Photobucket

Photobucket

Details
Jolly Hollys Cricut Lite Cartridge (images cut at 3.5")
Bella Road - Everybody Loves Christmas collection pattern paper
Papertrey Ink cardstock and twine
EK Success Large Slim Paper Punch - Journal Plate & Bracket
Stampin 'Up Scalloped Border Punch
My Pink Stamper Happiest Moments stamp set
Misc buttons and ribbon

RR Grilled Flank Steak

This is one of the first recipes I ever tried from the internet (or from a celebrity chef) and having been using for more than 5 years now. According to Food Network, this recipe aired in Season 5 (2004) of 30 Minutes Meals, with Rachael Ray, of course. Although I've tried other flank steak marinades, this ones is always my go-to recipe. I think it's all the garlic plus the smokiness of cumin and paprika that I like. This is excellent as a main dish, as well as in salads or fajitas, which is how I usually finish the leftovers. Tonight I accompanied the dish with roasted baby red potatoes which were as cute as they were yummy.

Photobucket

3 cloves garlic, finely chopped
1 tablespoon grill seasoning blend (recommended: Montreal Steak Seasoning)
1 teaspoon smoked paprika,
1 tsp cumin
2 tsp hot sauce, if desired
1 tablespoon Worcestershire sauce
2 tablespoons red wine vinegar
1/3 cup extra-virgin olive oil
2 pounds flank steak

Whisk together garlic through olive oil. Pour over steak and marinade for about 20 minutes (probably no more than an hour since there's vinegar), flipping half-way through. (I often use a ziploc bag for easy cleanup.)

Grill about 5-7 minutes per side for medium rare, depending upon the thickness of the meat.

Remove from grill and let rest for 5 minutes. Slice thinly against the grain.

Serves 4.

Photobucket